

Manage your course details
Register for your course, update your info and more
Student View is the place for your course information and to make requests to the University.
This is where you can manage many aspects of your course, including viewing modules, timetables and grades, updating your details, and applying for bursaries.
Jump to our guides on:
- Registering online for your course at the start of the academic year
- Uploading your photo
- Viewing your information and update your details like address or emergency contact
- Managing your finances and make payments to the University, such as tuition and accommodation fees
- Applying for funds like bursaries and scholarships
- Applying for extenuating circumstances for an assessment
- Choosing your optional modules for the next academic year
- Generating University letters to prove your student status
Registering online
When you're able to register for your course online, we'll send you an email asking you to visit the 'My Registration' page. Here you'll confirm your personal, course, fee and other information.
How to register for your course on your Student View
When you need to register, you will receive an email with a link to your My Registration page.
My Registration takes you step by step through the registration process
all you need to do is click on the Start or Amend button next to the relevant step
You can see this student has already started their registration as two steps, Personal Details
and also, other Personal Details, have been marked as complete
As soon as a step has been completed its status will change from Incomplete to Complete
and a green tick will appear. You will not be able to submit your registration until all steps have been completed.
Let's have a look at one of these steps, Emergency Contact Details
Because I have not started this section it is marked as Incomplete and I just need to press the Start button to access this step.
Here I need to enter details for someone who can be contacted if I am in an emergency
All mandatory information is highlighted and has an asterisk
So I am just going to select some data here
There are easy to use drop downs
Inputting information such as name and telephone number. I can also put an email address in here as well.
As soon as I have finished I can just press the continue button
and it will take me back to the My Registration page, and you can now see that this section has been marked as Complete
You can also amend any sections that you want to go back to. For example, if I wanted to go back to Emergency Contact Details
and press Amend I could come in here and just change the telephone number I entered as an example
As soon as all the steps have been completed and you have Complete and green ticks on all of the options
you will be able to submit the form. Once this has been done, you will see a confirmation message
and an overview of any next steps you may need to take including, if appropriate, a Student ID Check.
Once any checks that are needed have been completed you will see your My Student View
Uploading your photo
When you register for your course, you'll need to upload a photo of yourself to the system.
How to upload a photo
Click on the Start button next to the Upload Photo registration step
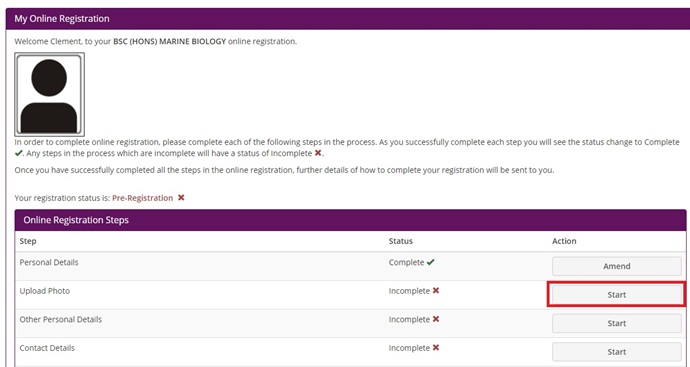
Click on Browse My Computer to find a suitable photo in .jpg format, and with a maximum size of 5MB. An error message will appear if the file you select is not suitable.
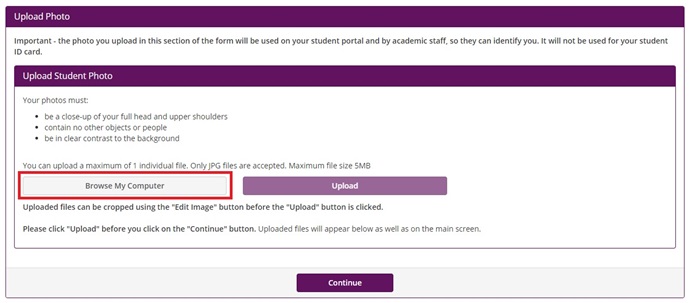
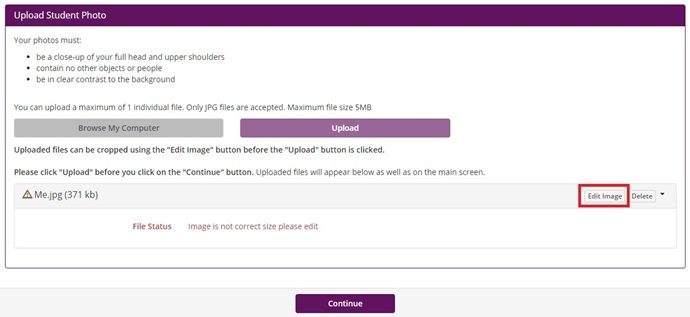
If your image is not the correct size, you'll see an error message. Press Edit Image to crop your photo to the correct size.
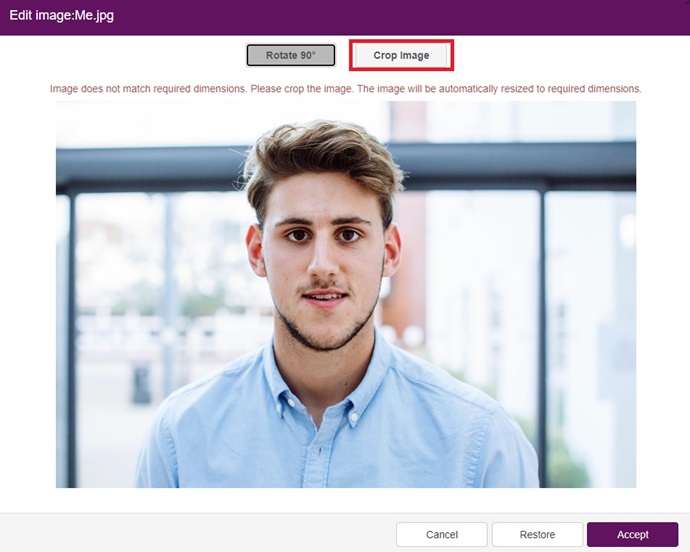
Use the cropping tool to crop your photograph and press Crop Selection when you have finished.
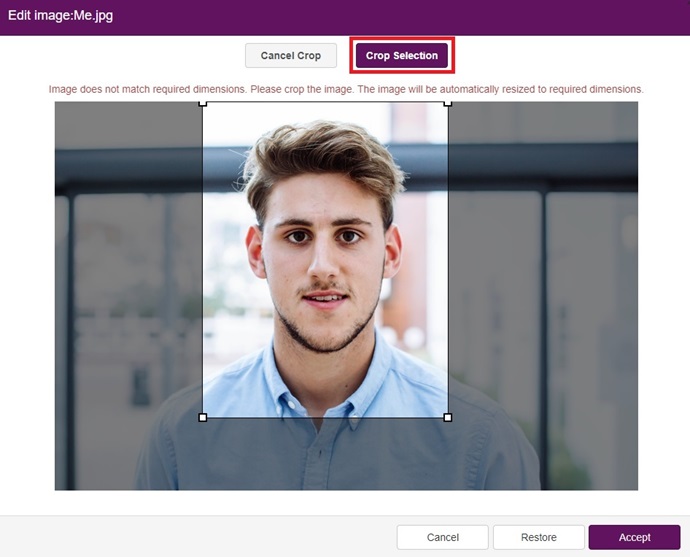
If the image is the correct size, a green confirmation message will be displayed. Press the Accept button at the bottom of the screen. The status will show as Awaiting Upload. Press the Upload button, and a confirmation message will appear when this has been completed.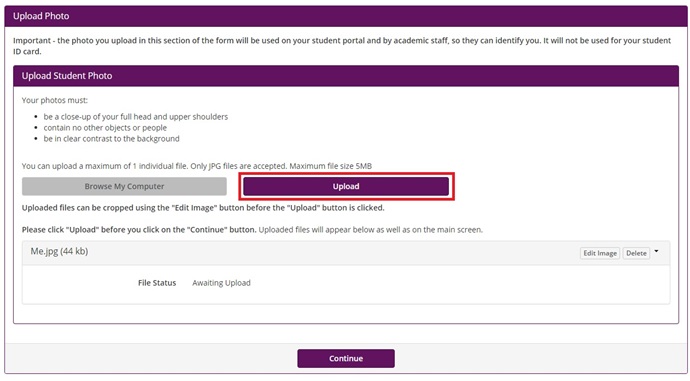
Press Continue at the bottom of the screen to move on to other tasks.
You can change your photo at a later date using these same steps.
Viewing your information
Here's how to update your personal information, including address, name and more.
How to view your information
Your Student View is the place for your course information and to make requests to the University.
You will be able to see Your Student View when you are eligible to register
and there will be increased functionality over the coming months
To start with, you will be able to view your personal information including
the course you are registered on and your contact information
There is also a link to view your timetable.
There will also be a number of tasks you can access. To begin with you will be able to update your address
and emergency contact information. Later on, other options will become available to you including
to request standard letters or a change in status
but you will not see these options straight away
Let’s have a look at one task that you will be able to access straight away, which is to update your address.
To do this, simply click on the Maintain My Address Details button.
This will allow you to make any changes to address details you have submitted.
Any of the fields are editable, so you can come in and delete or add information, or
if you need to enter a new address you can simply use the UK postcode search function.
I am just going to enter a new postcode, press Get Address
that will then allow me to find the address I would like to select
and it will update the information for me
Clicking continue will save any changes and take you to the next address that may need to be updated
which in this case is Current Term Time address. Any changes can be added or saved in the same way
Once I am ready to proceed, I can press the continue button which will take me to my Current Correspondence Address
I am able to update this in exactly the same way, should I need to
Clicking Finish will take you back to your My Student View page.
The other task you can access straight away will be to update your emergency contact information.
To access this, simply click on the Update My Emergency Contact option
This works in the same way as changing an address
so I can enter and change any information that is in these fields
and then all I need to do, for example if I add a new telephone number, is press Finish
We are excited by the new My Student View functionality, which is designed to be responsive
to the different stages students will be in throughout their academic journey at the University of Portsmouth
Managing your finances
The My Finance page is where you can view and manage your financial information at the University all in one place. Here you can view your financial statement, including your current balance on tuition fees, accommodation and other invoices. You can also make and manage payments online, and with some payment types set up a payment plan.
Find out more about how to make a payment to the University.
How to manage your finances
The My Finance functionality will allow you to view and manage your financial information in one place.
You will have access to My Finance as soon as you have completed your Online Registration and you will see it in your Student View
as an option at the top. To navigate to the My Finance page, all you need to do
is click on the My Finance page at the top and then Go to My Finance. Within this page you can perform a number of tasks
including viewing your financial statement, managing your payments or sponsor information
as well as access the funds catalogue where you can view and apply for bursaries and scholarships.
The My Finance container will show your current balance which will include tuition fee, accommodation and any
other invoices and payments which may be on your account. So here we can see this students' current balance is £9,250.00
you will see above this there is a notifications box. This box displays any recent activity on your account. In this
case we can see that a new invoice has been added to this students account.
The Finance Actions container allows you to perform a number of actions in the system. The first one we are going to have a look at is
View Financial Statement. Clicking on View Financial Statement will show an up to date view of your university account.
This relates back to the overall balance we looked at a second ago. It will show all invoices and payments
for which you will be able download any invoices or receipts all within the system.
So, in this case we can see an invoice for a tuition fee charge of £9,250.00
if I wanted to, as a student, look at the invoice,
I could click on the plus icon next to the transaction. I could click on view.
this will open up a new tab and I will see a copy of
the invoice.
You can also make payments online, and for some invoice types, choose a payment plan. To make a payment, simply click on the
relevant Pay Online button next to an invoice
Or, if I go back to the My Finance homepage
Select the Make a Payment Now option.
My Finance also allows you to add your bank details for any payments to or from the university, such as
to receive a bursary or scholarship payment, or to pay your tuition fees by direct debit
All you need to do is select the Manage My Bank Details option.
If your fees are being paid by a sponsor, you will also be able to let us know on these pages.
using the Manage Sponsors option.
Finally, the Bursaries and Scholarships container will allow you to access our funds catalogue
where you can view an up to date list of all scholarships, funds and bursaries you may be eligible for.
My Finance enables you to apply for funds all in one system, as well as check on the status of any submitted applications
via the My Applications and Awards option.
We are excited with the enhancements to the student experience that this new functionality brings.
If you have any enquiries please contact the relevant team
Applying for funds
You can search, view and apply for bursaries, scholarships and funds through the Portal. Here's how to check your eligibility, see what types of awards there are and check deadlines. You can also apply online and track your application progress as it's underway.
How to apply for funds
Within the My Finance screen of your Student View, the Bursaries and Scholarships container will allow you to search and apply for funds
as well as view the status of any applications that have already been made or started.
After clicking Search and Apply for Funds button, the following search screen will appear,
allowing you to search for particular funds in the catalogue. It will default
to the current academic year and your fee status, so all you need to do is click Search to access the catalogue.
The Funding Catalogue lists funds, scholarships and discounts which you may be eligible for.
Clicking the more button next to the description of a fund will open a new tab with more information about the fund
You can navigate to funds on additional pages using the page numbers at the bottom of the screen.
As an example, let’s click on the Vice Chancellor’s Scholarship for 2020/21
Clicking on more will open up the Funding Details page which provides some more information about
this fund, including any application deadlines and eligibility criteria.
You can see that this fund is something students are automatically considered for, so no application needs to be completed
However, the eligibility requirements section will give you an indication if this scholarship is something
you may be eligible for
Pressing close button will close the tab and we can now have a look at some other funds.
Now lets have a look a fund which requires an application and is currently open
We can see this as there will be an Apply button next to any funds that are open and have an application process
for example the Young Carer Bursary. We can click apply. After clicking apply, the same principles apply as before
so you can view some more information and the eligibility criteria.
If you believe you meet the criteria, clicking Start Application at the bottom of the screen will start the application process.
Each application is divided into two sections. The first half will display the status of the application
including any deadline date that you may need be aware of.
You will then see the different sections of the application. As we have just started a brand new application these would be displayed as
incomplete. But we can see the sections of the form that need to be completed.
The second half of the application is where we can complete the different sections of the application itself.
To begin, select the first application form section from the drop down which in this case is Young Carer Details
and then press Select Form Section
This section is simply asking us one question. Other applications may ask for more,
all we need to do here is answer the question using the drop down.
so here I am going to select Yes.
After pressing Next you will see that this section has now been marked as complete.
Let’s go to the next section - Evidence
Here you can see evidence is required via a document upload.
Pressing Next will update the screen and allow you to upload a file from your computer by clicking Browse My Computer.
Selecting Upload will then upload the document - it has been successfully uploaded as soon as the file status says
Successfully Uploaded. Pressing next will again show that the evidence section
has now been marked as complete.
If I press save and exit this will save any progress on my application and take me back to the My Finance homepage
Selecting My applications and awards will show me a full history of any applications I have started
Here we can see my application for the young carer bursary
which can be continued simply by pressing the Continue with Application button.
This takes me back to the application.
The final section I need to complete is Your Details
This section automatically looks at my student record
to see if I meet the criteria. As I meet the criteria all I need to do is read the terms and conditions
which I can see if I click on the button to read, and then state that I agree to them.
Pressing Next will take me back to the application homepage and we can see that all the sections are now marked as complete
I can now submit the application by clicking the checkbox, and pressing Submit
This only will appear when all sections of the form have been marked as complete
After I press Submit you will see a confirmation message to confirm that your application has been submitted.
Pressing Complete will just take you back to the My Finance homepage.
If I now select My applications and awards I will be able to see the history of any applications I have started
but also any that I have submitted.
So we can see that my application status says Submitted pending review.
Any updates to this application, will appear in this screen.
Of course, as a I demonstrated earlier, this is where you can return to application you have started but not yet submitted.
By simply clicking on the top, My Finance, and Go to My Finance, will take you back to the My Finance homepage.
Of course, depending on the fund, applications will have different sections that you may need to complete
and it will ask you to complete different information. However, the principles of completing an application are the same.
We hope you found this video useful. Once you have submitted your application you will receive an email confirming this.
The email will contain the contact details of the relevant department should you have any queries regarding your application
Applying for extenuating circumstances
If you need to apply for extenuating circumstances, because your assessments have been affected by personal issues, you can do this on Your Student View. You can submit a new extenuating circumstances application or review previously submitted applications there.
How to apply for extenuating circumstances
Hello. This short video will explain how to apply for extenuating circumstances via your Student View
Once you have logged in to your Student View, you need to click on the My Results page.
Clicking on this you will be able to find a My Extenuating Circumstances box.
Within this page, simply press View, Add And Amend EC Claim.
This will take you through to a page which will give you an overview of your personal and course information.
This includes the course you are currently registered on and the programme of study that you are working towards.
Towards the bottom of the page you will see there is a container saying, Log a new Request. To create a new request, simply press
the New Request button. Later on in the video I will talk about these other sections on this page which will
allow you to look at any completed requests, or any requests that you have yet to submit.
So, to submit a new Extenuating Circumstances request simply press New Request.
The following webpage provides some advice on Extenuating Circumstances
and there is a useful link to the My Port help pages which we recommend you read before submitting a request.
To proceed to the form itself, all you need to do is just
answer the question whether you have sought any guidance, selecting the relevant option from the drop down
I am going to answer the question to say that yes, I have read the guidance. Pressing Next will take you through
to the form itself, and this is the beginning of the request.
So, you need to follow the instructions that are listed. The first
thing you need to do is enter a summary of your circumstances, which you can do by clicking in the text box.
Just as an example, I am entering some text here. What you will see is that the first box, there is a 5000 character
limit, and it tells me how many of those characters I have used.
It does warn you that if you go over 5000 characters it won't save.
So, do make sure you are aware of that character limit, and check how many characters you have entered.
To expand the text box, you can do that by clicking in the right hand corner
of the box, and you can drag and drop it.
You then need to enter how the circumstances have affected your assessments.
These are just examples, if you read the guidance on the My Port page it gives you some information
about filling out this section.
You then need to select the nature of the circumstance, so select the circumstance which is most fitting for your request
and press Next. This will take you through to a list of your assessments
you can see this student is registered on
lots of different modules. So this is teh module code, and the name of the module
that I am registered on. You can see that I am registered on quite a few.
You need to select the assessments for each module
that have been affected and you want to include in this extenuating circumstances request. So, for example
if the assessment was in the module Microbiology & Molecular Biology, I click on the Select Assessments button
next to that module. This will take me through and it will
show me the different assessments that make up that module.
So, I can see the coursework and I can see the exam.
It tells me, this here is a portfolio and the other, the exam, is a written exam
All you need to do if you want to add an assessment to your request
is select from the relevant assessment the drop down, Impact
and that is either going to either be Non Attendance or Non Submission
For coursework, I am going to say Non Submission, because I am not submitting the coursework.
You then need to specify the original due date, which you can just do using the date picker.
To link this to your request, you need to simply select the checkbox next to the relevant assessment after you have added
the Impact and the Due Date, and press Add to Request.
What you will see here is that it now says 1 of 2 assessments
linked to the request.
I could go through and do that for as many modules as needed, so I could come into this
module here, and have a look, I have got coursework and exam, select the coursework here and the Impact
and the Due Date, and then Select to add it to the request.
So it works in exactly the same way. You are able to review the assessments you have linked to your request before you
submit, but you can actually come in here and remove any assessments
you may have added by mistake. So, if I click on Select Assessments again
If I wanted to remove this one I have just added, all I do is use the Select box again, and press Remove
From Request. This has now removed that assessment
from my request. Once I am happy that I have selected all the assessments that are relevant to this request
I can go down to the bottom of the page and press Next.
This will take me through to the third section of the request, which is the Evidence section.
Here I need to upload some evidence, and there is some more guidance here
about the file size, etc., that you can upload.
So, to upload evidence, all I need to do is select the Browse and Upload Evidence button and then Browse My Computer
This will take you to your computer and your files, select
from the relevant part of your computer, the file that you would like to upload. Here is my evidence.
That will tell you when the file has been successfully uploaded.
Simply press Close when you are done, and you can see that
it has now attached this document. If I wanted to remove it I can press Remove from Request, and I can also view that document as
well, if I need to. If you are not uploading evidence, you need to provide a
reason why. You could say that no supporting evidence is going to
be provided, or you can say that evidence is going to be uploaded later.
If you do select that evidence is going to be uploaded later on
you just need to specify in the second drop down, whether you would like to upload more evidence
later on. In this case, I am going to say that I do not wish to upload evidence later. If I had selected
that I wanted to upload evidence, what this would do is that it would leave it in my
outstanding requests, and it won't actually submit it, until I provide the evidence
that is needed. I am just going to leave the first question blank, because I am actually uploading evidence, and then I am
going to say that I do not want to upload evidence later because I have already uploaded something. Press Next
That will take you through to a summary page which gives you
an overview of the information you have provided. So, here are my circumstances
here are the assessments that I have linked, and here is my evidence.
If I wanted to come in and make any changes, simply press the relevant button. So, for example, if I want to add or remove
assessments, clicking Amend Assessments will take me back to that part of the form.
Scrolling down, you just need to read the confirmation message
and the certification, select the checkbox
that you agree, and press Submit. Now,
if you did not want to finish submitting the form in one go
it will save as you go through, so you can return to it later on.
But, I am now going to submit the form, and you can see all I do is press Submit.
If, I scroll down, this is when we can see these different sections
becoming active. So, these represent the different requests
that you have made before, or that you have started. So, Requests Yet to be Submitted
this will show you all the requests you have started that you have not completed.
You just click on the name of the heading and it will unfold for you.
So, actually, you can see I have started two already today. You can then come in and
press View and continue with the application, or you can delete them.
For Requests Awaiting Further Evidence, this will show any that you have marked
that you want to upload evidence later on. So you could come in, and upload the evidence
and then submit them from here. Now, the one I have just submitted
has come in to Requests under Consideration, and this is where you will be able to
see the latest updates, you can see any information
when that gets looked at by a staff member, you would see that in this part
of the system. You can also view the request as well. Any that have been completed you will
see, and deleted as well. All you need to do is to click on the relevant name
of the section and it will either unfold or fold that section. That is how the
Extenuating Circumstances requests can be made, and also tracked
within the system. Simply going up to My Results and then pressing View, Add and Amend EC Claim
will enable you to start a new application for Extenuating Circumstances
but also view any existing or applications that have already been started.
Choosing your modules
You'll be contacted by email when it's time to choose your optional modules for the upcoming academic years. For undergraduate students studying full time, this will be around the start of Teaching Block 2. You'll be given a deadline, and if you don't make your choices within the allocated time, you'll be signed up to default module(s).
Once the window for choosing your optional modules is open, you'll be able to access your module option choices by logging into your Student View, and selecting ‘My Option Choices’.
The ‘My Option Choices’ page will display three options:
- Choose your module option choices
- Choose your reserve modules
- Choose your language (not compulsory unless you have opted to study a language module)
Generating University letters
When using student view, you have the ability to generate standardised letters for yourself. These letters include bank letters, confirmation of studies letter and a council tax letter. Please see video below for instructions on how to generate letters.
How to generate letters
When using Student View, you have the ability to generate standardised letters for yourself.
These standard student letters include a 'Bank Letter' which can be used to open a student bank account with your bank.
A 'Confirmation of Studies' letter which confirms you are a registered student at the University of Portsmouth.
And a 'Council Tax Letter' to apply for council tax exemptions.
Please be aware that access to the letters described is based on course you are studying.
If you are eligible to receive a standard letter, it will be available to you on your Student View.
If you are not eligible, you will not find the access shown in this video.
To generate one of the aforementioned letters for yourself, you will need to be logged in to the Student View.
Ensure you have My Student View page selected.
From here, you will need to look for the My Enrollment Tasks container.
Inside this container is the Request Standard Letters button you will need to click.
Please take a moment to read the text displayed on this new screen, to ensure that you understand the information that will be provided in the letters once they are generated.
When you are ready, you will need to select the letter that you wish to generate by using the dropdown menu found towards the bottom of the page.
Select the letter you wish to generate, then click the button labelled Next.
Student View will take a moment to generate your letter.
When generating a bank letter, there is an additional step where you have to select your bank branch from another dropdown menu.
If the branch for your student bank account is not featured on this list, you'll need to select 'Other' provide the address details of your bank.
The fields marked with a star or asterisk are mandatory fields, they are also highlighted in pink.
This means you will not be able to proceed without populating these fields with information.
Once complete, tick the box to confirm the information you have provided is correct and press the confirmed button.
The system will then take a moment to generate your letter for you.
Once the generation process is complete, Student View will display a confirmation message to confirm that your letter was generated successfully and was emailed to your student email account.
Please access your student mailbox where the email from Student View can be found in your inbox with a PDF Attachment of your letter.
The email will be from myport@port.ac.uk with the subject line containing the name of the letter you generated.
Contact us
If you have technical trouble with using Your Student View, you can use the live chat box in the bottom right of this page between 9.00am and 5.00pm, Monday to Friday. Or you can get in touch with the Service Desk on servicedesk@port.ac.uk.
Enable University alerts
Turn on notifications for critical updates like closures, safety alerts, and urgent service disruptions.


