Zoom is a cloud-based enterprise video and audio conferencing solution that includes chat, screen sharing and webinar functionality. It is easy to start, join, and collaborate across any device. Zoom is available for use for staff and students at the University.
Training
If you would like to learn how to use Zoom or to ensure you are making the most out of the available features, please book on to one of our Zoom training courses.
Quick guides
Below are a selection of quick guides that are useful for configuring Zoom.
Enabling and Disabling Name Changes
If you already have a Zoom account
If you already have a free or Pro zoom account using your University email address you will be asked if you would like to join or keep your account separate when you first log in. We recommend that you join your account so you no longer need to pay for an additional license. If you have any stored recordings you will need to download these before you join your account, you can re-upload these after you have joined your accounts.
If you choose not to join accounts, you will be prompted to change the email address on your account so it no longer uses a University email address. We advise you to join accounts so individual licenses are no longer required.
To convert your free or Pro account to a University of Portsmouth account that is fully licensed you must log into the University of Portsmouth domain using Single Sign-on (SSO) using the link below, choose Sign-in then log in with your University username e.g. bloggjs and password.
https://port-ac-uk.zoom.us
Set your account up
To set your account up, visit the link below and choose Sign-in then log in with your University username and password.
Desktop and mobile client
Once you have set your account up, you need to install the desktop or mobile client to use Zoom.
The latest and ongoing University Windows builds already contain Zoom so check your start menu as Zoom may already be installed.
If it is not installed follow the standard process below. You will not need admin rights to install Zoom but if your install is blocked with a notification, please copy the installer file from your downloads and paste it into an alternative location before opening.
- Click here to download the Zoom installer. Open the file and follow the prompts to install.
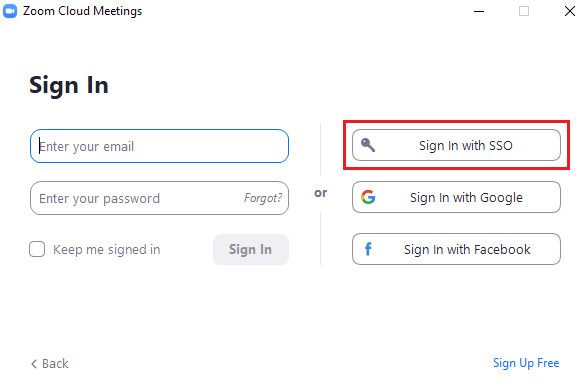
- When opening the Zoom desktop application select Sign In>, select Sign in with SSO.

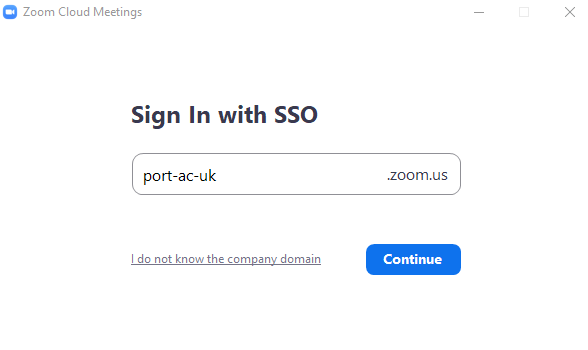
- Enter port-ac-uk as the domain name.

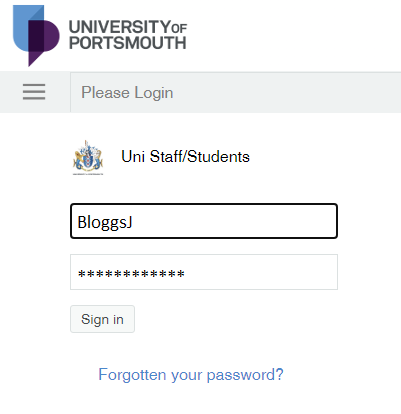
- You will be directed to a single sign on webpage and prompted to enter your University username and password e.g. BloggsJ.

- If you have already created a Zoom account using your University email address, you will be asked if you want to join your accounts. It is recommended that you join accounts.
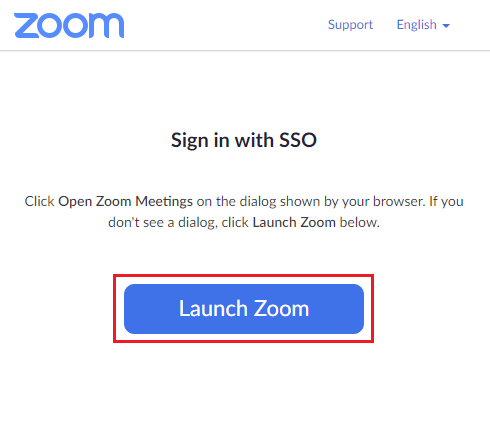
- Your browser may ask for permission to open Zoom links, if so please accept, then click Launch Zoom.

- Zoom will open and will respond to links clicked in your web browser and in the desktop client.
- Download the Zoom installer. Open the file and follow the prompts to install. This will require admin rights.
- When opening the Zoom desktop application select Sign In>, select Sign in with SSO.
- Enter port-ac-uk as the domain name.
- You will be directed to a single sign on webpage and prompted to enter your University username and password e.g. BloggsJ.
- If you have already created a Zoom account using your University email address, you will be asked if you want to join your accounts. It is recommended that you join accounts.
- Your browser may ask for permission to open Zoom links, if so please accept, then click Launch Zoom.
- Zoom will open and will respond to links clicked in your web browser and in the desktop client.
If you already have a Zoom account using your University email address, it is recommended to sign in with the desktop version to ensure you set your account up the first time.
- Visit your App store and install the Zoom Cloud Meetings app.
- When prompted to sign in, select SSO.
- Enter port-ac-uk as the domain name.
- Enter your University username and password e.g. up1234567
- You should be ready to start using Zoom.
Keeping safe in Zoom meetings
- Keep your waiting room turned on, if you are expecting a lot of people, make another attendee a co-host so they can let people in.
- Update your client to the latest version – the newer clients allow you to directly report bad behaviour to Zoom.
- If all the attendees have Zoom accounts then leave the meeting authentication setting on, if your meeting is with University only attendees you can increase the authentication to University of Portsmouth accounts only.
- When everyone has arrived at your meeting, lock the meeting.
Security
Zoom content is protected with Advanced Encryption Standard (AES) 256. More information on data protection and security can be found on the Zoom website:
Features
Staff and students have access to the licensed version of Zoom that offers some additional features to the basic version. The features below are available to staff:
- Meeting capacity: 300
- Transcription: Yes
- Meeting duration (for more than 2 people): Unlimited
- Cloud recording: 0.5GB per user
- Large meeting capacity: up to 1000 - license required
- Webinar capacity: up to 50,000 - license required
FAQs and tutorials
You can allow others to schedule meetings on your behalf by giving them privileges to your account. To do this:
- Log in to your Zoom account.
- Choose Settings from the menu on the top then ensure the Meetings tab is selected.
- Scroll down to the bottom of the page and look for the setting Schedule Privilege, click the icon then enter the email address you wish to allow privileges too. The user you are giving privileges to must have a licensed account. If they do not have a licensed account, they will need to complete the Set your account up process before you add their email address.
- Once access has been granted, they can schedule meetings on the web client either using their own account or any account they have delegate access to by choosing Meetings from the menu on the left and either selecting Myself or other user from the drop down list on the right before clicking Schedule a Meeting
You can obtain reports of all events. To do this:
- Log in to your Zoom account.
- Choose Reports from the menu on the left.
- Select the report type you would like. Participant lists can be found under the Usage reports
- Search for the event by date then select Generate to create the report, you can then download the report.
Need Help?
Contact the Service Desk:
- Phone: +44 (0)23 9284 7777
- Raise a Service Desk Ticket
- Start a Chat
Enable University alerts
Turn on notifications for critical updates like closures, safety alerts, and urgent service disruptions.


