

Image

Your essential guide to the digital tools, systems, services and support you’ll use throughout your studies at the University of Portsmouth.
This page is your starting point for using IT services at the University of Portsmouth.
It brings together the key information you need to get set up, access University systems, connect your devices, save your work, use learning platforms and find the right support when you need help.
Whether you are new to the University or returning to your studies, you can use this page as a quick reference for the main IT services and digital tools available to you. Each section introduces an important topic and links to more detailed guidance where needed.
 Your account, sign-in and IT support
Get your account ready, protect your sign-in, and know where to go when something is not working.
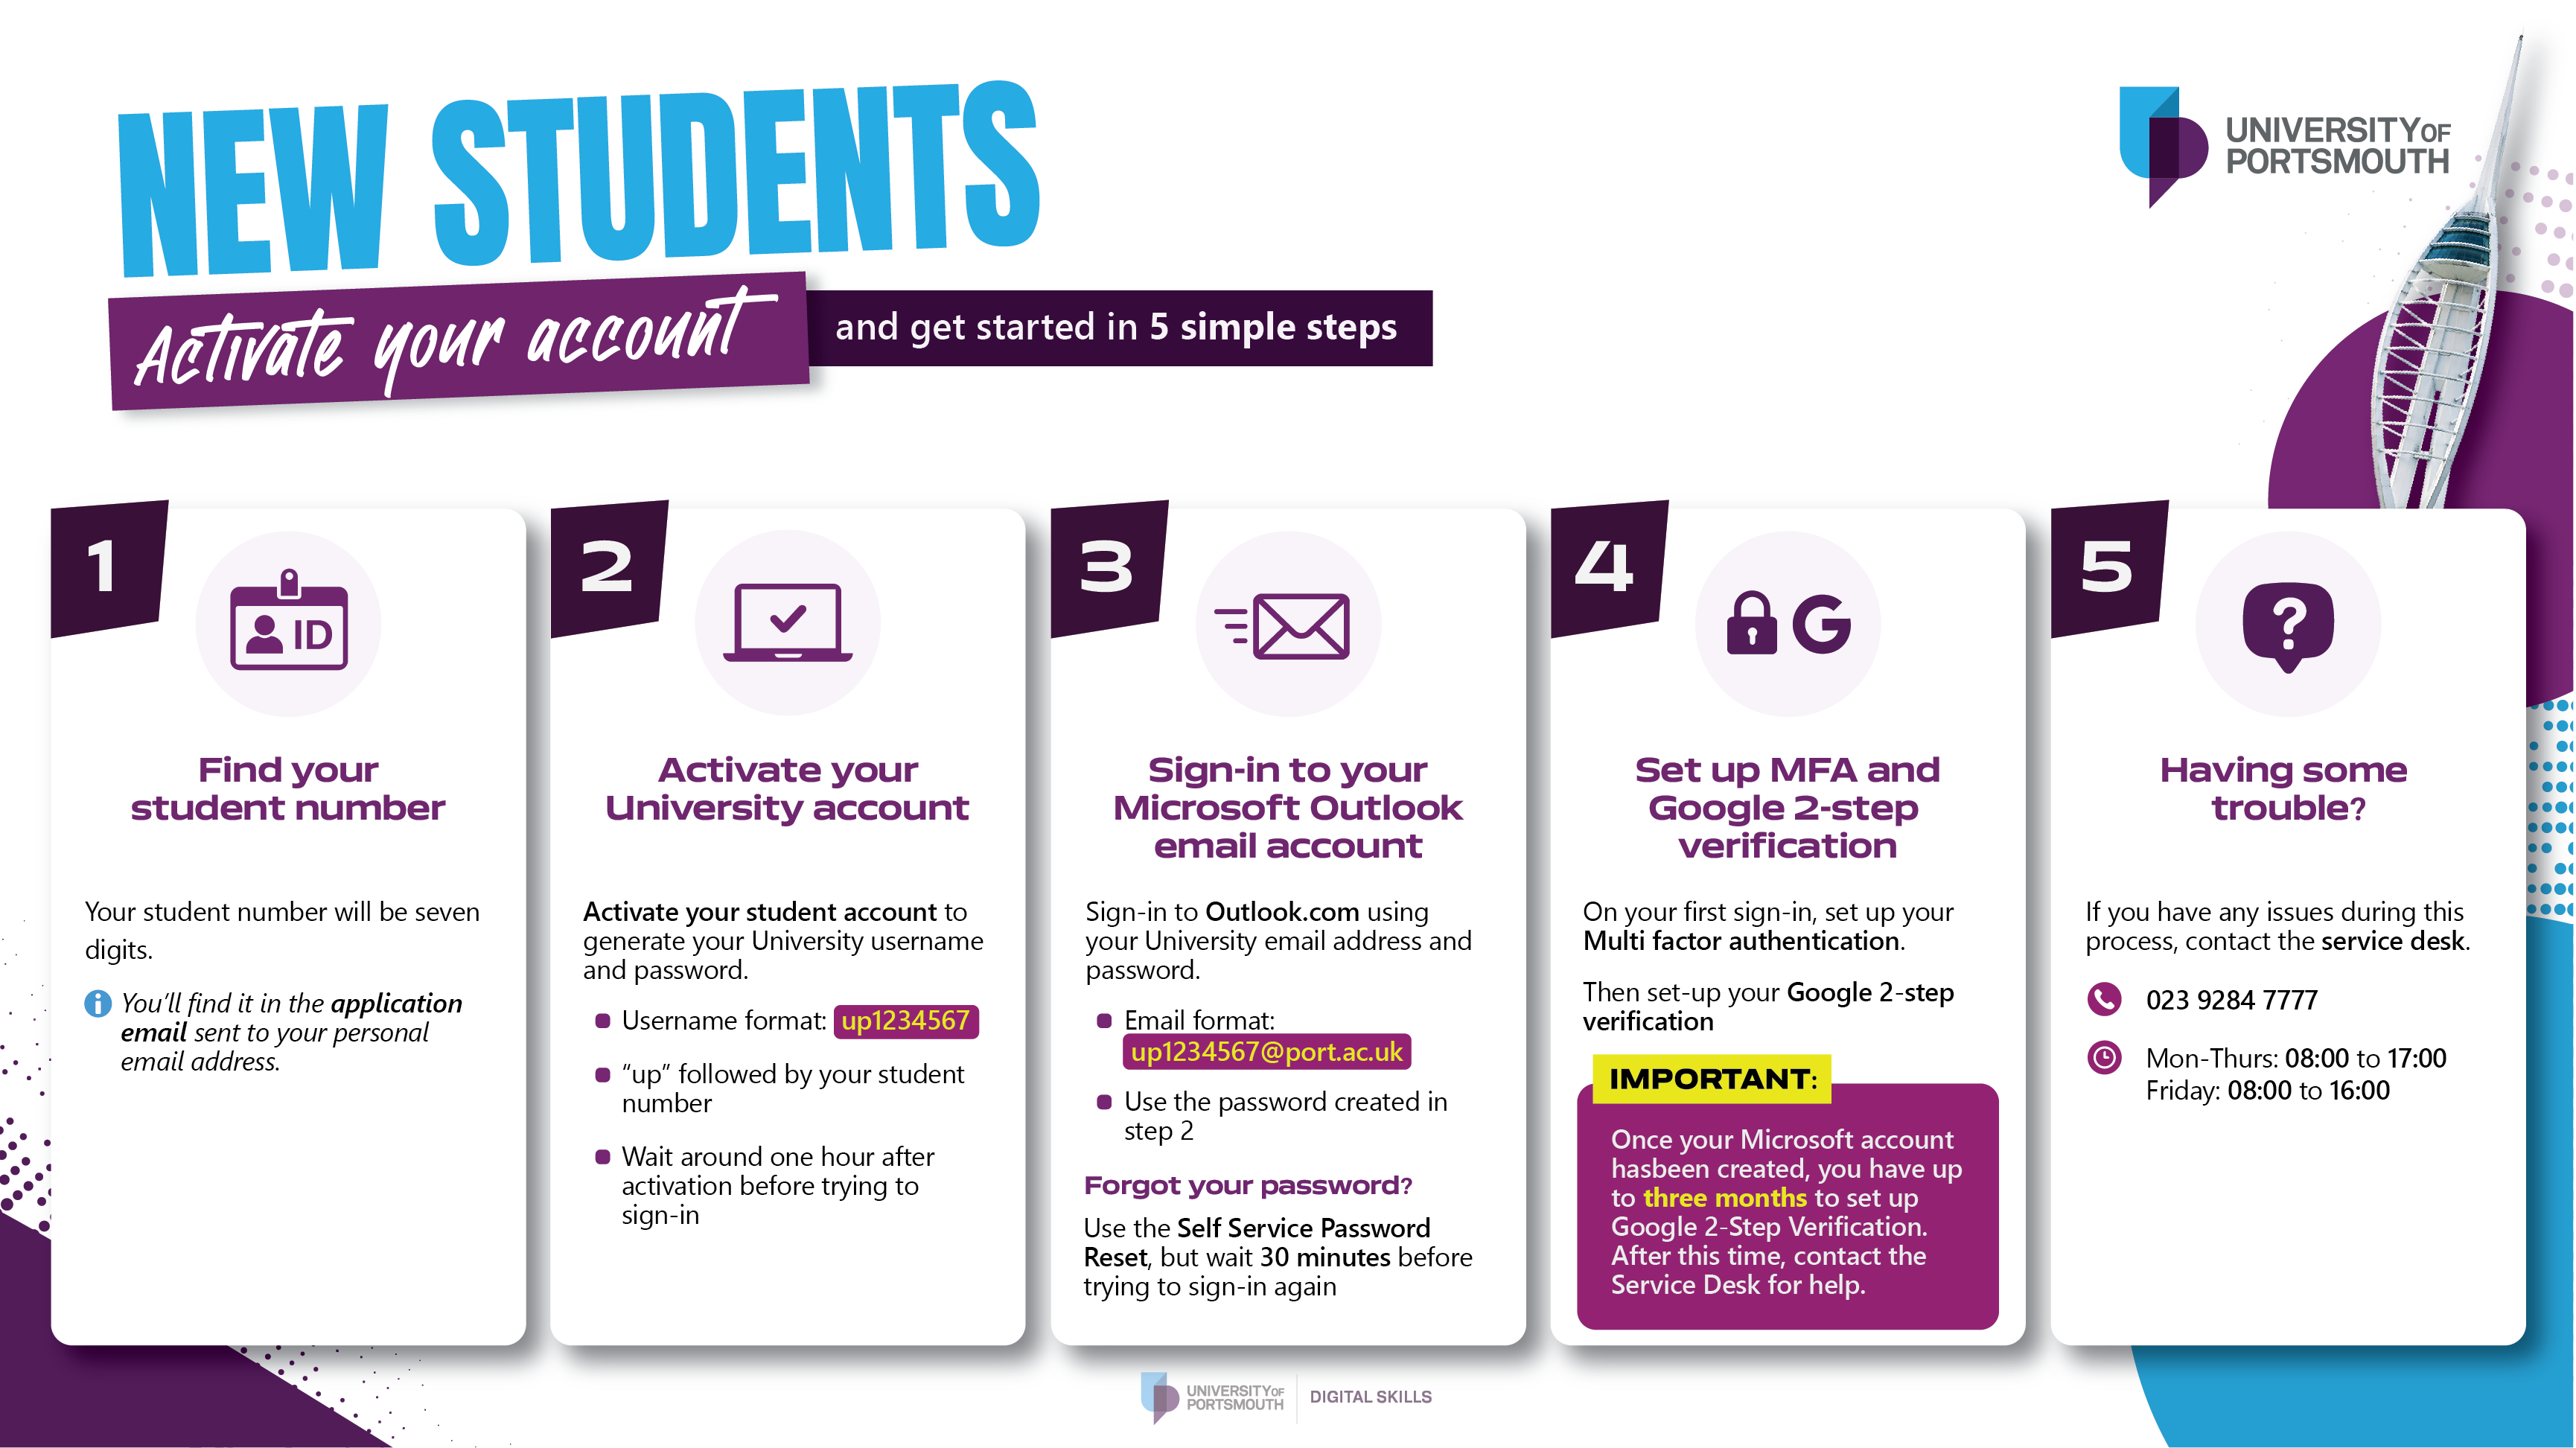
Note: Using a mobile device? Pinch to zoom in and make the image easier to read. For detailed instructions, see the Activating your student account section.
Expand the sections below to view the instructions and additional information
If you’re joining the University for the first time, activate your University student account and then gain access to your Microsoft Outlook email account by following these steps:
1. Find your Student Number (it will be a seven digit number)
You’ll find this in the application email sent to your personal email address.
2: Activate your University Network Account
If you haven’t already done so, activate your student account to generate your University username and password.
Your username will look like: up1234567 (“up” followed by your student number)
It takes approximately one hour for your account to be ready after activation. Please wait an hour before proceeding to log into your account.
3: Log into your Microsoft Outlook email account
Sign in to Outlook.com using your University email address and password.
Your email address will be: [email protected] (up followed by your own student number)
Your password is the same as the one you set up in step 2
Reset if you've forgotten your password (Note: you will need to wait approximately 30mins after changing your password for it to filter to Microsoft Apps)
4: Set up Multi-Factor Authentication (MFA) and 2-Step Verification
On your first Microsoft login, you’ll be prompted to follow the instructions to set up Microsoft MFA.
You will also need to set up Google 2-Step Verification.
Important: Once your Microsoft account has been created, you will have up to 3 months to set up Google 2-Step Verification. After this time, you will need to contact the Service Desk for help.
5: Need Help?
If you need any support please contact IT support.
The University is currently moving from Google Workspace to Microsoft 365 as part of the Modern Work Programme (MWP). During this transition, you may still need to use more than one system. For the latest guidance and updates, visit the Your move to Microsoft page.
Multi-factor authentication (MFA) adds an extra security check when you sign in to your University accounts. This helps protect your information even if someone else knows your password.
The method you are asked to use depends on the University service you are signing in to:
You may need to set up more than one method. Each one protects a different University account or service, so the sign-in prompts may look different.
If you need help setting up MFA or signing in to your account, contact the Service Desk.
There is a range of IT support available at the University, depending on the type of help you need. The options below will help you find the right support route, whether you want to follow self-service guidance, get practical help on campus, or contact the Service Desk for further technical support.
The student IT support pages include a range of self-service articles to help you find answers quickly. These cover common topics such as accessing University systems, connecting to services, using software, printing, accounts and keeping your information secure.
This is a good place to start if you want to check guidance, follow step-by-step instructions, or solve a common IT issue yourself.
The Student IT Help Advisers are based in the University Library and provide friendly, practical support for students.
They can help with a range of everyday IT questions, including Wi-Fi, printing, account access, University software and using digital services for your studies. They are a helpful first point of contact if you are on campus and would benefit from hands-on support.
The Service Desk can help with IT issues that need further investigation, technical support or a formal support request. You can contact them by phone, start an online chat, or raise a ticket through the Self-Service Portal.
💡 Service Desk contact details
Phone: 023 9284 7777
Opening hours: Monday to Thursday, 08:00 to 17:00, and Friday, 08:00 to 16:00
ℹ️ Note: More guidance on raising a Service Desk ticket is available in the section below.
You can raise a Service Desk ticket when you need to report a fault, request help with a University IT service, or get support for an issue that needs further investigation. Raising a ticket creates a formal support request so the Service Desk can review the issue and respond with the right guidance.
ℹ️ Note: When completing the form, include as much useful information as possible. This could include what you were trying to do, the system or service affected, any error messages you have seen, the device or browser you were using, and if necessary, the best times or days to contact you.
You can watch the video below for a step-by-step visual guide:
 Connect your devices and access University services
Set up your own device, connect on campus, and access the systems and software you need for study.
Expand the sections below to view the instructions and additional information
The Virtual Private Network (VPN) gives you a secure connection to University services when you are working away from campus. Some services, such as AppsAnywhere, may require you to connect to the VPN before you can access them remotely.
Before you can use the VPN, you will need to download and install it on your device. The steps below explain how to do this on a Windows PC.
For more information, including guidance for other operating systems, visit the Guide to the Virtual Private Network.
You can watch the video below for a step-by-step visual guide.
There are 5 Open Access areas across campus, giving you access to over 600 PCs, Macs, short-loan laptops and printing facilities. These spaces are useful if you need to use a University computer, access course software, print documents, or work on campus without relying on your own device.
You can find Open Access areas in the:
If you are not on campus, you can still connect to a University lab computer from your own device. This is known as remote access. It lets you use a University desktop as if you were sitting at a computer on campus.
Remote access can be helpful if you need to use specific software installed on University computers, or software that may not be available on your own device. Windows 11 and Linux lab computers are available for remote access.
For full instructions, including guidance for Mac users, visit the Remote Access to Lab Computers page.
AppsAnywhere is the University’s apps portal. It gives you access to a range of software you may need for your course, whether you are studying on campus or away from the University.
You can use AppsAnywhere to stream apps or download available software for study and University work. This is useful if you need access to software that is not already installed on your own device.
You can watch the video below for a step-by-step visual guide.
The Wi-Fi network available across the University campus is called eduroam. This is the main wireless network for students and staff, and you can use it in all campus buildings and over 70 other locations in Portsmouth.
You can connect to eduroam using your University account username and password. Once connected, your device should usually remember the network and connect automatically when eduroam is available.
⚠️ Important: Use @port.ac.uk when entering your username. Do not use .myport.ac.uk.
For full guidance, including device-specific instructions and Mac guidance, visit the Connecting to Campus WiFi page.
 Cyber security and staying safe online
Learn how to protect your accounts, devices and personal information, recognise phishing and scams, and use University IT services safely and responsibly.
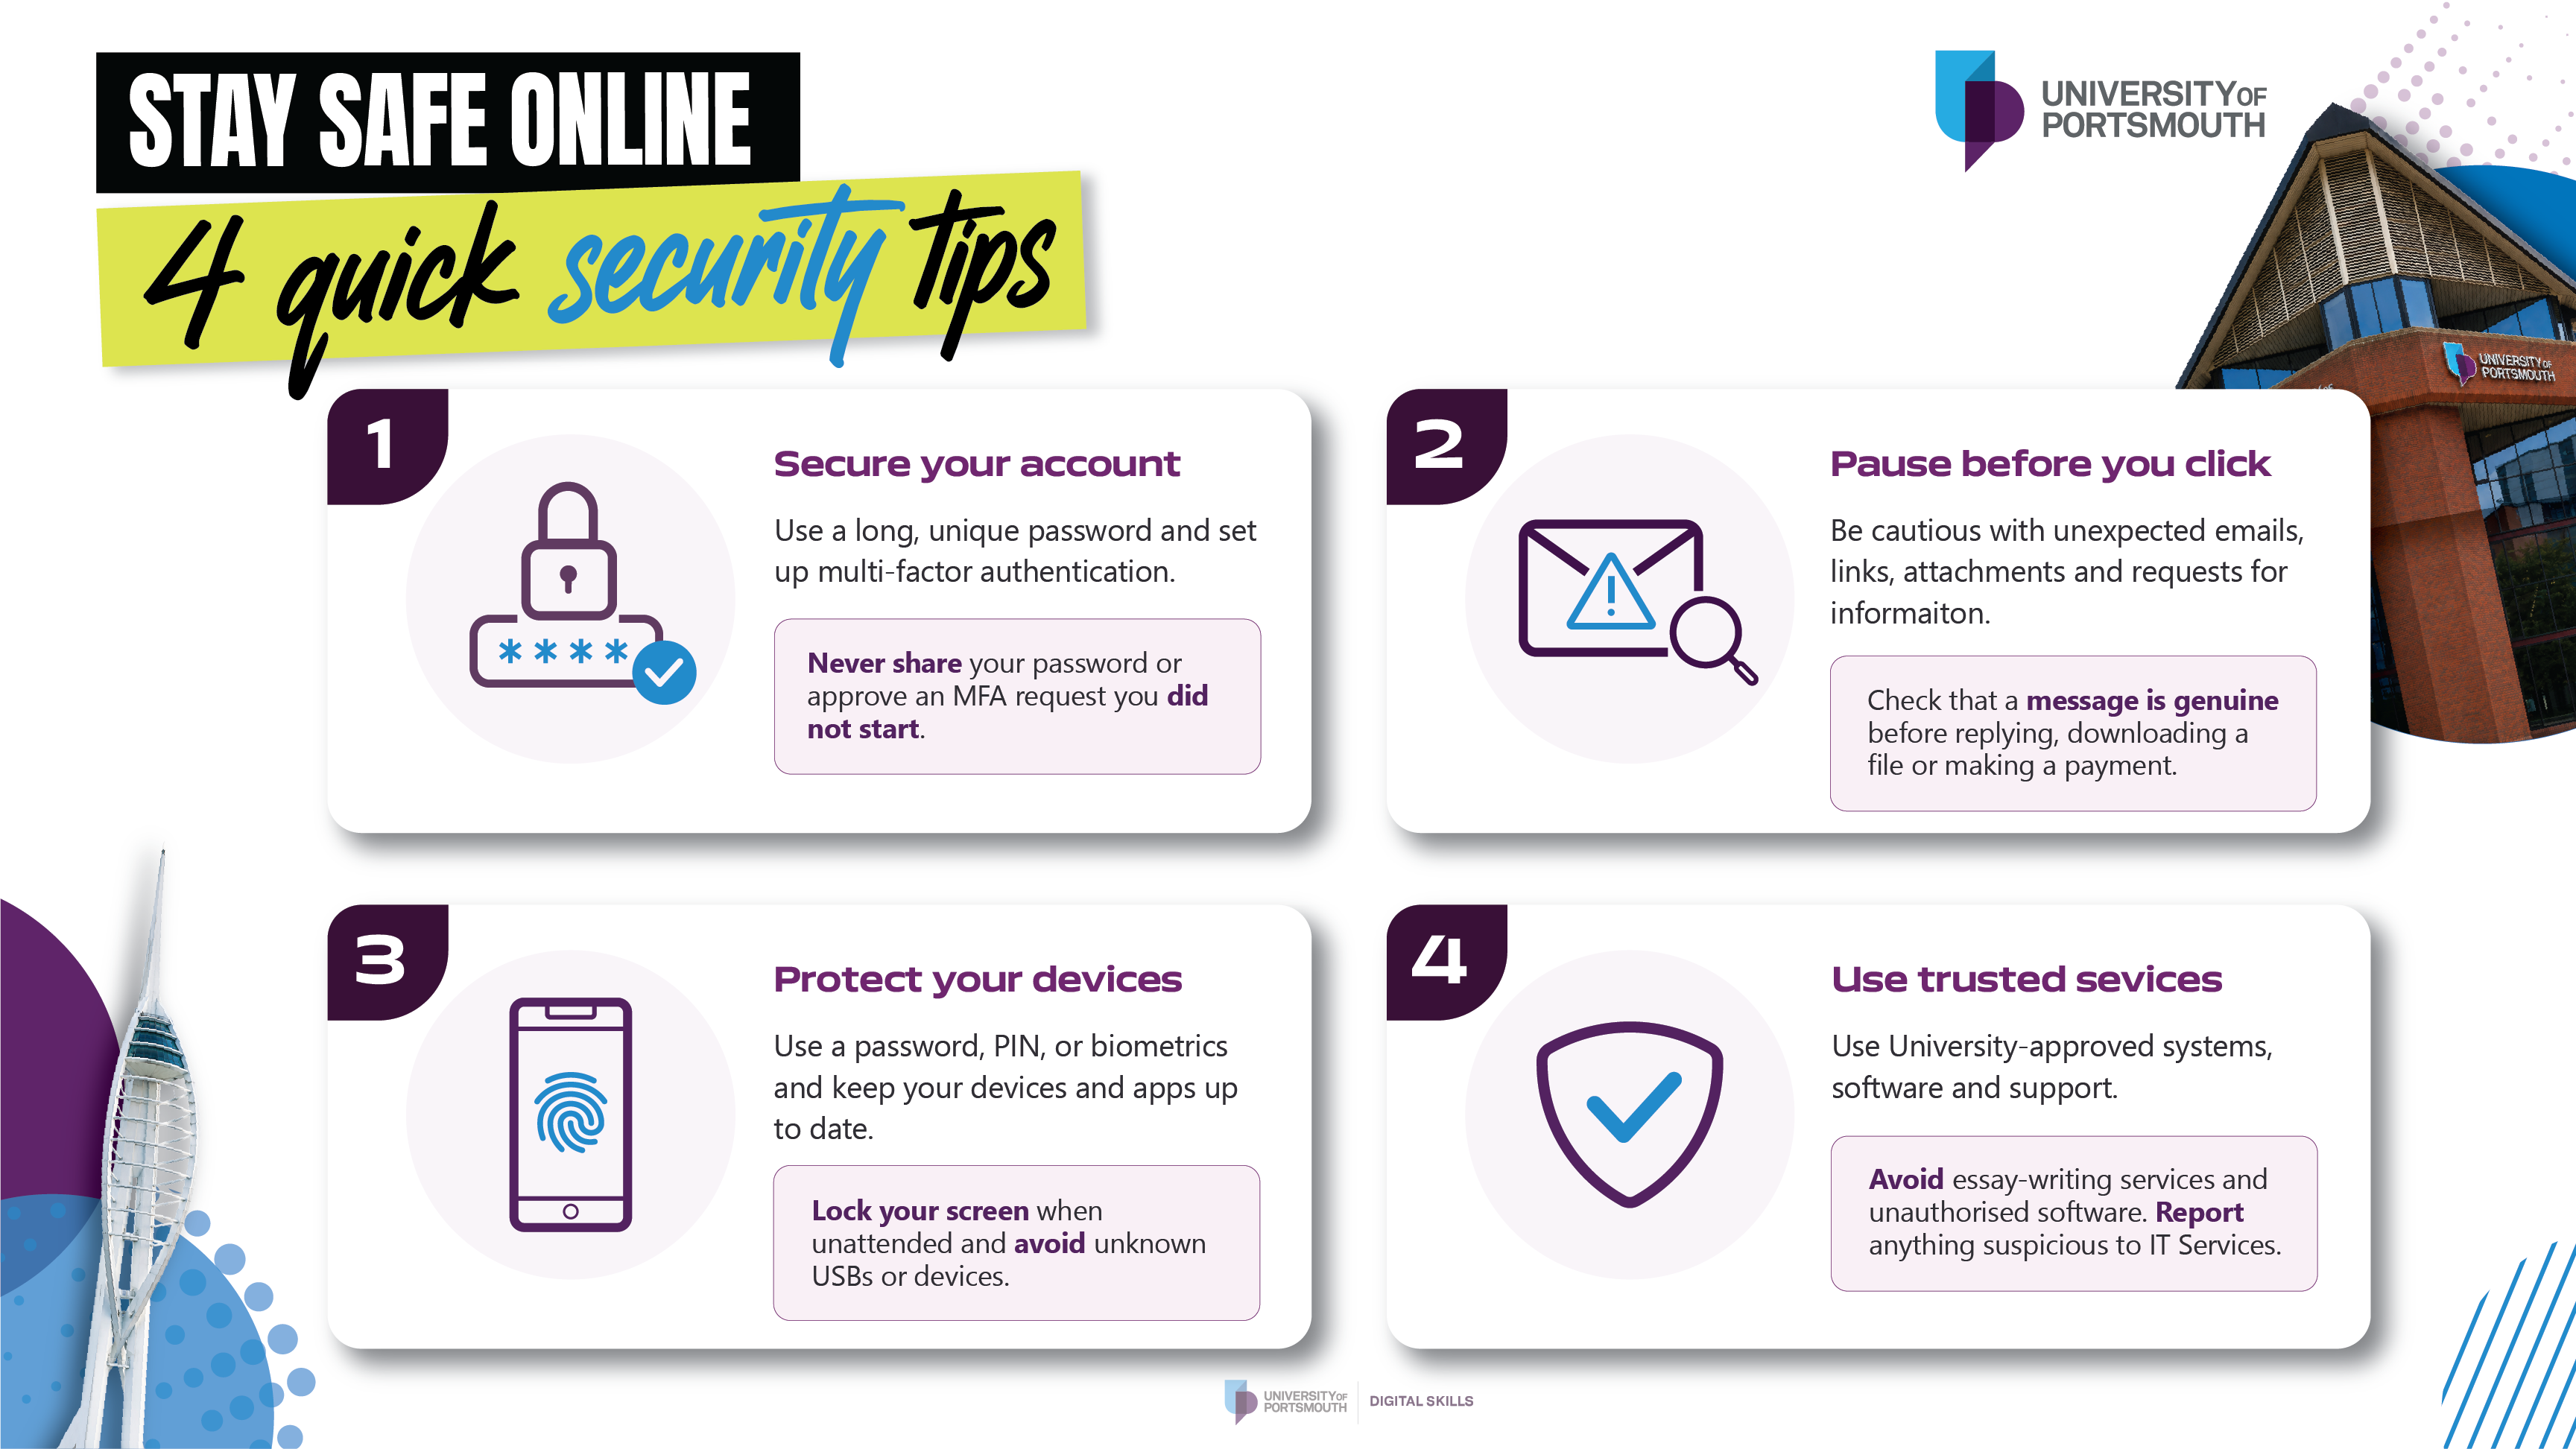
Note: Using a mobile device? Pinch to zoom in and make the image easier to read.
Expand the sections below to view the instructions and additional information
Your University account gives you access to your email, learning resources and academic work, so it is important to keep it secure. A few simple habits can make a big difference.
MFA is required when accessing Microsoft services with your University account. Follow the Microsoft MFA for students guidance to set it up.
⚠️ Important: If you receive an MFA notification when you are not trying to sign in, do not approve it. Change your password and contact IT Support as soon as possible.
Your phone, tablet and computer hold a lot of important information, including saved passwords, personal details and University work. A few simple steps can help keep them secure.
Information shared on social media can sometimes be used to create convincing scams or gain access to your accounts. Even small details can reveal more than you expect when they are combined.
Watch the short video below to see how information shared online could be collected and used.
You can also explore the University’s guidance for more advice about protecting yourself online.
Scammers often target students through emails, text messages, phone calls, social media and fake websites. They may pretend to be your bank, the University, Student Finance, a delivery company or someone offering accommodation or work.
Phishing is a fake message or website designed to trick you into sharing personal information, making a payment or giving someone access to your account.
Before you respond, select a link or download a file, pause and check that the message is genuine. Be careful if it:
Some scams look very convincing. If you are unsure, do not use the links or contact details in the message. Visit the organisation’s official website or contact them using details you already trust.
If the message involves your University account, do not reply or enter any information. Contact IT Support for advice.
Websites and social media accounts offering essays, assignment help or guaranteed grades may look genuine, but they can be scams. They may take your money, misuse your personal information, provide copied work or threaten you after you have paid. Using these services could also lead to an academic misconduct investigation.
If you are struggling with your studies, support is available through the University:
Always use trusted University support rather than an external essay-writing service.
University accounts, Wi-Fi, computers and software are provided to support your studies. Everyone who uses them has a responsibility to help keep University systems and information safe.
University IT services must not be used for illegal, harmful or unauthorised activity. This includes:
Contact IT Support as soon as possible if you think your account has been accessed, notice suspicious activity or lose a device that can access University information.
You are responsible for activity carried out through your University account. Serious misuse may lead to your access being restricted and could result in disciplinary or further action.
You can read the full policy for more information about using University IT safely and appropriately.
 Study systems and learning support
Access the main platforms, tools and support services you may use for teaching, learning, online sessions and study activity.
Expand the sections below to view the instructions and additional information
Student View is one of the main systems you will use to manage information linked to your course and student record.
You can use Student View to check key study information, including your modules, timetable and grades. You can also use it to update your personal details and apply for bursaries.
It is a useful place to keep track of your course information and make sure your student details are correct and up to date.
You can access Student View through the Student View login. For more detailed guidance on what you can do in Student View, visit the Your Student View page.
Zoom is used for online teaching, meetings and virtual sessions at the University. You can access Zoom on a desktop or laptop, and you can also use it on a mobile phone or tablet.
We recommend installing the Zoom app on your device, as this usually gives you the best experience for sound, video quality and joining sessions smoothly.
ℹ️ Note: The University is currently moving towards Microsoft 365 as part of the Modern Work Programme (MWP). During this transition, you may be asked to use different systems in different situations, including Zoom and Microsoft Teams.
Always follow the joining instructions provided for your session, meeting or teaching activity. Over time, the University will move towards greater use of Microsoft Teams.
Your University email address usually includes your student number, for example [email protected].
You can watch the video below for a step-by-step visual guide.
Microsoft 365 is available through your University account. You do not need to create separate accounts for each app. Once your University account has been activated, you can access Microsoft 365 apps such as Outlook, Word, Excel, PowerPoint and OneDrive through your internet browser.
You can use these apps to communicate, create and store documents, and collaborate as part of your course or other University activities.
You can watch the video below for a step-by-step visual guide.
Video here
The University Library is a central place for study, research and support. It offers much more than books, with a range of spaces, resources and services to help you study in the way that works best for you.
You can use the Library for:
You can find out more about Library services, facilities, opening hours and support on the University Library page.
If you are working with other students, you can book a group study room for shared work, discussion or presentation practice.
Group study rooms are for two or more people. Bookings can be made up to 14 days in advance, and rooms are booked in 1 hour slots. When you book online, make a note of your room number, date and time, and PIN, as you will need these to claim your room.
You should claim your room at the start of your booking. If a room is not claimed within 15 minutes, it may be released for other students to book. If you no longer need the room, cancel your booking before the start time so the space can be used by someone else.
ℹ️ Note: If you are off campus, you may need to use the University VPN to book a study room.
The University offers support to help you access your studies, University services and digital tools in a way that works for you. This may include support from the Disability Advice team, as well as accessibility features built into the tools and devices you use.
Exploring these options early can help you find the support, settings and tools that suit your needs. This can make it easier to study, attend online sessions, complete assessments and use University systems with confidence.
The Disability Advice team provides confidential support for students and applicants who have a disability or need additional support for their academic studies.
The team can provide advice and guidance on:
If you have a condition, disability or support need that may affect how you access the campus, curriculum, teaching, learning, assessments or any other University service, you can contact the team in confidence. It is best to get in touch as early as possible so they can guide you through the support available.
More information on contacting the team is available on the Disability Advice page.
Many digital tools include features that let you adjust how you read, listen, navigate, type and take part in online activities. Depending on the device or service you are using, you may be able to change settings such as text size, colour contrast, captions, keyboard navigation, screen readers, voice typing and audio settings.
The links below are useful starting points for finding accessibility guidance for different systems and services:
Portia is the University’s AI chatbot, available 24 hours a day to help you find the information in our student pages easier. You can ask Portia about:
You can use Portia on a phone or computer. It appears in the bottom-right corner of many Student Services, Student IT Support and Careers pages.
Portia provides general information but cannot access personal details held in systems such as Moodle, Timetable or SITS. Do not include names, student numbers or anything else that could identify you or another person.
As Portia uses AI, its answers may occasionally be inaccurate. Check important information against official University guidance. If Portia cannot answer your question, it may direct you to live support during business hours.
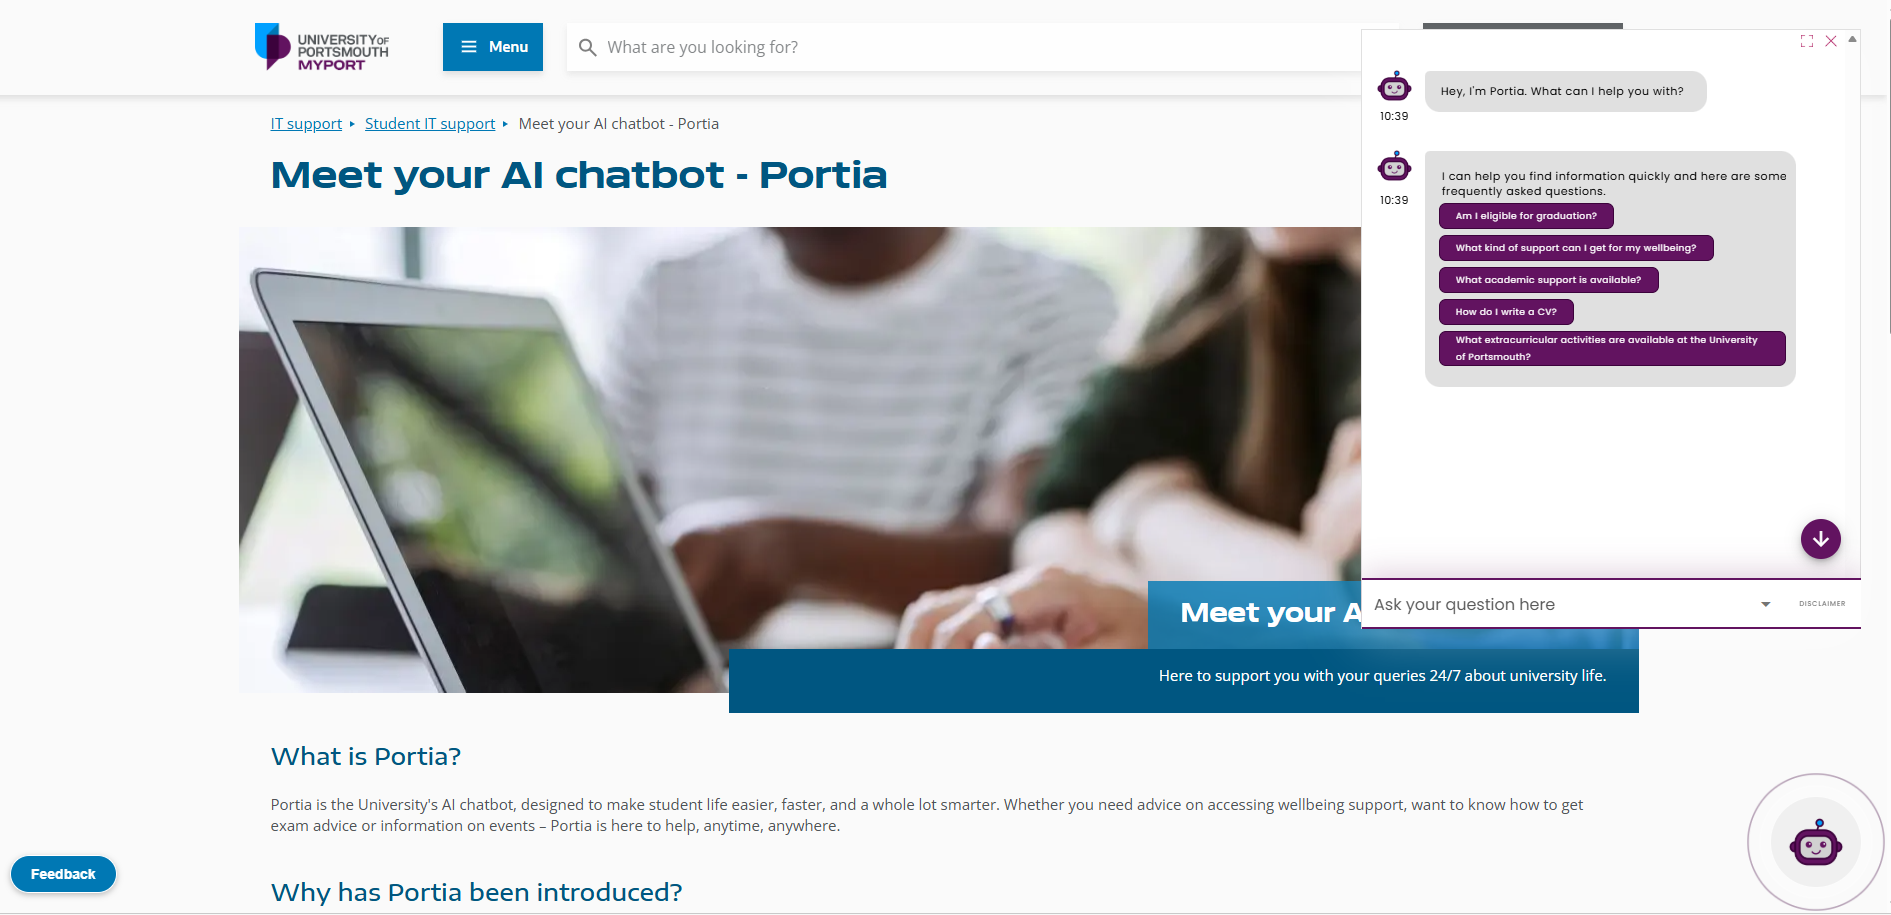
Moodle is the University’s virtual learning environment (VLE). It is where you will find many of the learning materials, activities and resources linked to your course and modules.
You may use Moodle to access module information, weekly learning materials, reading lists, recorded teaching sessions, announcements, discussion forums and assessment information.
Moodle is available 24 hours a day, 7 days a week and can be accessed from a smartphone, laptop or desktop computer. You will only have access to your Moodle courses and modules once you have registered, or re-registered, on your course.
When signing in to Moodle, select the OpenID Connect button and use your University credentials.
For further support, you can access Moodle directly or view the Moodle Guide for a fuller overview of modules, assessments, notifications and other features.
Moodle login Moodle support guides
 Get ready for university with our Student IT Induction webinars
The Digital Skills team is offering Student IT Induction webinars from 14–18 September. Choose the date that suits you and get a head start with the essential IT systems, services and support you will use throughout your studies.
 Files, printing and training
Save your work securely, print on campus, prepare PowerPoint handouts and access training to build your digital confidence.
Expand the sections below to view the instructions and additional information
Need to print something for your course? Printers are available in open-access areas across campus, and you can send your documents to the University print queue before collecting them from a printer when you are ready.
Watch the video below for a step-by-step guide to printing on campus using Web Print.
If you are printing a PowerPoint presentation for revision or note-taking, you may find it useful to print it as a handout. This lets you print multiple slides on each page instead of printing one full slide per page.
Printing a presentation as a handout can help you use less paper and ink, make your printing credits go further, and reduce the environmental impact of printing.
Open your PowerPoint presentation.
Select File from the top ribbon, then choose Print.
Under Settings, use the first drop-down menu to choose whether to print all slides or a custom range.
If you choose a custom range, enter the slide numbers in the Slides field. For example, you can enter 1,3,5-12.
In the Print Layout section (second drop-down), under Handouts, choose how many slides you want to appear on each page. Use the preview on the right-hand side to check how the page will look.
3 slides gives you space to write notes beside each slide.
4, 6 or 9 slides is useful if you only need the slides for reference.
To reduce paper usage, choose a double-sided printing option, such as Print on Both Sides, if available (third drop-down).
Check the preview, then select Print
You can watch the video below for a step-by-step visual guide.
There are a number of training opportunities available at the University to help you build confidence with the digital tools and systems you may use during your studies.
The Digital Skills team provides training and resources to help you make the most of the technology available to you at the University. This includes support with key digital tools, study-related systems and software that can help you work more confidently and effectively.
There are currently a limited number of Digital Skills sessions available for students. You can check the Digital Skills page for the latest information and a full list of available sessions.
ℹ️ Note: We are currently reviewing the Digital Skills sessions we provide for students. Please check the Digital Skills page for updates and new training opportunities.
If you have a question about Digital Skills training, you can email [email protected].
As a student at the University of Portsmouth, you have free access to LinkedIn Learning through your University account. LinkedIn Learning is an online learning platform with thousands of expert-led video courses covering business, technology and creative skills.
You can use LinkedIn Learning to explore topics linked to your course, build general study and digital skills, or develop skills that may support your employability. Courses are available online and through the mobile app, so you can learn at your own pace and return to topics when you need them.
For more information, including login guidance and FAQs, visit the LinkedIn Learning page.
You can watch the video below for a brief introduction to LinkedIn Learning.
It is important to save your work somewhere secure and easy to access. The recommended option for most students is Microsoft OneDrive, as it lets you store your files online and access them from different devices.
You also have access to the N Drive, which is your personal network storage area when using standard University PCs or Macs on campus.
ℹ️ Note:
- We recommend keeping important files in more than one place, especially assignments or documents you are still working on. For example, you may want to keep your main copy in OneDrive and a backup copy elsewhere.
- We do not recommend relying on removable storage devices, such as USB memory sticks, as they can be lost, damaged or become corrupt.
OneDrive is the University's cloud storage area, and is already included as part of your University Microsoft 365 account. It is the recommended place to store your files because you can access them online from different devices, whether you are on campus or studying elsewhere.
Your University OneDrive has 5GB of storage. You can log in to OneDrive using your University email address and password.
If you are using Microsoft 365 for the first time, you may need to set up Microsoft MFA. Guidance is available in the Microsoft MFA article.
The N Drive is your personal network storage area. It is available when you log in to a standard University PC or Mac on campus only.
Your N Drive has a 20GB storage capacity. Files on your N Drive can be restored for up to 3 weeks after they have been modified.
⚠️ Important: Please be careful when using your N Drive, as it contains important system configuration files. Do not delete files if you are unsure what they are used for.
For more information, visit the How to store your files article.
 Campus information and student essentials
Access key information for day-to-day study, including your student card, campus locations and important University dates.
Expand the sections below to view the instructions and additional information
Your University student card is an important part of student life on campus. It gives you access to a range of University buildings, facilities and services.
You should carry your card whenever you are on campus and keep it safe, as you may need it for:
You should apply for your student card before the start of the academic year as part of your initial registration. You will receive separate email instructions, or you can follow the Joining the University guidance, which explains how to upload your photo and where to collect your card when you arrive on campus.
For full guidance on applying for, collecting and using your card, visit the University Student Cards page.
It is useful to know where to find key campus information before you need it. The University provides online guidance to help you find your way around campus, plan your travel and check important dates during the academic year.
The Maps and Directions page can help you find your way around Portsmouth and locate University buildings, facilities and services.
It includes an interactive map showing University locations, as well as information on getting to campus, University buses, walking, cycling, parking and other travel options.
The Key dates page lists important dates for the academic year, including term dates and other University dates you may need to be aware of during your studies.
Turn on notifications for critical updates like closures, safety alerts, and urgent service disruptions.