Person working at a Windows 11 computer

Using Windows 11

Understanding the key differences as we move to Windows 11

Welcome to Windows 11

Your insights and suggestions are crucial to the continuous improvement of this page. Please share your feedback by emailing us at digitalskills@port.ac.uk.

Essential Information for Windows11 Users

Colleagues should be aware of the following:

  • Storage: While you will have access to OneDrive, Google Drive remains your primary storage platform.
  • Microsoft Office upgrade: The Office version installed on your current Windows 10 device will be upgraded from Office 2019 to Office 365. This automatically syncs with the same office tools provided by Office 365 for the web meaning your work is accessible from anywhere via a web browser.
  • Microsoft Office Compatibility issues: Be mindful when collaborating with colleagues who are not yet upgraded to Windows 11 that there are known compatibility issues between Office 365 for the web and Office 2019 which can result in data loss when collaborating. To avoid this, current guidance is to continue to use Google Workspace for collaboration and document sharing until notified otherwise.

If you have any questions about the above, please email digitalskills@port.ac.uk

Key Differences from Windows 10 to Windows 11

Below are the main differences between Windows 10 and 11

  • OneDrive will be the default location for file storage (10gb limit), Google Drive will still be available via your browser
  • Microsoft Edge will be your default browser
  • Redesigned user interface, the start button is now positioned in the centre of the screen 
  • Company Portal replaces Software Centre 
  • Office 365 will replace Office 19
  • Apps Anywhere will be available from your system tray
  • Copilot Chat is available to install from the Company Portal
  • System upgrades will now occur automatically
  • Windows Store will be unavailable in Windows 11.  Instead you can download apps from the Company Portal or Apps Anywhere .  This ensures that all applications are secure, compliant and tailored to our organisational needs.

OneDrive

As you set up and explore your new Windows 11 machine, you may notice that Microsoft OneDrive (Microsoft's version of Google Drive) is now included as part of the build. 


Please note the following: 

  1. For now, we ask you to continue using Google Apps and Google Drive as your primary tools for collaboration and storage. 
  2. Some software may save files to OneDrive by default. We recommend checking OneDrive occasionally to assess whether any files might have been stored there. 

OneDrive will become your primary location for storage when we transition to Microsoft 365 later this year, you will receive further instructions and support during that migration process. 

Compatibility issues with Office 2019 and Office 365

  • There have been a few reported incidents of content loss when sharing Microsoft Office documents between Office 2019 on a desktop and Microsoft documents created in a browser using Office 365 for the web. This is a known Microsoft issue. 
  •  Office 2019 is currently on standard UoP Windows 10 devices, Office 365 will be installed on Windows 11 devices, while Office 365 for the web is available via any browser via office.com
  • The current guidance is to continue to use Google Workspace for collaboration and document sharing. However, as you are part of the pilot program, if you do create documents in Office 365, it is recommended that they are edited and shared exclusively within the Office 365 environment without opening them in Office 2019.

Windows 11 Support

If you require any support with Windows 11 after your upgrade please contact Service Desk. The Contact IT Support article contains detailed  information on how to reach the Service Desk.

Training (optional)

LinkedIn Learning Windows 11 Training

As a member of staff you currently have access to LinkedIn Learning.  For more information, view this article

Windows 11 Essential Training: This is a comprehensive course that contains chapters on:

  • Getting Started with W11
  • Launching and Using Applications
  • File Explorer
  • Working with the Desktop
  • Working with Bundled Applications (including Edge)
  • Using Search Tools
  • Managing Notifications
  • Using Accessibility Features


Windows 11 Quick Tips: Lots of quick tips to get the most of Windows 11.  This course includes videos on:

  • General Interface tips
  • Modifying the Taskbar
  • File Management
  • Working with applications

Trainer-led Courses

Trainer-led sessions will be provided to assist you in transitioning to Windows 11. Instructions on how to book on this training will be included in the email inviting you to schedule your device update.

Please email a digitalskills@port.ac.uk if you would like to find out more.

Preparing for Windows 11

Digital Declutter

Before upgrading to Windows 11, please schedule some time to complete a Digital Declutter. 

A Digital Declutter involves removing Redundant, Obsolete and Trivial (ROT) digital items. This will help to enhance efficiency, compliance and minimise data storage requirements.  

For detailed guidance please refer to the Digital Declutter and the Corporate Governance Information Matters articles.

Transfer files saved on your Desktop or in your Download Folder 

The Windows 11 upgrade will delete any files stored directly on your device on your Windows 10 device this includes: 

  • files saved on your Desktop
  • files saved in your Downloads folder.

If you need to keep these files, you will need to move them to either your Google Drive or N: Drive before upgrading.

Note: Your Google Drive and N: Drive will not be affected by the upgrade.

Instructions

  1. Open File Explorer and display your Download folder (This PC > Documents > Downloads > Chrome Downloads)
  2. Drag any files you need to keep to your N: Drive or Google Drive
  3. Open File Explorer and display your Desktop folder (This PC > Desktop)
  4. Drag and files you need to keep to your N: Drive or Google Drive

The recommended browser for Windows 11 is Microsoft Edge. 

The process to transfer your bookmarks is simple and consists of the following steps: 

  1. Complete housekeeping in Google Chrome: Review and delete any unnecessary bookmarks.  This will streamline the import process, enhance browser performance, and ensure a more organised bookmark collection.  

  2. Sign into Google Chrome and enable sync: This will allow you to transfer your bookmarks seamlessley into Google Chrome


Complete Housekeeping on your Bookmarks in Chrome

  1. Open Google Chrome
  2. Click on the ... at the top right of your browser a menu will display
  3. Select Bookmarks and lists and then Bookmark manager
  4. The Bookmark manager click on a folder to display the bookmarks
  5. To delete a bookmark select the ... after the bookmark, a menu will display select Delete
  6. To delete a folder right click on the folder and select delete
  7. To create a new folder select the ... next to the search bar and select Add New Folder

(The Video below also contains a demonstration on housekeeping your bookmarks)


Sign into Google Chrome and ensure Sync is enabled

  1. Open Google Chrome
  2. Click on the profile disc (top right)
  3. A dialogue box will display, if you are not signed on the Sign in Button 
  4. Use your University email and password to sign in
  5. Clicking on the profile disc, will now show that you are signed in and that Sync is on

NB: Google Chrome is available to download from the Company Portal
 

Note: Ensuring sync is on in Chrome will allow you to import bookmarks, passwords, and browsing history into Microsoft Edge.

  • Please make a note of any Apps Anywhere apps you use, as these will need to be installed in Windows 11.

  1. Sticky Notes is a Windows 10 feature that allows you to create virtual sticky notes that are displayed on your desktop
  2. Any sticky notes you have created will be lost when you upgrade to Windows 11
  3. Please record any information you need in a document and store it in a file in Google Drive or on the N Drive

There are several versions of OneNote, and file locations may vary based on how the notebook was set up. Follow the instructions below to ensure any OneNote files are saved correctly before upgrading to Windows 11.


OneNote on the Web

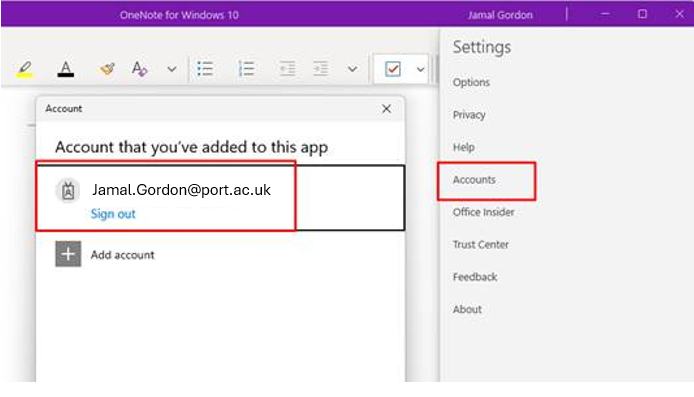
No action needed as these notebooks are stored in OneDrive. They will remain accessible once you have upgraded to Windows 11.


OneNote for Windows 10

Notebooks are automatically synced to your Microsoft 365 account and are not stored locally. These will be available on OneNote for the Web, or when you sign into OneNote on your  Windows 11 device.


To check:

  1. Open OneNote for Windows 10 from your start menu
  2. Click on Settings (click on the ... top left) on the menu bar
  3. Select Accounts
  4. Ensure that you are signed into your UoP account. An example is shown below:

OneNote Account Settings

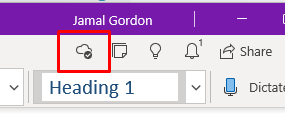
In addition check that the Sync icon is shown on OneNote, see below:

Sync Item in OneNote

OneNote 16

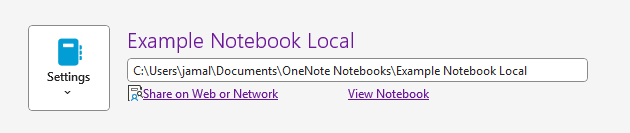
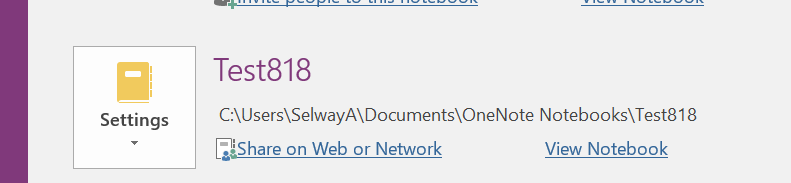
OneNote 16 notebooks can be stored locally or on OneDrive.  Notebooks that are stored locally will need to be synced to OneDrive. To check where your notebooks are stored follow the instructions below:

  1. From the start menu open OneNote 16
  2. Select File in the top left
  3. Your notebooks will be displayed showing where they are stored

Location of notebooks

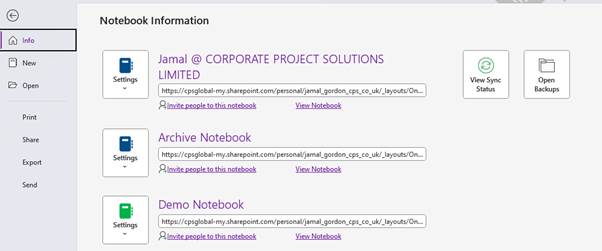
In the example above the notebooks are stored in Microsoft 365 as the path starts with https:\\. These notebooks will be available when you upgrade to Windows 11.

However, if any of your notebooks show a local file path starting with C:\ you will need to sync them to OneDrive by following the instructions below.

Locally stored notebook

To sync a local notebook to OneDrive

  1. Log into your Microsoft 365 account by opening a browser and logging into Office.com with your university credentials
  2. From the start menu of your Windows 10 device open OneNote16
  3. Select File in the top left
  4. Your notebooks will be displayed showing where they are stored
  5. If your notebook is stored locally (you can tell because of the C:\ file path)  select Share on the web or network (shown under the locally stored notebook)OneNote stored locally
  6. Select OneDrive followed by browse and select a OneDrive folder to store your notebook
  7. You will be prompted to name the notebook, click on Move
  8. It may take a while for your notebook to sync, to force the sync click on Settings followed by Sync Sync Settings
  9. Your notebook will now be available through the OneNote app  - we recommend that you check your notebooks have moved before your device is upgraded to Windows 11. 

Viewing OneNote in M365

  1. Open a browser
  2. Navigate to Office.com and log in with your university credentials
  3. Click on the App launcher and select OneNote
  4. OneNote will open showing the available notebooks

  1. At a designated time, laptop users will be asked to schedule an appointment for their upgrade at the W11 Upgrade Hub located on the ground floor of St. Andrews Court.
  2. When attending your appointment, please ensure you bring a phone (or another device) for Multi-Factor Authentication which is  required for the upgrade process


Installing Apps in Company Portal

Company Portal

Company Portal allows you to securely install applications such as Copilot Chat, VPN and Adobe.  In Windows 11 the Company Portal replaces the Software Centre.

Installing Applications

  1. Click on the Company portal icon on your desk desktop
  2. The Company Portal will open
  3. In the Navigation panel on the left select Applications
  4. The apps available to install will be displayed, click the app you want to install
  5. More information will be displayed along with an Install button, click on the Install button 
  6. The app will be installed this may take several minutes, an Installed message will display once completed
  7. The app will now be available from your Start menu.

Company Portal Icon


Installing the VPN

Company Portal Icon


  1. Open Company Portal; there is a shortcut on your desktop (see image above)
  2. Select Apps in the left-hand menu
  3. Click on Global Protect VPN Staff 
  4. More information about the app will display, click on the Install button
  5. The app will install, this may take several minutes, an Installed message will display once completed
  6. The VPN will now be available from your System tray (it's in the same location as it was in Windows 10)

Company Portal showing the VPN tile

Installing Chrome

Note: Microsoft Edge is the recommended browser for Windows 11.

Microsoft Edge is purpose-built for Windows 11 and Microsoft 365, offering advanced features and tools to optimise your experience.  

Google Chrome however  is available form the Company Portal.

  1. Open Company Portal; there is a shortcut on your desktop
  2. Select Apps in the left-hand menu
  3. Click on Chrome for Business
  4. More information about the app will display, click on the Install button
  5. The app will install, this may take several minutes, an Installed message will display once completed
  6. At the end of the process you will get a message asking if you want to set Chrome as the default browser (you can also do this later see instructions below)
  7. Chrome will now be available from your Start Menu


Setting Chrome as a Default browser

  1. Click on the Start button
  2. Select Settings
  3. In the search bar at the top of the navigation panel on the left type default apps
  4. Select Default Apps from the search results
  5. In the second search bar Set defaults for applications type in Chrome
  6. The Apps > Default apps> Google Chrome page will open. Make Google Chrome your default browser will appear at the top of the page click on the Set default button

Using Windows 11

Start Menu

The Start Menu is in the centre next to the search bar.  Click here to view image

To open an application:

  1. Click on the Start Menu
  2. Once opened you will see Pinned Apps
  3. Click on View apps to show all apps
  4. Select the App to open
  5. To Pin an app so it is visible when you click on the start menu right click the app  and select Pin

Search Bar

The search bar can be used for various types of searches. Here are some examples:

  • Find and open an app – Type the name of an app to locate and launch it.
  • Search for a file – Enter the file name or keywords from the file, then select the Document filter at the top of the search results.
  • Perform an internet search – Type your query to search the web directly

Changing the Location of the Start Menu

  1. Right-click on an empty space in the taskbar
  2. Select Taskbar settings
  3. Click Taskbar behaviours in the right pane
  4. Select the Taskbar alignment drop-down
  5. Change the alignment from Centre to Left

Shutdown and Restart

It is always advisable to shut down Windows 11 each night after you finish work.

If it has been some time since you last properly shut down, we recommend restarting to ensure all software can be updated if needed.

  1. Click on the Start Button (to the left of the search bar on the task bar)
  2. At the bottom left of the dialogue box a power button will display, click on to display options:
  • Lock
  • Sleep
  • Shut down
  • Restart

Multiple Desktops

Task View is available on the Task Bar. View Image

Having multiple desktops allows you to separate your tasks into different places, which can be especially handy if you need to multitask.

Task View is made up of two sections. View Image

  • The top allows of the screen show all the applications and browser windows you have running on a desktop. You can open a window by clicking on the thumbnail
  • The Second part of the screen contains virtual desktops, click the + symbol to create a new virtual desktop.

For more information, please view this Microsoft article

File Explorer and OneDrive

  1. The default Home view displays recommended, favourited and recent files 
  2. The folder signified by the blue cloud displays files stored in your OneDrive
  3. Mapped folders such as the N:Drive will be displayed under Network

Note: All files and folders placed in OneDrive will automatically sync to the web version 


Snap layouts

Snap layouts are preconfigured ways to organise windows on your screen

  1. Hover over the minimise or maximise button in the upper-right corner of your window to launch the Snap layout box
  2. Select the layout you wish to use

For more information view Windows 11 Snapping article

Themes

A theme is a combination of desktop background pictures, window colours, and sounds.

  1. Click on the Start button
  2. Click on Settings
  3. Select Personalisation
  4. Select Themes
  5. In the Current Theme section, choose a theme to select it
  6. Close the Screen

View Image

Accessibility in Windows 11

To access the accessibility options:

  1. Click on the Start Menu
  2. Click on Settings
  3. Select Accessibility in the panel on the left
  4. Accessibility Options will display

Accessibility Options are listed in three categories:

Vision

  • Text Size
  • Visual Effects (Scroll bars, transparency, etc)
  • Mouse Pointer and Touch
  • Text Cursor
  • Magnifier
  • Colour filters
  • Contrast themes
  • Narrator: This is a screen reader 

Hearing

  • Audio 
  • Captions  (option to turn Audio and Video Captions live on your screen)

Interaction

  • Speech (Allows you to control your device via voice)
  • Keyboard
  • Mouse
  • Eye Control

For more information, please view the Microsoft Accessibility in Windows 11 article

Microsoft Edge

After upgrading to Windows 11, we recommend using Microsoft Edge as your browser. Microsoft Edge offers many benefits, including:

  • Seamless integration with Microsoft products for a smooth user experience.
  • Productivity-enhancing features such as Collections, screenshot tools, advanced search and Copilot Chat.
  • Customization options like vertical tabs for a personalised browsing experience.
  • Chromium-based foundation for compatibility with a wide range of websites and services

For more information, please view the Microsoft Edge article.

Deleting files: OneDrive & Windows 11 Recycle Bins 

The default storage location for files you create using a Windows 11 device is Microsoft OneDrive. Staff are currently allocated 10gb to store files. 

Using File Explorer to access your OneDrive 

  1. Open File Explorer (yellow folder on your task bar) 
  2. Click on your OneDrive Folder in the navigation pane -  it will have a blue cloud icon with your name next to it 
  3. Your OneDrive files and folders will be displayed  
  4. To delete a file, hover over the file, right click and select the Delete Icon
  5. When you open a file from File Explorer it will be synced to your device, the Status column will indicate where the file is synced to: 
  • A green tick in a circle indicates the documents has been synced to your device – the file will be available on your device and in the cloud via office.com 
  • A blue cloud icon next to the file or folders indicates the file has not been synced to your device  

Accessing OneDrive via a browser 

  1. Open a browser and navigate to Office.com, if prompted to sign in, select OneDrive from the app launcher 
  2. Select My Files in the navigation pane, your files and folders will display (the default home view is automatically generated and does not give full functionality)
  3. To delete a file or folder hover over it, right-click and choose Delete
  4. To open a file hover over it, right click and select Open, you will have the choice to Open in a browser Open in app

Recycle Bins 

There are two recycle bins:

OneDrive Recycle Bin 

To access the Recycle Bin log into OneDrive via a browser, click on Recycle bin in the navigation panel.   

The following files will move to this Recycle Bin when deleted: 

  • Files that have been created and edited in the browser 
  • Files that have been synced to your device*  

*These files will also go to the Windows 11 recycle bin.

Files will remain in the OneDrive Recycle Bin for 93 days. If you delete them from the OneDrive Recycle Bin before 93 days, they will move to the second stage Recycle Bin, which acts as a fail-safe. They will remain there for the remainder of the 93 days unless you delete them permanently.

Windows 11 Recycle Bin 

To access the Recycle Bin, click on the Icon on your desktop. 

The following files will move to the Recycle Bin when deleted: 

  • Files that are synced to your device
  • Any other files are stored locally e.g. files in your Download folder

*These files will also go to the OneDrive Recycle bin. 

Locally deleted files will remain here until you empty it. OneDrive files will be deleted after 93 days. 

Syncing 

Syncing means that specified folders on your W11 device are automatically updated to OneDrive in the cloud. This allows you to access to these files via an internet browser through Office.com or mobile app.  When you add, change, or delete a file in your synced folder, these changes are reflected both locally and in the cloud. 

Your Windows 11 device will be set up to automatically sync folders to OneDrive: 
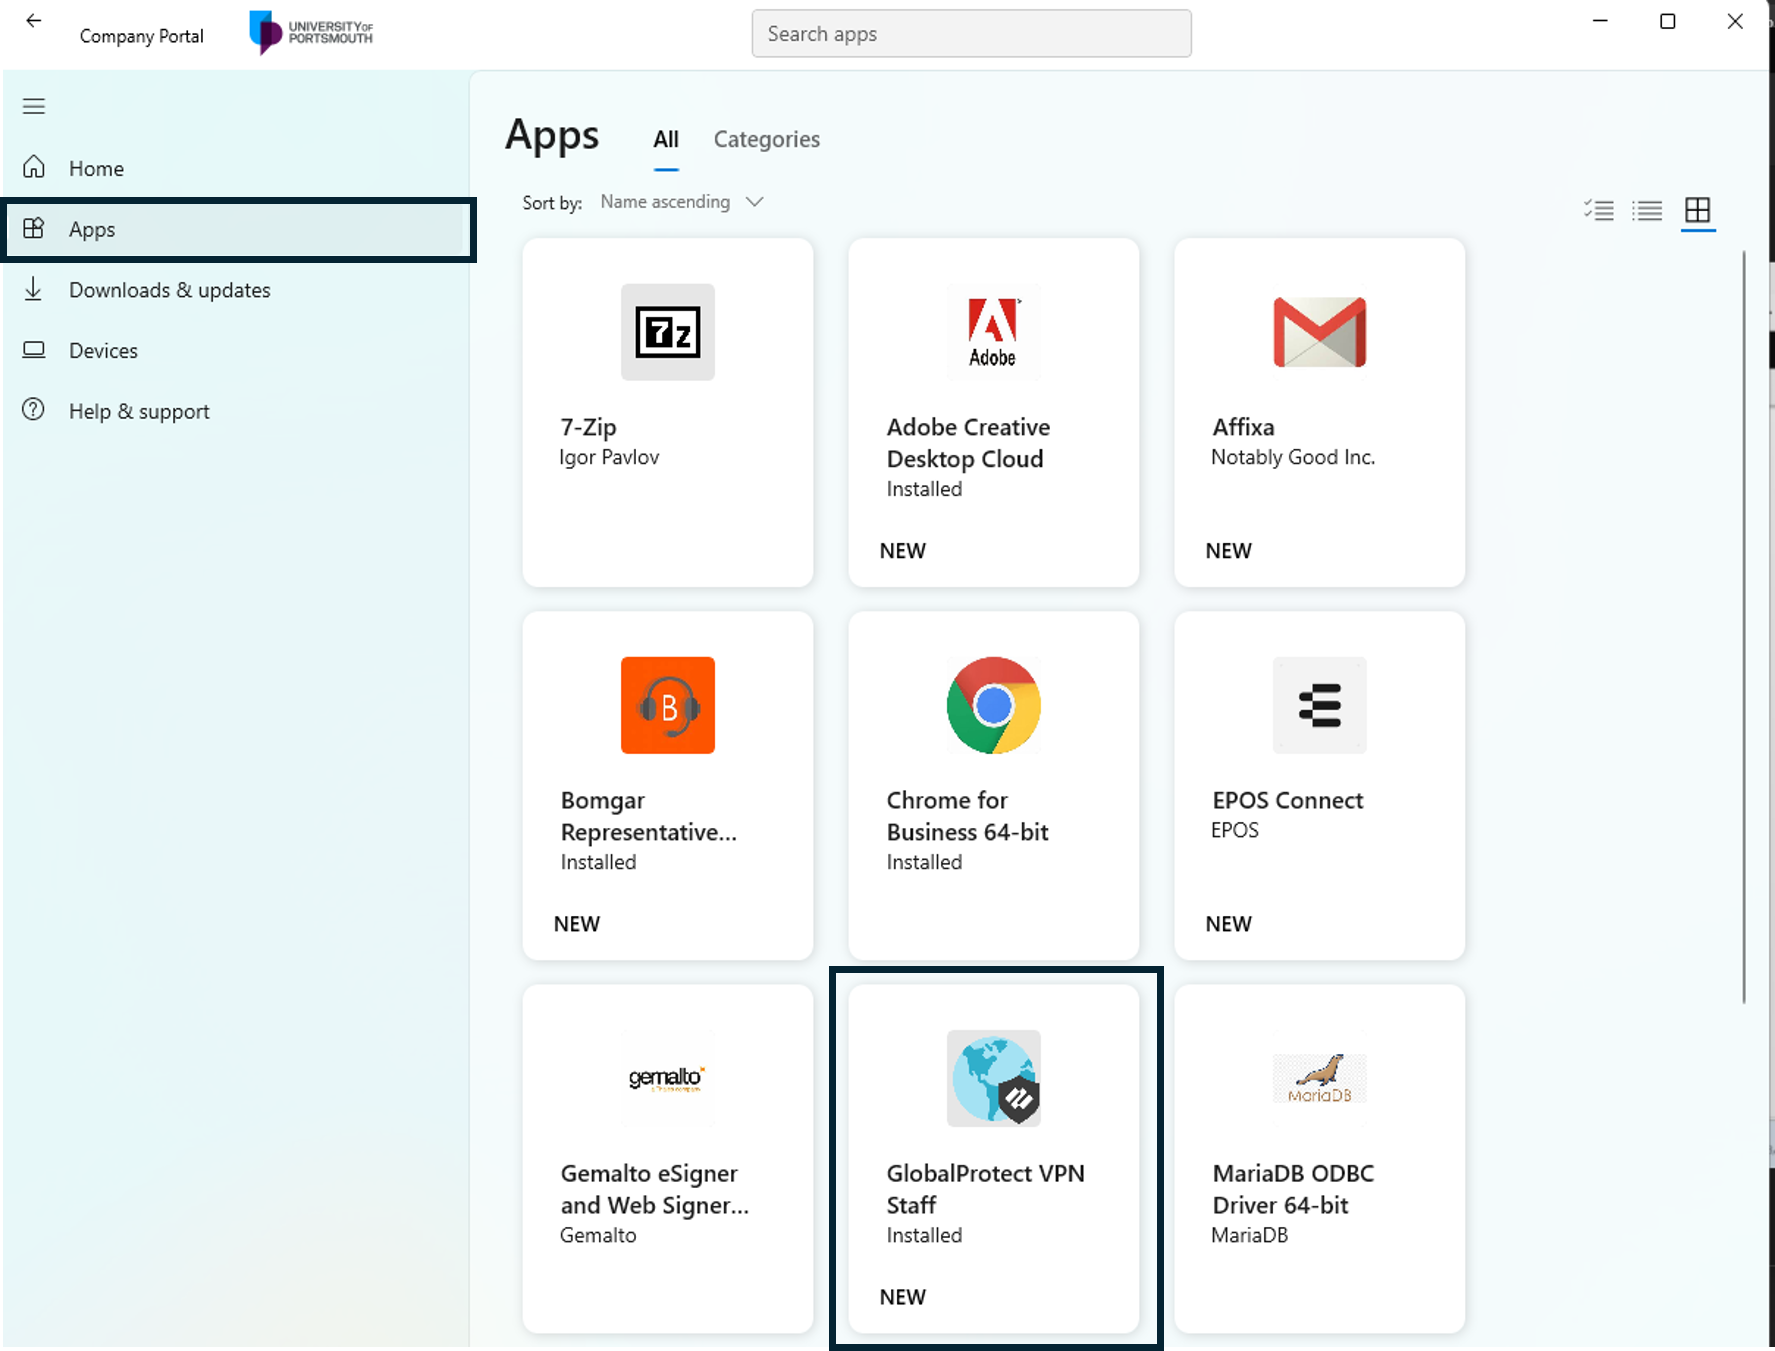
  • Desktop 
  • Documents 
  • Pictures 

Choosing Folders to Sync

  1. Select OneDrive icon in your task bar
  2. Select the Cog
  3. Select Settings
  4. Select Account
  5. Click on the Choose folders button
  6. The Choose Folders screen will display, folders that are greyed out will automatically be synced.  You can select or deselect folders to sync by clicking on the check box next to the folder

Windows FAQ

The Google Drive for Desktop app allows users to access their Google Drive as a G Drive in File Explorer.

However, during testing for Windows 11, the app encountered file syncing errors. Consequently, the project team have decided not to make this tool available. You can however still access Google Drive via your web browser.


Mapping the N drive to File Explorer

Step 1: Connect to the VPN.

  1. Connect to the VPN if you are off site. 

Step 2: Locate and copy your N drive path

  1. Click on the following link to find your N drive location.

  2. A search screen will display type in your username e.g. selwaya and click on the search icon.
  3. A screen will display. In the N Drive column select and copy the Windows path.

Step 3

Choose to create a temporary or permanent connection to the N Drive.

Option 1:  Temporary Connection: This method will disconnect when you log off.

  1. Type Run the search bar and press enter on your keyboard
  2. In the open field, enter: <your N drive location> and click on OK
  3. The N drive will now be available under This PC in File Explorer (it may take several minutes to appear

Option 2: Permanent connection.

  1. Open file explorer
  2. Scroll down and right-click on This PC
  3. Select Map network drive 
  4. In the Drive dropdown field, select N
  5. In the Folder field, paste: <your N drive location> 
  6. Ensure you tick Reconnect at sign-in
  7. Click on Finish
  8. Your N Drive will appear under This PC in File Explorer (it may take several minutes to appear)

Mapping the K drive to File Explorer

NB: you will need to connect to the VPN if you are off-site


Option 1: Direct Connection

This method will disconnect when you log off

  1. Connect to the VPN if off-site
  2. In the search bar, type run and press enter on your keyboard
  3. A run dialogue box will appear
  4. Type in \\sp1\public
  5. Click on OK
  6. Click on Finish, and you will now have the K Drive Available under This PC in File Explorer (it may take several minutes to appear)

Option 2: Permanent connection

  1. Connect to the VPN if off-site
  2. Open File Explorer
  3. Scroll down and right-click on This PC
  4. Select Map network drive from the ... See more menu
  5. Select the Drive Letter K
  6. Click in the folder box
  7. Type in \\sp1\public
  8. Click on Finish
  9. Your K Drive will now appear under This PC in File Explorer (it may take several minutes to appear)

Connecting to the VPN

The process of connecting to the VPN remains the same in Windows 11.

  1. Click on the up arrow in the system tray.  View Image
  2. Select the Global Protect Icon View Image View Image
  3. The Global Protect dialogue box will display Click on Connect View Image
  4. Type your credentials in the SSO 
  5. You may be asked to authenticate
  6. A message will appear informing you that "The site is trying to open GlobalProtect", click on Open View Image
  7. GlobalProtect will connect and the icon will change to blue.

Accessing Wi-Fi on Windows 11

  1. Click on the Wi-FI icon which is located to far right side of the task bar  View Image
  2. Select the Wi-Fi Quick setting, followed by the down arrow
  3. Select the Wi-Fi you wish to connect to

Downloading the Zoom Client

  1. If you are off-site turn on the VPN
  2. On your desktop, click on the Company Portal Icon 
  3. The Company Portal will open; click on the Zoom icon to select it.  View image
  4. Click on Install, the installation may take a few moments.  View Image
  5. You will be notified when Zoom is installed.  View Image
  6. Close Company Portal
  7. Zoom will now be available via the start menu, alternatively, type in Zoom in the search bar
  8. Select Sign in to Zoom
  9. Select sign-in with SSO  View Image
  10.  Fill in the SSO username and password
  11. You may be asked for authentication
  12.  Zoom should open

Opening Zoom automatically when starting your computer

  1. If you want Zoom to open automatically when start your computer
  2. Click on your Profile Icon in Zoom  View Image
  3. Select Settings 
  4. In the General category, select Start Zoom when I start Windows View Image


Changing the location of the Start Button

  1. Right-click on an empty space in the taskbar
  2. Select Taskbar settings
  3. Click Taskbar Behaviours in the right pane
  4. Select the Taskbar alignment drop-down
  5. Change the alignment from Centre to Left

Turn on Dark Mode

  1. Using the search bar at the bottom of the screen, search for the settings
  2. Settings (with a cog)  will appear as a Best Match
  3. Select Personalisation from the left menu
  4. Select Colours
  5. In the Choose Your Mode section, select Dark from the drop-down menu

Adding a printer at home

  1. Select the Start button
  2. Select Settings (ensure the window is opened fully)
  3. Select Bluetooth & devices
  4. Select Printers and Scanners
  5. Select Add Device
  6. Available printers will be displayed

For more information, please view the Add a Printer article

Adding a bluetooth device

  1. Turn on your Bluetooth device and make it discoverable. The way you make it discoverable depends on the device. Check the device or visit the manufacturer's website to learn how.
  2. On your PC, select the Network, Sound, or Battery icons (  ) next to the time and date on the right side of your taskbar.
  3. Select Manage Bluetooth devices on the Bluetooth quick setting, then select your device under New Devices. View image
  4. Follow additional instructions if they appear, then select Done.

  5. Your Bluetooth device and PC will usually automatically connect anytime the two devices are in range of each other with Bluetooth turned on.

For more information, please view the Pair a Bluetooth Device article

Using USB Memory sticks

When you plug in a USB stick/drive, you will get a message informing you:

  • You will need to Encrypt the drive using BitLocker Drive Encryption 
  • Don't encrypt this drive. If you choose this option, you will be able to open files on the drive but you will not be able to save new files on it.

Encrypting your USB Stick/drive

  1. Choose Encrypt the drive using BitLocker Drive Encryption View image
  2. Select Use a Password to unlock this device View image
  3. Type in a Password and Re-enter.  Click on Next
  4. Choose How you want to unlock this device screen will display, select Use Password View Image
  5. You will then be prompted to create a backup for your recovery key. Choose Print the Recovery File (Save to a file does not work as your laptop is already encrypted. View Image
  6. In the next screen, you will be able to select a Printer to print your recover file, if however you choose Adobe PDF you will be able to save the file to your laptop
  7. You will then be prompted to start encrypting your Drive.  Please be aware Encrypting a device may take several hours.


Printing on site

  1. Connect to the VPN
  2. In your taskbar (where you found the VPN) there is a green printer icon, left click on this and then "view my printers"
  3. The staff printer which will need to show as installed is \\printing-app-02\UoP-Printer 
    If there are any issue check for windows updates first, if that doesn't fix it please report to the Service Desk

  1. Open OneDrive in a browser
  2. Select Settings Cog
  3. Select OneDrive Settings
  4. The Notification Settings Panel will display
  5. Use the Toggle button to turn specified notification on or off

OneDrive Notification available through settings