

Microsoft Teams Chat interface

Using Microsoft Teams

Communicate and collaborate with classmates and lecturers all in one place

Microsoft Teams is the University’s all-in-one tool for communication. Use it to chat with classmates, join online meetings, and take part in group discussions. You can access Teams through your web browser or on your mobile device, so you can stay connected wherever you are.

Some lectures and other virtual teaching events may still use Zoom, so check your course information for details.

Key features of Microsoft Teams

  • Chat: Instant messaging for one-on-one or group conversations, with support for emojis and rich text.
  • Meetings & Video Calls: Have face-to-face conversations online with features like screen sharing, background effects, and recording options.
  • Cross-Device Access: Use Teams on desktop, web, or mobile so you can stay in touch wherever you are.
  • Notifications & Activity Feed: Keep track of new messages, meeting invites, and important updates in one place.

Expand the section below to view the instructions and additional information

To help you make the most of Microsoft Teams, we offer free, on-demand courses through LinkedIn Learning. Whether you're new to Microsoft Teams or looking to improve your skills, these courses are designed for students.


Recommended courses

  • Microsoft Teams Essentials Training
    Learn how to set up Teams, manage conversations, schedule meetings, share files, and collaborate effectively across devices..

  • Microsoft Teams Tips and Tricks
    Boost your productivity in Microsoft Teams with time-saving tips, advanced features, and customisation options for chats, meetings, and notifications.


How to access

  1. Visit LinkedIn Learning via the University portal.

  2. Log in with your University credentials.

  3. Search for the Microsoft Teams courses and start learning at your own pace.

These courses are a great way to boost your productivity and stay organised throughout your studies.


Getting set up

Find your way around Microsoft Teams, choose how to access it, set your availability and manage the notifications you receive.

Expand the sections below to view the instructions and additional information

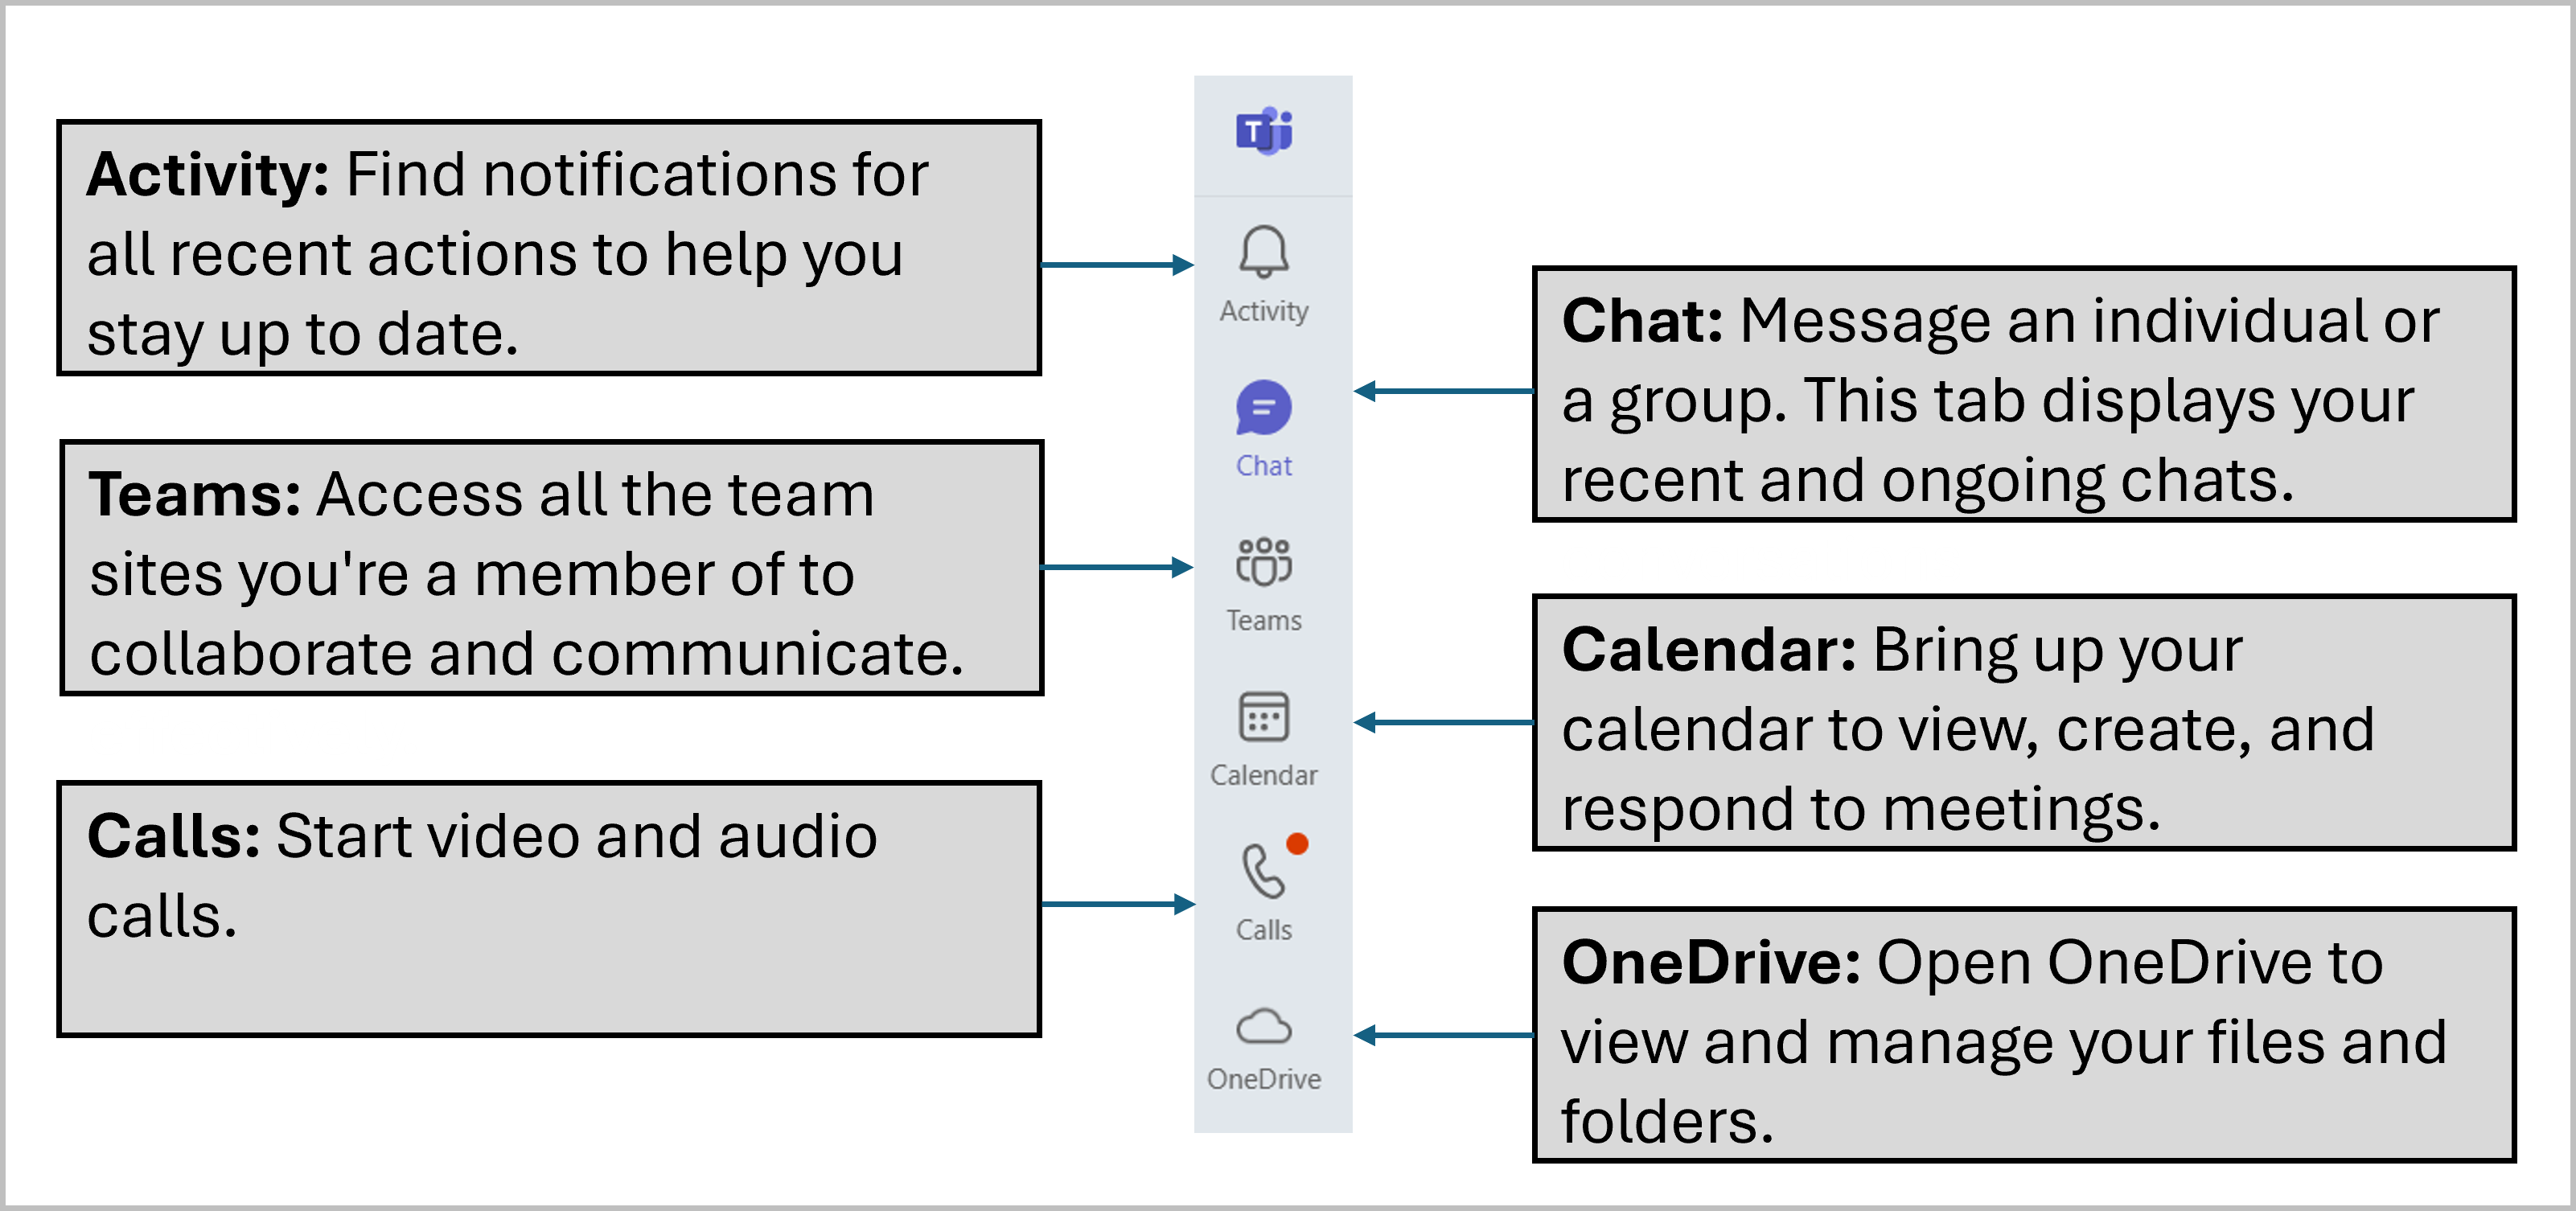
When you open Microsoft Teams, you’ll see the main navigation bar down the left-hand side of the screen. This is your quick access point to everything in Microsoft Teams. from chats and meetings to files and notifications.
 

What's each section for?

  1. Activity: See all your recent notifications in one place, so you can quickly catch up on messages, mentions, and updates.
  2. Chat: Send messages to one person or a small group. This is where your ongoing and recent conversations appear.
  3. Teams: View all the Teams, such as class groups, project spaces, or student societies.
  4. Calendar: Check your schedule, create meetings, and join online sessions. Note: Your Teams calendar is the same as your Outlook calendar, so anything you add or update will appear in both.
  5. Calls: Make quick audio or video calls to classmates or lecturers without needing a meeting link.
  6. OneDrive: Open your University OneDrive to access, store, and manage your files and folders.

Teams Interface

You can access Teams directly from your web browser, making it quick and easy to chat, join meetings, and keep in touch.


Accessing Teams

  1. Open your internet browser (Edge, Chrome etc).

  2. Go to www.office.com.

  3. Sign in with your University credentials.

  4. Select the App Launcher menu from the top of the navigation menu.

  5. Click Teams from the list of available Microsoft 365 apps. This will open in a new browser tab.

You can access Microsoft Teams anywhere by downloading the Teams mobile app from the App Store or Google Play Store.


Download the Teams app

  • Android: Open the Google Play Store, search for Microsoft Teams (purple icon with a “T”), then tap Install.
  • iOS: Open the App Store, search for Microsoft Teams (purple icon with a “T”), then tap Get.


Sign in to your account

  1. Open the Teams app.
  2. Enter your full University email address (e.g. [email protected]) and tap Sign in.
  3. When prompted, enter your University password.
  4. Complete multi-factor authentication using the Microsoft Authenticator app.
  5. Once signed in, your Teams dashboard will appear. Use the bottom menu to access Activity, Chat, Teams, Assignments, and Calendar.

Keeping your Microsoft Teams status up to date lets your classmates, lecturers, and group members know when you’re available, busy, or away. It’s a quick way to help everyone communicate better and plan around each other’s time.

Your status is linked to your Outlook calendar and updates automatically. For example, it will show as Busy if you’ve accepted a meeting or Available (green) if your calendar is free.

Manually setting your status

  1. Click on your profile picture (top-right corner of the Teams window).
  2. Choose the status that best matches your availability:
    • Available: You’re online and ready to chat or collaborate.
    • Busy: You’re working and don’t want interruptions.
    • Do Not Disturb: All notifications are muted.
    • Be Right Back: You’re away for a short time.
    • Appear Away: You’re not actively using Teams right now.
    • Offline: You’re signed out or appearing offline.
  3. To set a time limit for your status, click Duration and choose how long it should last.
  4. Click Done to save your changes.


Adding a status message

  1. Click on your profile picture (top-right corner of the Teams window).
  2. Select Set status message and type your note (e.g. “In the library until 4 PM” or “Group project meeting in progress”).
  3. Tick Show when people message me if you want them to see your note when they start a chat with you.
  4. Choose when you want the message to disappear under Clear status message after.
  5. Click Done to apply it.

Customising your notifications in Microsoft Teams helps you keep up with important updates from lecturers and classmates without getting overloaded with alerts.


Changing your notification settings

  1. Click on Settings (...) next to the search bar.
  2. Select Settings, then choose Notifications and Activity from the menu.
  3. Scroll through the options to adjust how and when you are notified (ex. for messages, mentions, and meetings).

Tip: To mute all notifications temporarily, set your Teams status to Do Not Disturb (see the Setting Your Status section).


Getting email alerts for missed activity

  1. In the same Notifications and Activity settings, scroll to the Missed activity emails section.
  2. Choose how often you want to receive these emails from the dropdown menu (e.g. every 10 minutes, hourly, daily).


Chat and conversations

Start and manage chats, reply to messages, share files, find information and communicate appropriately with others.

Expand the sections below to view the instructions and additional information

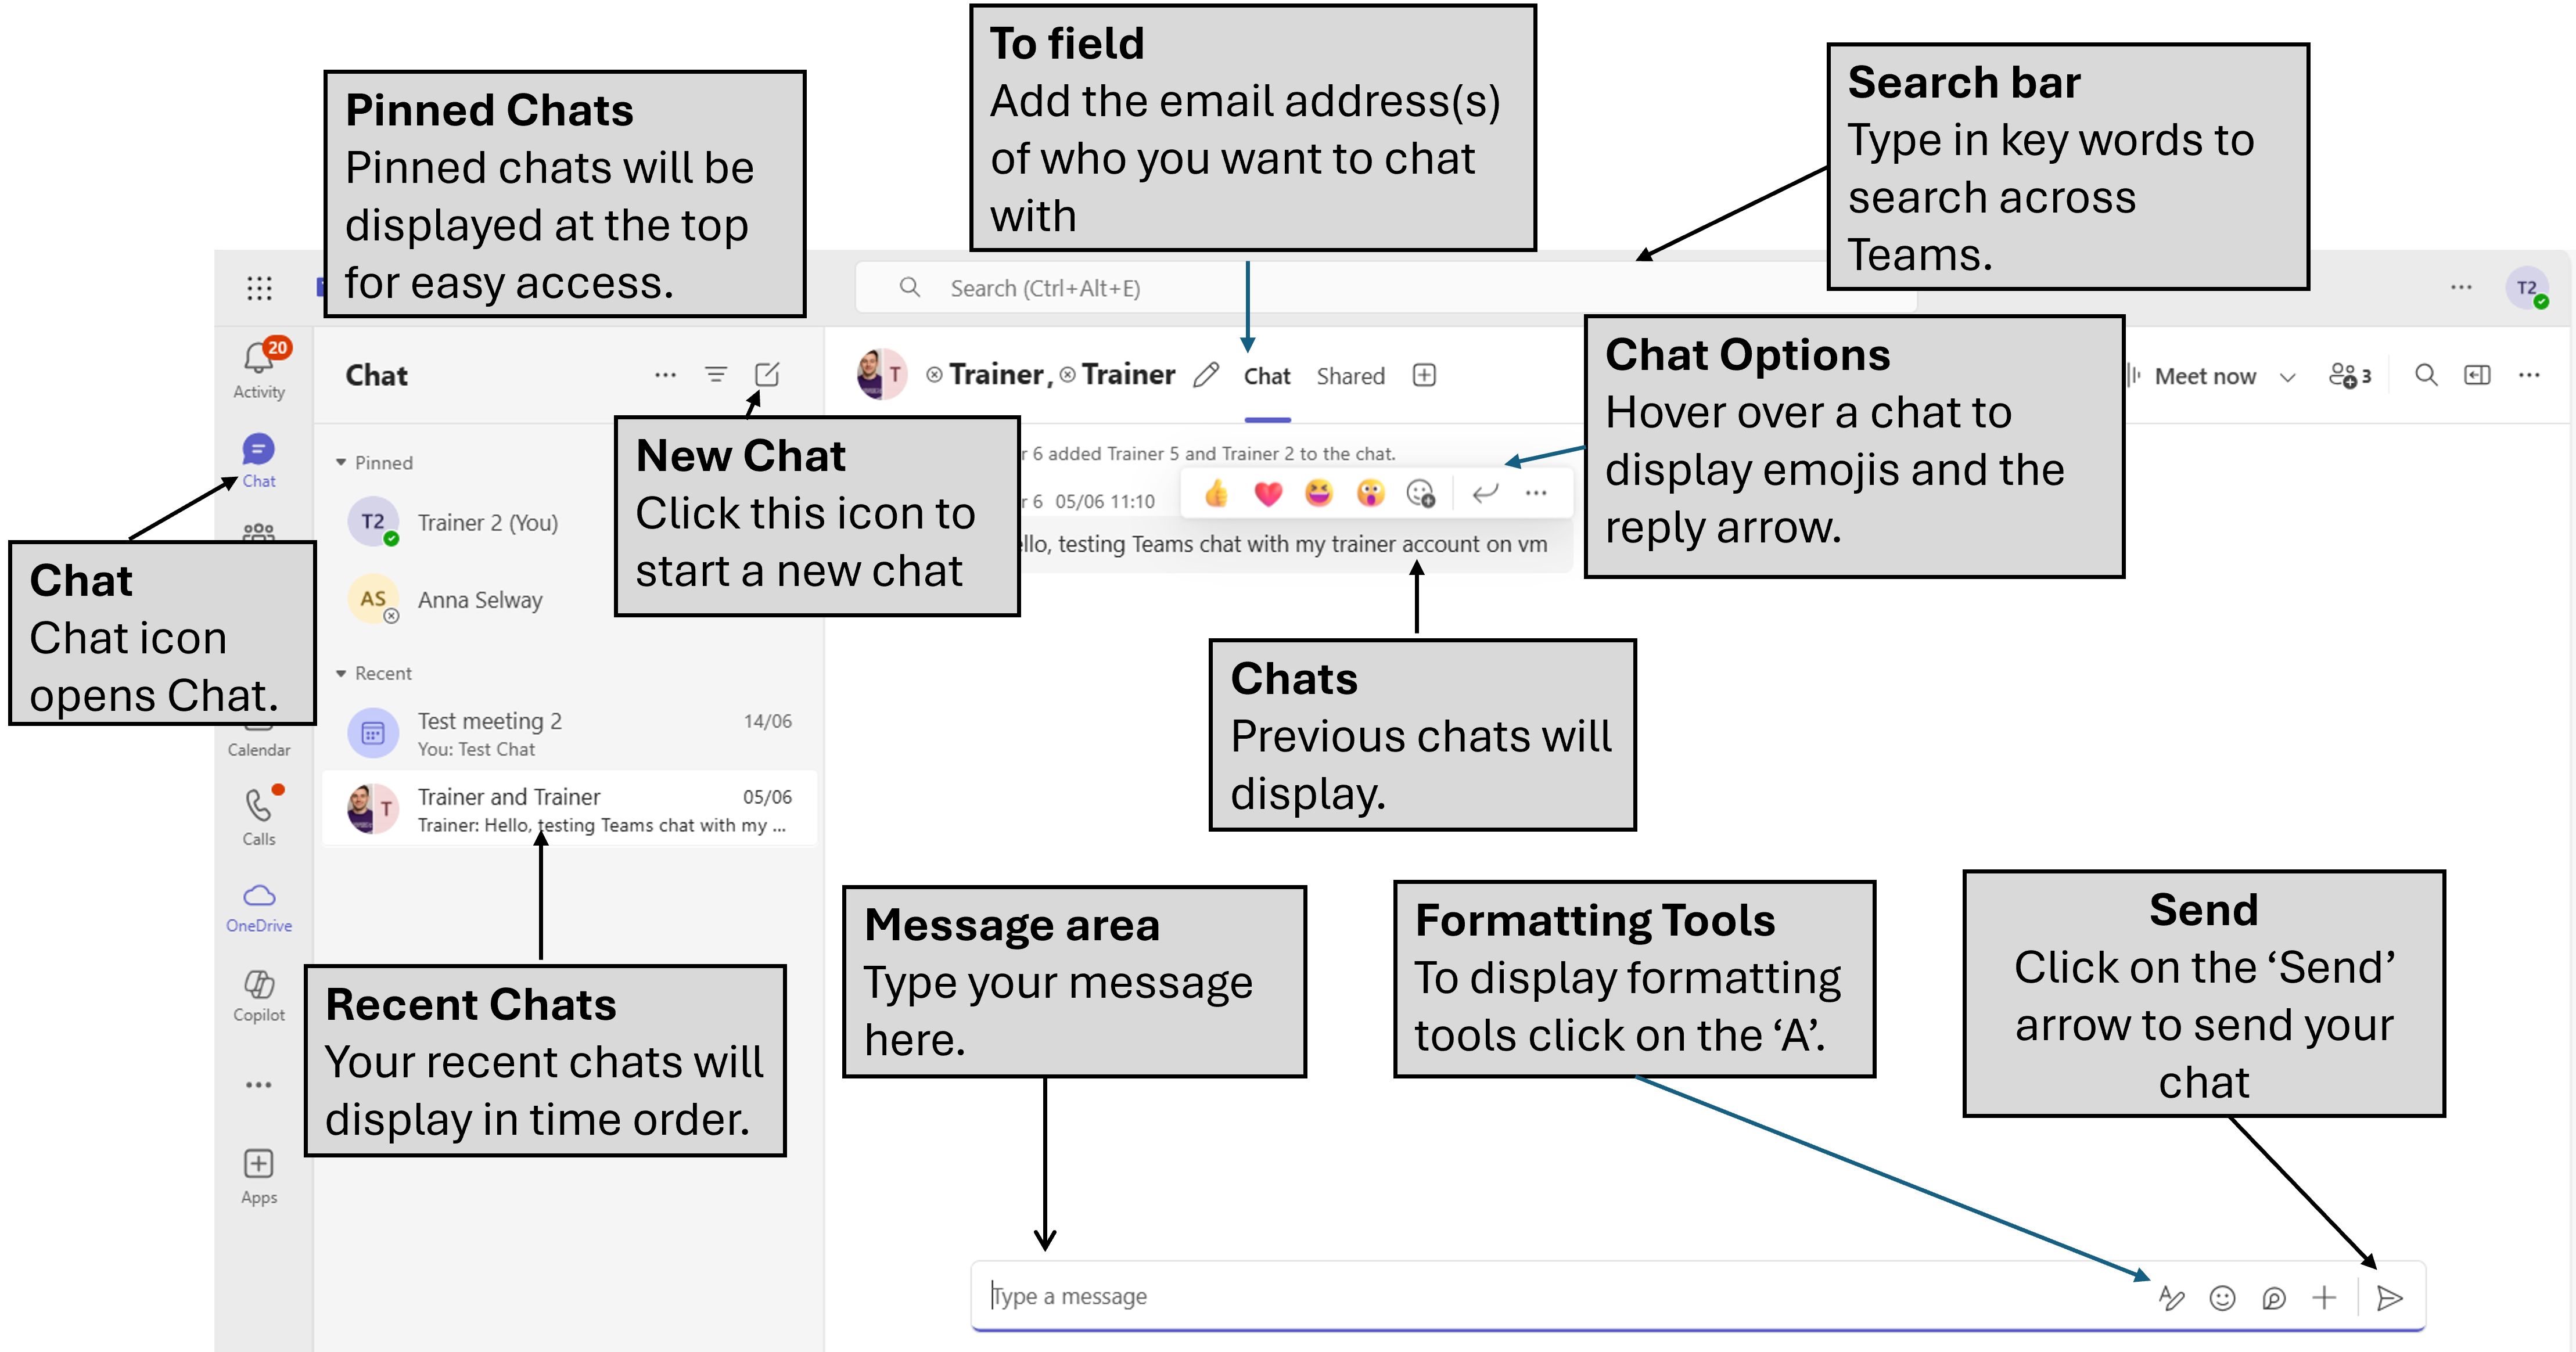
To view this image in more detail, right-click it and select Open image in new tab. You can then zoom in for a closer look. Using a mobile device? Pinch to zoom in and make the image easier to read. 
Microsoft Teams Chat Interface

Chats in Microsoft Teams are a quick way to connect with classmates, lecturers, or project groups. They’re private, great for short conversations, and allow you to share files instantly.


Starting a 1:1 chat

  1. Open Teams and select Chat from the navigation bar.
  2. Click New Message (square with a pencil icon).
  3. In the To field, type the name or University email address of the person you want to message.
  4. Type your message in the box at the bottom of the screen.
  5. Use the toolbar below the message box to:
    • Emojis, GIFs & Stickers – add personality to your messages.
    • Loop Components – create live, editable lists, tables, and checklists everyone can update in real time.
    • Attach a file – share documents or images from your device or OneDrive.
  6. Click the Send arrow to post your chat.


Starting a group chat

  1. Follow steps 1–2 above to open the New Message window.
  2. In the To field, type the name or University email address of the first person, then continue adding more names.
  3. To give your chat a title, click the drop-down arrow in the To field and enter a name (e.g. “History Group Project”).
  4. Type your message, use the toolbar options from step 5 above, and click Send.

Notes:

  • Chats are automatically deleted after 90 days, so don’t store anything important that you might need later.
  • For long-term storage or shared resources, use email or a Teams channel.

Keep chats organised by using Reply with Quote. This shows the original message above your reply, making it clear what you’re responding to.


Reply with quote

  1. Open Teams and go to Chat.
  2. Find the message you want to respond to.
  3. Right-click the message and select Reply with quote from the menu.
  4. Your reply box will appear with the original message quoted above it. Type your reply, then click Send.

You can’t leave a one-to-one chat in Teams, but you can hide it from your Chat panel if you no longer need it in view. This is a useful way to keep your chat list tidy without deleting any messages.


Hide a chat

  1. In the Chat panel, click More options (...) next to the chat.
  2. Select Hide.

Note: The chat disappears from your list but will reappear if the other person messages you.

In Microsoft Teams, you can easily share files in a 1:1 or group chat. This is great for working together on documents, sharing images, or sending resources. You can upload files from your device or link to ones stored in the cloud.


Sharing files

  1. Start a new chat or open an existing one.
  2. Locate and select the Attach Files button (paperclip icon) in the message field.
  3. Choose one of the two options:
    • Attach cloud file – share a file from OneDrive, Teams, or another connected cloud service.
    • Upload from this device – upload a file directly from your computer.
  4. Pick the file you want to share.
  5. Click the Send arrow to post it in the chat.
  6. The file will appear in the conversation and can also be found later in the Shared tab at the top of the chat.

Tip: If you want to share a file from a Team in a private chat, find it in the Team’s Files tab, copy the link, and paste it into the chat. Remember, the other person will need permission to view it. If they’re not a member of the Team, you’ll need to update the sharing settings in OneDrive.

Deleting a chat doesn’t always remove shared files, they may still be accessible through OneDrive. If you need to fully remove access to a file, follow these steps:


Remove chat history

  1. Hover over the chat you want to remove.
  2. Click More chat options (...) and select Remove chat history.


Update file permissions in OneDrive

  1. Open OneDrive and select My files.
  2. Go to the Microsoft Teams Chat Files folder.
  3. Find the file you shared.
  4. Click More actions (...) next to the file and select Manage access.
  5. Under the Links tab, click the bin icon to Remove link.
  6. Confirm that the file will no longer be shared.


Manage or move the file

  1. If you no longer need the file in the chat folder, click More actions (...) and choose Move to.
  2. Select a new location for the file.

For quick acknowledgement in a 1:1 or group chat, react with an emoji instead of sending a full message.


Reacting to a chat

  1. Open the chat and hover over the message.
  2. Click an emoji from the reaction menu (e.g. 👍, ❤️, 😀).
  3. Your reaction will appear on that message for everyone in the chat.

You can favourite important conversations so they stay at the top of your Chat panel for quick access. This is useful for keeping track of your most-used conversations without having to search for them. Chats in your panel are split into two sections:

Favourites – which remain at the top until you move them,

Recent – which show your most recent chats in date order.


Pin your chat

  1. Open Teams and select Chat from the navigation bar.
  2. To pin a chat, right-click the conversation, select Move-to, then Favourites.
  3. To unpin, hover again, right-click, and choose Remove from section.

If a group chat is no longer relevant to you, leaving it can help keep your Chat panel organised. Once you leave, you won’t see any new messages or updates from that conversation.


Leave a group chat

  1. In the Chat panel, click More options (...) next to the chat.
  2. Select Leave.
  3. You’ll stop receiving messages and the chat will be removed from your list.

If you need to locate something you or someone else said in a chat, you can search within that specific conversation. This makes it easy to revisit important details or follow up on previous discussions.


Find a message

  1. Open Teams and select Chat from the navigation bar.
  2. Open the chat you want to search in.
  3. On your keyboard, press Ctrl + F (Windows) or Command + F (Mac).
  4. A search bar will appear at the top of the chat.
  5. Type in a keyword and press Enter.
  6. Browse the results and click any one to jump to that message in the conversation.
  7. Click Exit search (X) when you’re done.

If you’re not sure where something was said or shared, you can use the search bar at the top of Teams to look across all your chats, group chats, and Teams channels at once. This is useful for finding messages, files, or people quickly.


Find what you're looking for

  1. Open Teams and click in the search bar at the top of the screen.
  2. Type a keyword, name, or phrase related to what you’re looking for.
  3. Press Enter on your keyboard.
  4. Browse the list of results, which may include messages, files, and people.
  5. Click any result to open it in the right place within Teams.

Tip: You can filter your results by selecting the tabs above the list (Messages, People, Files, Group chats, and Teams and channels).

Good communication in Microsoft Teams makes group work, projects, and everyday chats run smoothly. Whether you’re messaging one person or the whole class, these tips will help you keep things clear, respectful, and easy for everyone to follow.


Be clear and concise

  • Before sending a message that needs a quick response, check the person’s status. If they’re busy, they might not reply straight away.
  • Keep messages short and to the point – long blocks of text can be hard to read and might be better suited to an email.
  • Try to put your point in one short paragraph rather than lots of separate lines.


Keep it professional and respectful

  • Be mindful of your tone – read your message back before sending to make sure it’s clear and can’t be misunderstood.
  • Avoid writing in ALL CAPS (it can feel like shouting) and use emojis in moderation.
  • Respect people’s time – if someone is set to Do Not Disturb, save non-urgent messages for later. Use the “urgent” tag sparingly.


Manage your availability

  • Update your status to show if you’re available, busy, or away. This helps others know when they can expect a reply.


Be inclusive in group chats

  • Make sure everyone who needs to be involved in the conversation is included.
  • If you add someone new to an existing chat, remember they may be able to see previous messages depending on the settings – so add with care.


Think before you send

  • Double-check spelling and wording to avoid confusion.
  • If you wouldn’t say or do something in a face-to-face meeting, don’t do it in Teams.


Use reactions wisely

  • A quick thumbs-up is a great way to say “okay” or “got it” without sending another message.
  • Other reactions (love, laugh, wow, etc.) can add personality but should be used appropriately based on the group’s tone.
  • GIFs and stickers can make things fun – just keep them relevant to the conversation.


Calls and meetings

Start calls, join scheduled meetings and understand the key features and expectations for taking part.

Expand the sections below to view the instructions and additional information

When you’re chatting with someone in Teams, you can instantly start an audio or video call without leaving the conversation. This is a quick way to talk things through in real time instead of typing back and forth.


Start your call

  1. While in your chat, go to the top right corner of the screen.
  2. Click the small drop down arrow next to the telephone icon in the top right corner. This gives two options to choose from:
    • Audio call – for a voice-only conversation.
    • Video call – to speak face-to-face on camera.
  3. The call will start immediately. The other person’s device will ring and they’ll see a notification inviting them to join.

Tip: You can only call people who are part of your organisation or whose contact details are saved in Teams.

Meetings scheduled in Teams appear in your calendar, where you can review the details and join at the scheduled time. Before entering, you can check your microphone, camera and background settings so you are ready to take part.


Join a meeting

  1. Open Teams and select Calendar in the left menu.
  2. Click the meeting in your calendar, then select Join.
  3. Choose your microphone, camera, and background settings on the screen that appears.
  4. Click Join now to enter the meeting.

Tip: You can also join when a pop-up reminder appears, just click Join and you’ll go straight to the meeting.

Whether you’re joining a lecture, group project catch-up, or a one-to-one tutorial, following some simple meeting etiquette can make your Microsoft Teams meetings more productive and enjoyable for everyone. These tips will help you stay professional, avoid distractions, and make sure every voice is heard.


  • Check your setup: Use a headset for clearer audio and test your microphone and speakers before joining.
  • Pick a quiet spot: Reduce background noise so everyone can focus on the discussion.
  • Look professional on camera: Turn your camera on to show you’re engaged, and use background blur or a simple image to avoid distractions. If your connection struggles, you can switch video off.
  • Be ready to contribute: Use the meeting chat to share links, ask questions, or add comments without interrupting the speaker.
  • Raise your hand: Use the ‘Raise hand’ feature before speaking to keep conversations orderly.
  • Mute when not speaking: This avoids background noise like typing, coughing, or shuffling papers.
  • Use reactions: A thumbs-up or clap emoji can show approval or agreement without breaking the flow of conversation.
  • Share your screen or files: Use screen sharing, file sharing, or PowerPoint Live to present your ideas clearly.
  • Respond to invites: Always accept or decline meeting requests so organisers know who will attend.

Remember: Background noise, side conversations, or unnecessary movement can distract others. Treat online meetings with the same respect as in-person ones.


Working smarter

Use shortcuts, mentions, scheduled messages and links to communicate more efficiently and get more from the platform.

Expand the sections below to view the instructions and additional information

/Slash commands are a quick way to get things done in Microsoft Teams without having to click through menus. Just type a forward slash (/) into the search bar at the top of Teams or into a chat box, then choose from the list or start typing a command you know.

They’re great for saving time and making everyday tasks faster. Here are some handy ones you might use as a student:

  • /brb – Set your status to "Be right back".
  • /call – Start an audio or video call with someone.
  • /chat – Open a chat and send a quick message.
  • /goto – Jump straight to a specific chat or channel.
  • /meetnow – Start or join a quick meeting instantly.
  • /loop – Add a collaborative Loop component, like a live paragraph everyone can edit.
  • /offline – Set your status to appear offline.
  • /settings – Open your Teams settings menu.

Tip: There are lots more commands to explore – type / into the search bar to see the full list.

@mentions are an easy way to grab someone’s attention in a busy chat or channel. Without them, your message could get lost among other notifications.


What you can @mention

  • Individual – Notifies one person directly (ex. @Alex).

  • Everyone – Notifies all members of the chat (ex. @Everyone)

  • Tags – Custom groups set up in the Team settings (ex. @ProjectLeads) so you can notify specific people without alerting the entire team.


Use @mentions politely

  • Be specific – Use @mentions to direct your message to the right person. For example: @Jordan, can you upload the latest draft?
  • Don’t overuse – Avoid tagging everyone for non-urgent updates. Save group tags for important announcements.
  • Be respectful – Think before tagging people outside of normal hours, as it will send them a notification.
  • Follow up – If someone doesn’t reply, they may have missed the alert. Send a polite reminder if needed.

Tip: You can type @ anywhere in a message to see a list of people, channels, and tags you can mention.

You can schedule messages in Microsoft Teams so they’re sent at a specific date and time. This is handy if you want to plan announcements, send reminders, or make sure your message arrives at the best time for your classmates or lecturers.


Before you schedule

  • Don’t overdo it – Keep scheduled posts balanced so you’re not flooding a chat or channel.
  • Check back later – Make sure your scheduled message has been sent and that people have seen it.
  • Final step matters – Remember to click Post (channels) or Send (chat) after scheduling, or your message won’t go out.


Scheduling a message in a channel

  1. Open the team and channel where you want to post.
  2. Type your message in the message box.
  3. Click Actions and apps (+) on the left of the message box.
  4. Select Schedule message.
  5. Choose the date and time you want it posted.
  6. Click Continue, then Post to confirm.


Scheduling a message in a chat

  1. Open the 1:1 or group chat where you want to send your message.
  2. Type your message in the message box.
  3. Click Actions and apps (+) on the right of the message box.
  4. Select Schedule message.
  5. Choose the date and time you want it sent.
  6. Click Continue, then Send to confirm.

Tip: Scheduled messages can be edited before they’re sent – just open the draft and make your changes.

Still need help?

If you need a hand with Teams, the Service Desk can help with access, chats, calls and meetings.

Contact the Service Desk

Enable University alerts

Turn on notifications for critical updates like closures, safety alerts, and urgent service disruptions.