Image

Microsoft Teams was introduced in 2025 as the University’s primary tool for collaboration and teamwork. For migration details, see Migration from Google to Teams at the bottom of this page.
As part of the Modern Work Programme supporting the move from Google to Microsoft tools, Phase 1a (Personal Productivity) introduced Microsoft Teams for chat and virtual meetings, replacing Google Chat and Google Meet, with Outlook calendar access for joining meetings.
Phase 1b (Connected Collaboration), planned for later this year, will introduce Teams and Channels, providing shared collaborative workspaces to support teamwork and document sharing.
Need more help? This guide provides an overview of Microsoft Teams, but you can explore further by starting with the Essential Teams Chat and Meetings training in Docebo.
If you have a quick question, you can chat with your Digital Superhero or post in your Teams Launch Community. For one-to-one support, book a session on the M365 WoW sessions page and choose “How-to Guidance.”
Use the sections below to expand and view more information
The following course is available through the 'Modern Work Programme Learning Plan: Essential Training for M365' which is located on Docebo. The course has been designed to help you build confidence and capability with Microsoft Teams:
Note: The transformation project is being delivered in batches. You will gain access to the Learning Plan approximately one week before your migration date.
If you need assistance finding these courses email [email protected].
As a member of staff you currently have access to LinkedIn Learning. For information on how to access LinkedIn Learning view this article.
Once you migrate, you’ll be added to a Launch Community team for your department or faculty. Inside, you’ll find a Q&A Support channel, which is a dedicated space where you can ask questions or share any observations about the migration process. Colleagues and support staff can reply directly to your posts, helping you get the answers you need.
Use the sections below to expand and view more information
An introduction to Teams from Microsoft.
Microsoft Teams is a collaboration and communication tool that supports groups of people working together. Teams is useful for:
Be aware:
Teams is an auditable system. Posts and chat conversations are disclosable in the event of a Freedom of Information or Subject Access Request.
Please note: You will not have access to the full functionality in Teams until Phase 1b: Connected Collaboration.
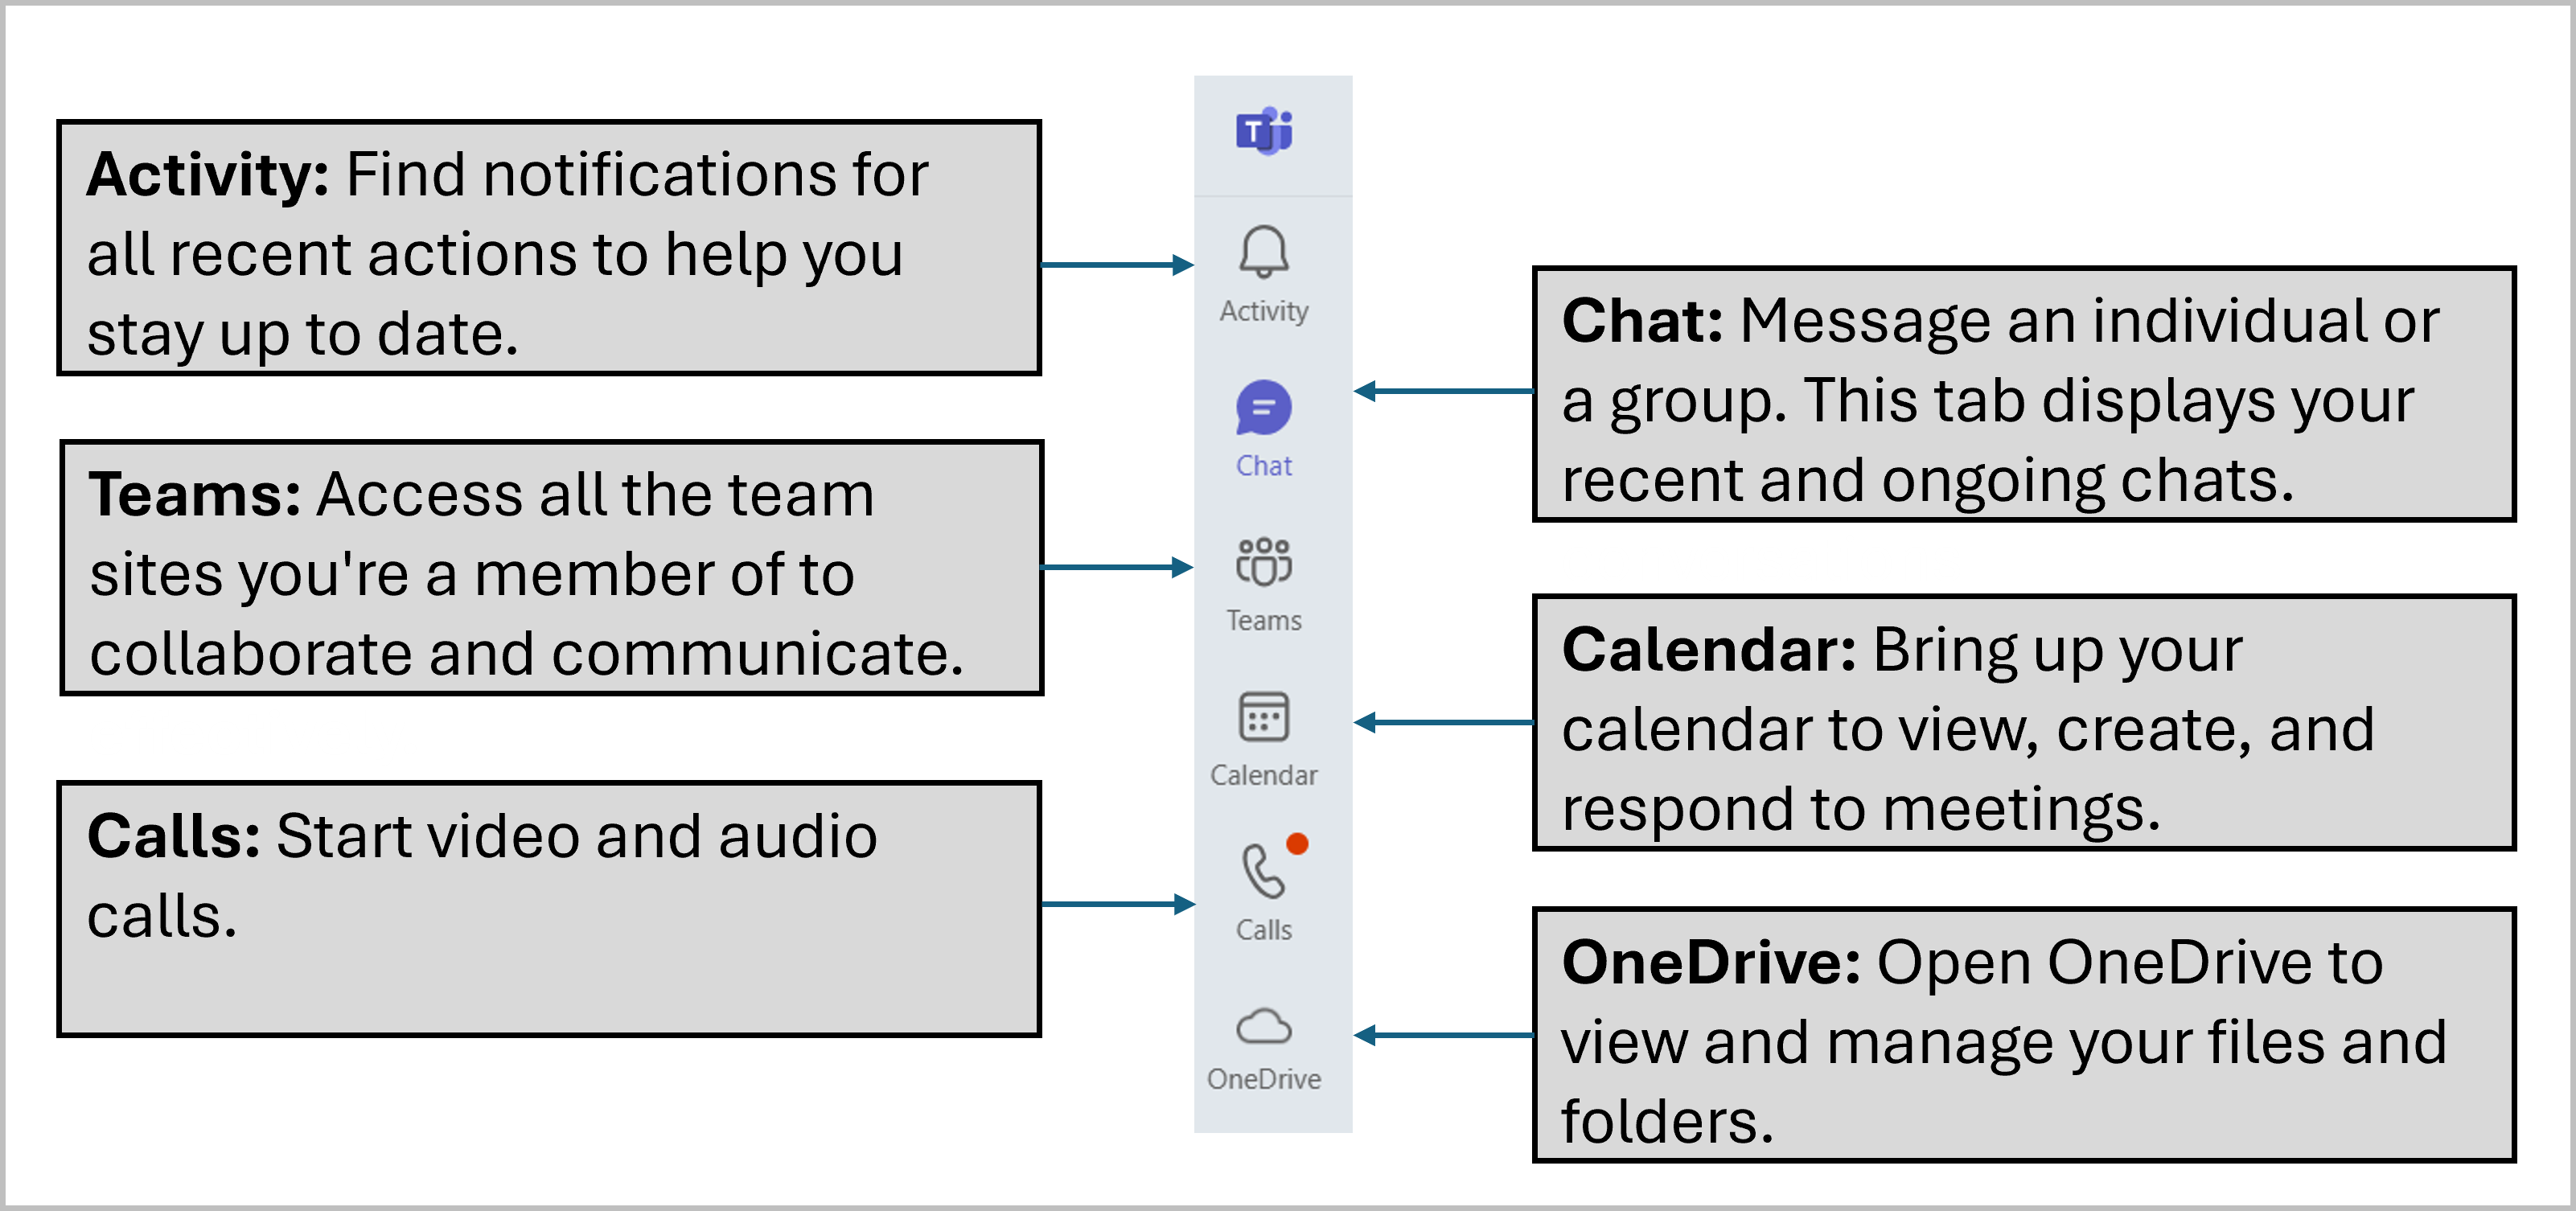
When you open Microsoft Teams, you'll find the navigation bar on the left-hand side of the screen. This is your main access point to the app's features and tools. It includes the following sections:
You can access Teams using any internet browser by going to office.com.
On Windows 10, Microsoft 365 apps (including Teams) are only available via the browser..
On Windows 11, the recommended browser is Microsoft Edge, which works seamlessly with Microsoft 365 and Teams.
To open Teams on the web:
Open your internet browser (Edge, Chrome etc).
Go to www.office.com.
Sign in with your University credentials.
Select Apps from the left-hand menu.
Click Teams from the list of available Microsoft 365 apps. This will open in a new browser tab.

Keeping your status up to date in Microsoft Teams helps colleagues know your availability and improves communication across your team.
Your status is automatically linked to your Outlook calendar and updates based on your meeting responses, for example, it will show as 'Busy' if you’ve accepted a meeting, 'Available' (green) if your calendar is clear, and it will reflect 'Out of Office' if you’ve set that in your calendar.
Click on your 'Account Manager' (profile picture) in the top-right corner of the Teams window.
A pop-up form will display which allows you to set your status:
Customising your notification settings in Teams helps you stay informed without being overwhelmed.
Note: To silence all notifications, set your Teams status to 'Do not disturb' (refer to the instructions in the Setting Your Status section).
To set up an email alert for missed activity in Teams, follow these steps:
If you would like further information, please refer to the Teams section of our Managing Microsoft 365 Notifications article.
The Zoom plugin allows you to create Zoom meetings directly from your Outlook or Teams calendar. This means you can schedule the calendar invite as normal, while the plugin creates the meeting in Zoom and adds the Zoom joining details to the invite.
The plugin is being rolled out in phases. When it is available to you, the Zoom drop-down will appear at the top of the meeting window. If you do not see the Zoom drop-down, the plugin has not yet been made available to you.
In Outlook or Teams Calendar, create a new meeting. You can do this by selecting New in the top left corner, or by double-clicking the time slot you want to use.
In the top ribbon, select the Zoom drop-down and choose Add a Zoom Meeting.
If you are prompted to display Zoom in a new window, select Allow.
From the login screen, scroll to the bottom and choose SSO. Do not enter your login details on this screen.
In the company domain section, enter port-ac-uk and select Continue.
You will be taken to the University login screen. Enter your University username and password.
Complete any required MFA, such as a text code or Authenticator app approval.
You may be shown another login screen. If this appears, enter your University details again.
Once authentication is complete, the final window will confirm that you have successfully signed in to Zoom using SSO.
In Outlook Calendar, create a new meeting. You can do this by selecting New in the top left corner, or by double-clicking the time slot you want to use.
Enter the necessary meeting details, such as the title, attendees, date and time.
In the top ribbon, select the Zoom drop-down and choose Add a Zoom Meeting. The Zoom meeting details, including the meeting link, will be added to the invite.
To edit Zoom meeting details, such as audio and video settings, select the Zoom drop-down again and choose Settings. A panel will appear on the right side with the available options.
When you are happy with the meeting details, select Send. The event will appear in everyone’s calendar as normal.
To join the Zoom meeting, open the meeting event in your calendar and select the Zoom meeting link. This may look something like https://port-ac-uk.zoom.us/...
The link will open Zoom, and you can join the meeting in the usual way.
Teams Chat
Starting a 1:1 chat in Microsoft Teams is a quick and easy way to connect directly with a colleague for private messaging and collaboration.
Emojis, GIFs, and Stickers: Add personality and expression to your messages using built-in emojis, animated GIFs, and fun stickers.
Loop Components: Create live, collaborative content (like checklists, tables, or task lists) directly in a chat or channel message, allowing everyone to edit in real time. More training is being developed on Loop.
Actions and Apps: Includes additional functionality such as 'Schedule message' and 'Attach a file'.
Note:
Visit the Modern Work information Site for more details on what tool to use when.
To keep your posts and their associated conversations together and easy to follow, always select ‘Reply’ when responding to an existing post.
It is not always necessary to reply to a chat. Instead, you can react with an emoji to indicate you have read the message
Be aware:
Writing a response as a new post can get lost in the thread and may confuse other members. If you accidentally create a new post instead of replying, delete it and re-post your message as a reply in the correct place.
Microsoft Teams makes it easy to start a conversation with multiple people at once.
Note:
Visit the Modern Work information Site for more details on what tool to use when.
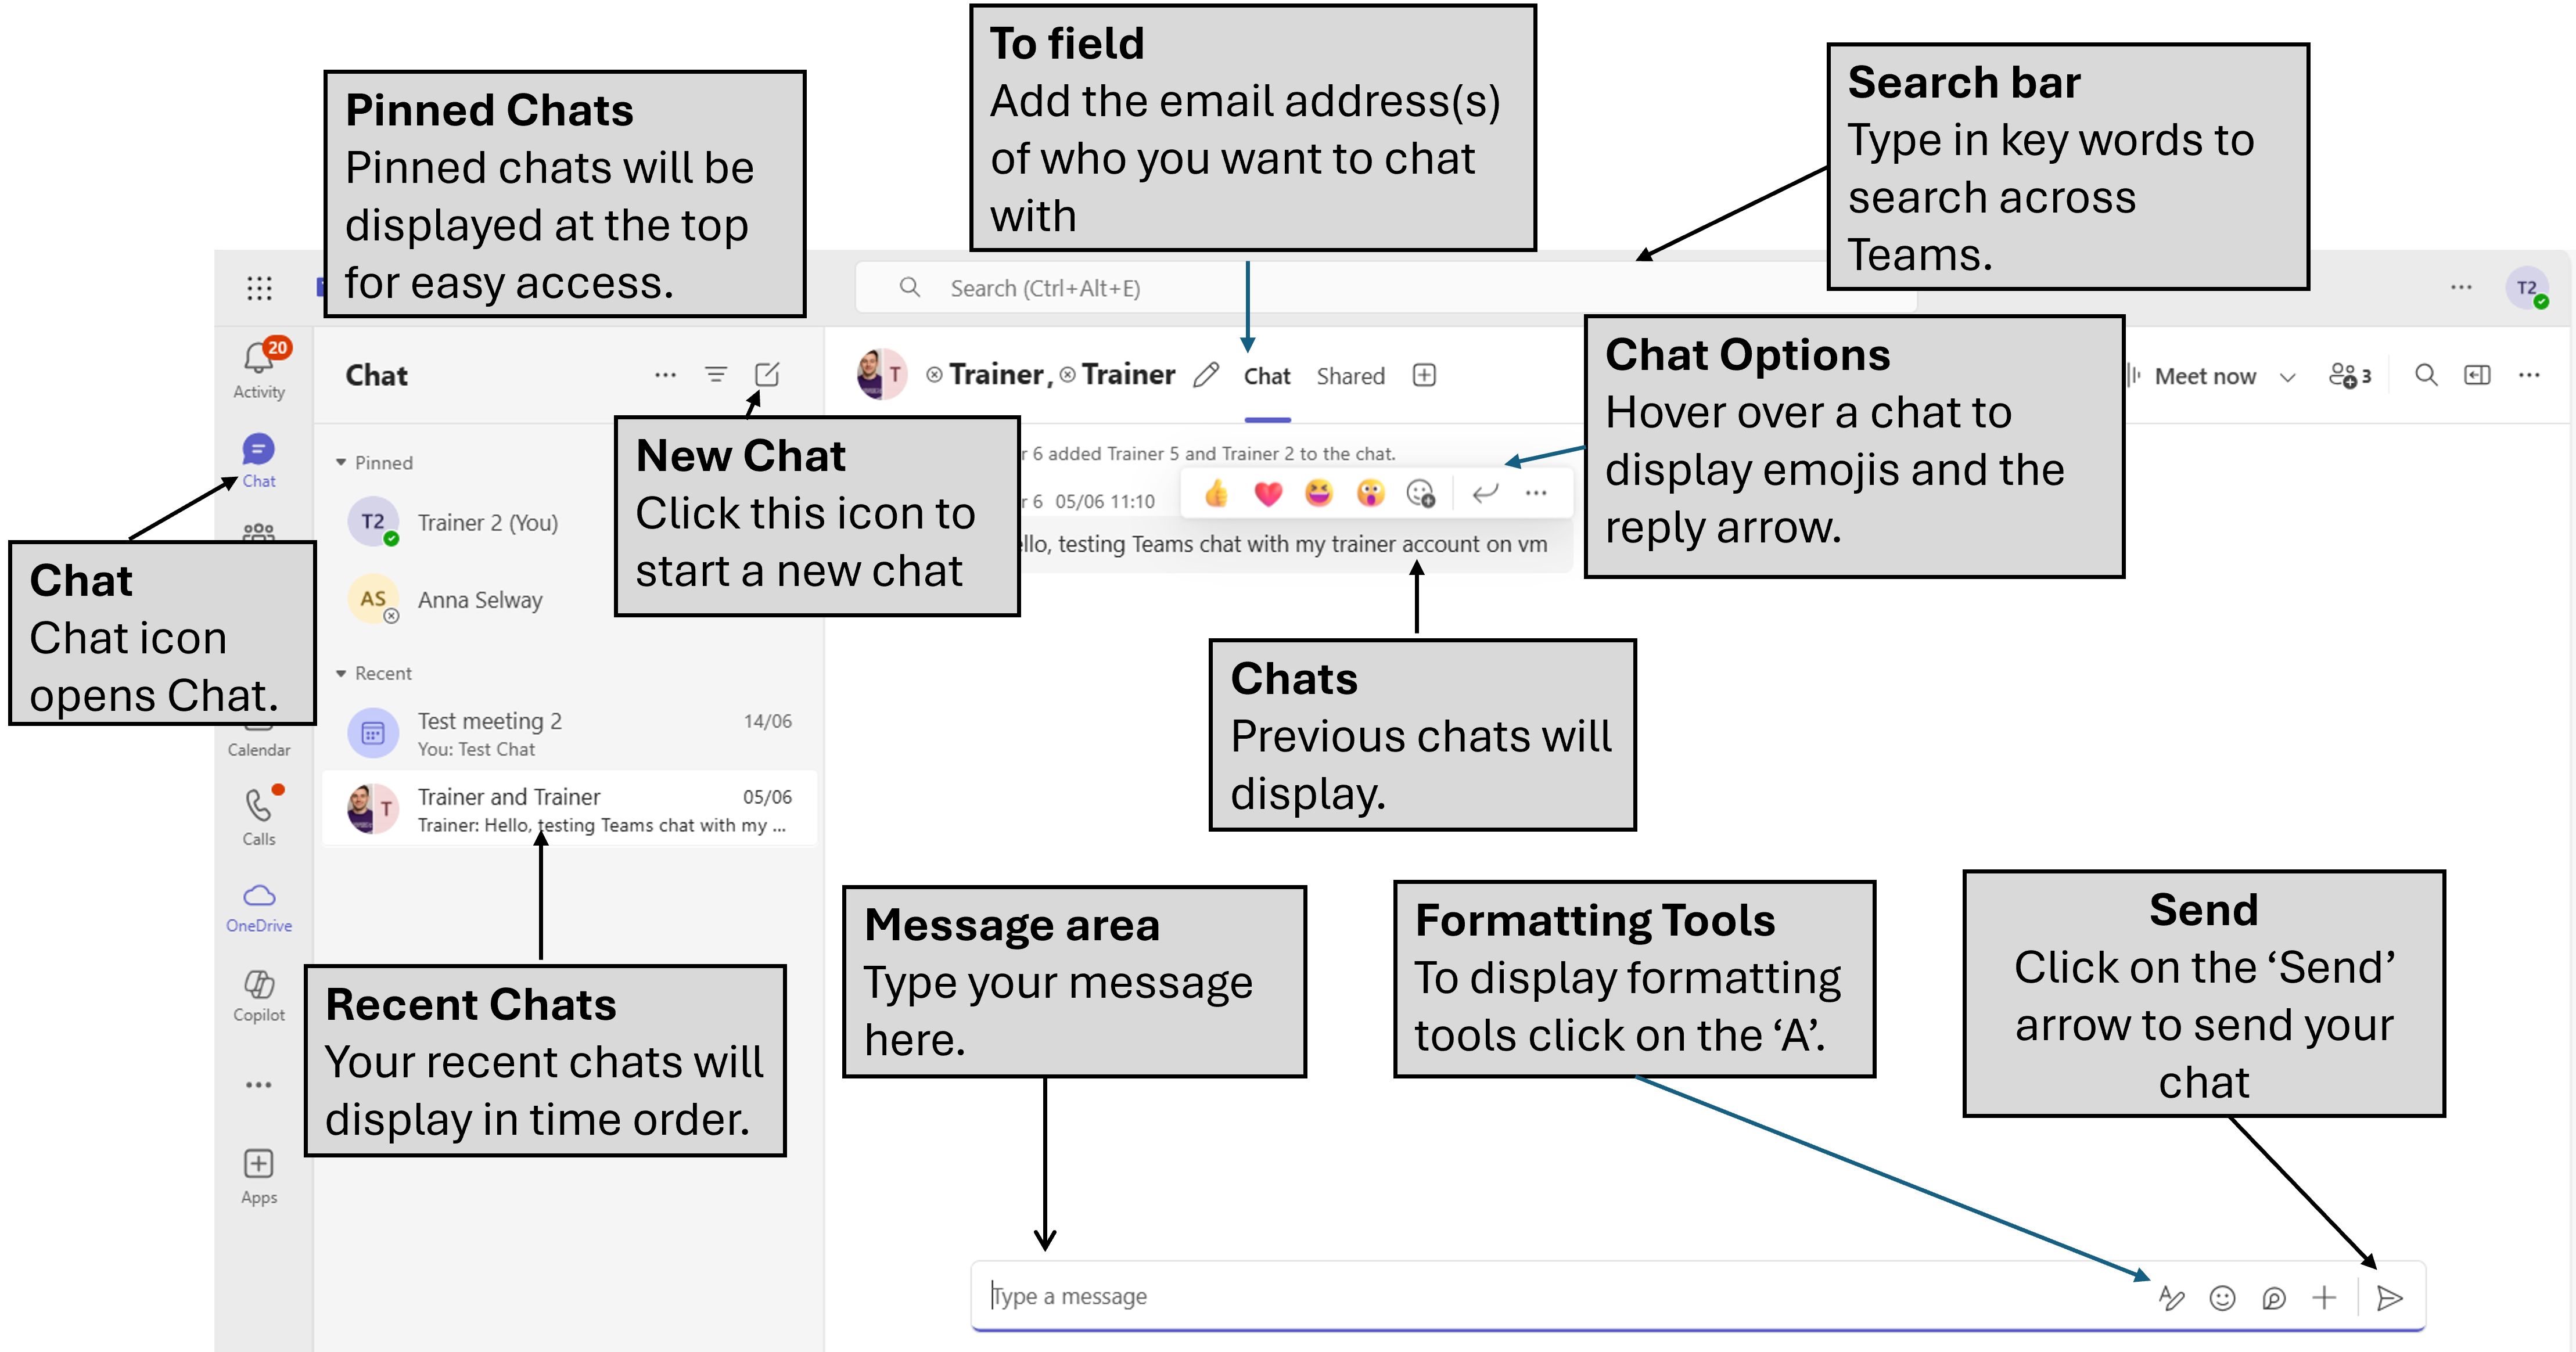
The Chat panel in Microsoft Teams helps you manage and organise your conversations efficiently.
Your conversations will appear in the Chat panel, which is divided into two sections:
While you can't leave a one-on-one chat in Teams, you can hide it from view. For group chats, however, you have the option to leave the conversation entirely.
If you're trying to locate a specific message in a chat, Microsoft Teams allows you to search within individual conversations. This is especially helpful when you need to quickly find past information or follow up on a previous discussion.
If you are looking for a message, file, or keyword across all your Teams and chats, the global search bar at the top of the screen makes it easy to find what you need.
Note: You can also filter your results by selecting the tabs at the top of the results: Messages, People, Files, Group chats, and Teams and channels.
Using emojis is a quick way to indicate acknowledgement, approval, or appreciation of a chat. The thumbs-up icon is the equivalent of saying 'okay'.
Clear, respectful, and concise communication is essential for productive collaboration in Microsoft Teams. Whether you're sending a quick message or participating in a group chat, following a few simple etiquette guidelines can help ensure your messages are well-received and your intent is understood. The tips below will help you communicate more effectively, maintain professionalism, and foster a positive and inclusive team environment.
Microsoft Teams makes it easy to share files directly within a chat, whether you're collaborating one-on-one or in a group. You can upload documents from your device or link to files stored in the cloud.
Note: You can share a file from a Team in a Teams chat by first locating the file in the relevant Team channel (under the Files tab), copying the link, and then pasting it into the chat. You cannot directly browse Team files from a private chat, but you can download the file from the Team and upload it manually into the chat if needed. The file recipient will also need to be a member of the team to view the document, if they are not a member you will need to add them to the file permissions.
While you can delete a chat from your view in Microsoft Teams, any files shared within that chat may still be accessible to others. To fully manage access, especially for sensitive or outdated files, you’ll also need to update sharing permissions in OneDrive. Follow the steps below to remove a chat and restrict file access:
Teams Meetings
If you are in chat with someone, it is easy to start an audio or video call with them.
You can schedule Teams meetings and virtual internal calls from either your Outlook or Teams calendar. The meeting will display in both.
The Scheduling Assistant in Teams is a powerful tool designed to help you find the best time for meetings by checking the availability of all attendees.
When creating meetings in Outlook, the creator has the option to make the meeting a Microsoft Teams meeting. The following options are available for Teams meetings:
|
Meeting option |
What it does |
|---|---|
|
Who can bypass the lobby? |
Decide who gets into meetings directly and who should wait to be let in by using the lobby.
|
|
People dialing in can bypass the lobby |
Turn the People dialing in can bypass the lobby toggle on to allow anyone joining your meeting by phone to enter without waiting in the lobby. |
|
Who can admit from the lobby? |
Choose who can let people into your event from the lobby. By default, organizers, co-organizers, and presenters can admit people from the lobby. |
|
Announce when people dialing in join or leave |
Turn the Announce when people dialing in join or leave toggle on to receive alerts when people calling in by phone join or leave your meeting. |
|
Require unverified participants to verify their info before joining |
When you turn on the Require unverified participants to verify their info before joining toggle, unverified participants will receive an email with a one-time passcode they'll need to enter to join the meeting. |
|
Meeting option |
What it does |
|---|---|
|
Choose co-organisers |
After you invite people to your meeting, add co-organisers to give them most organiser capabilities.
|
|
Who can present |
See Roles in a Teams meeting for details about selecting presenters and changing someone's role before and during a meeting. . |
|
Enable language interpretation |
Turn on the Enable language interpretation toggle to add a professional interpreter to your meeting who can instantly translate the speaker’s language into another in real-time. |
|
Meeting option |
What it does |
|---|---|
|
Enable Green room |
The Green room allows organizers and presenters to join an event while attendees wait in the lobby.
|
|
Meeting option |
What it does |
|---|---|
|
Allow mic for attendees |
Turn the Allow mic for attendees toggle on or off to change attendee mic permissions.
|
|
Allow camera for attendees |
Turn the Allow camera for attendees toggle on or off to change attendee camera permissions. |
|
Meeting chat |
Change this setting to let attendees chat anytime, during a meeting only, or not at all. By default, anyone invited to a meeting can participate in the meeting chat before, during, and after the meeting. |
|
Q&A |
Enable Q&A to allow attendees to ask questions, post replies, and post anonymously during a meeting. Q&A can be unmoderated or moderated by meeting co-organisers. |
Allow reactions |
By default, attendees can send live reactions during a meeting to express how they feel about what’s being shared. |
Allow attendance report |
Attendance reports contain meeting attendance details, including how long attendees stayed, and how long your meeting lasted, and more. Turn on the Allow attendance report toggle to generate, view, and download attendance reports. |
|
Meeting option |
What it does |
|---|---|
|
Record and transcribe automatically |
Turn on the Record and transcribe automatically toggle to record and transcribe your meeting as soon as it starts.
|
|
Meeting option |
What it does |
|---|---|
|
Allow Copilot |
Choose when to allow Copilot during a meeting or event by selecting an option from the Allow Copilot dropdown menu.
If you choose Only during the meeting, Copilot can work without turning on transcription. If you turn on transcription, Copilot can always be used after the meeting.
|
|
Meeting option |
What it does |
|---|---|
|
Provide CART Captions |
Turn on the Provide CART Captions toggle to use Communication access real-time translation (CART) captions during a meeting. CART captions are generated by a trained CART captioner who listens and translates speech into text instantly.
|
Information taken from Microsoft support
Microsoft Teams makes it easy to join and run meetings, whether you're a participant or the organiser. From setting up your audio and video to managing meeting settings and features, Teams provides a range of tools to help you run meetings smoothly and professionally.
In Microsoft Teams, every scheduled or ongoing meeting automatically generates a dedicated chat thread. These meeting chats allow participants to share messages, links, and files before, during, and after the meeting.
The meeting organiser can control chat availability by setting it to On, Off, or In-meeting only.
To ensure productive, respectful, and smooth-running meetings, it's important that all participants follow a set of basic etiquette guidelines. These practices help create a professional environment, minimise distractions, and ensure everyone has the opportunity to contribute effectively.
Be aware:
Teams & Channels
You can only open a Microsoft Team Site if you're a member of it.
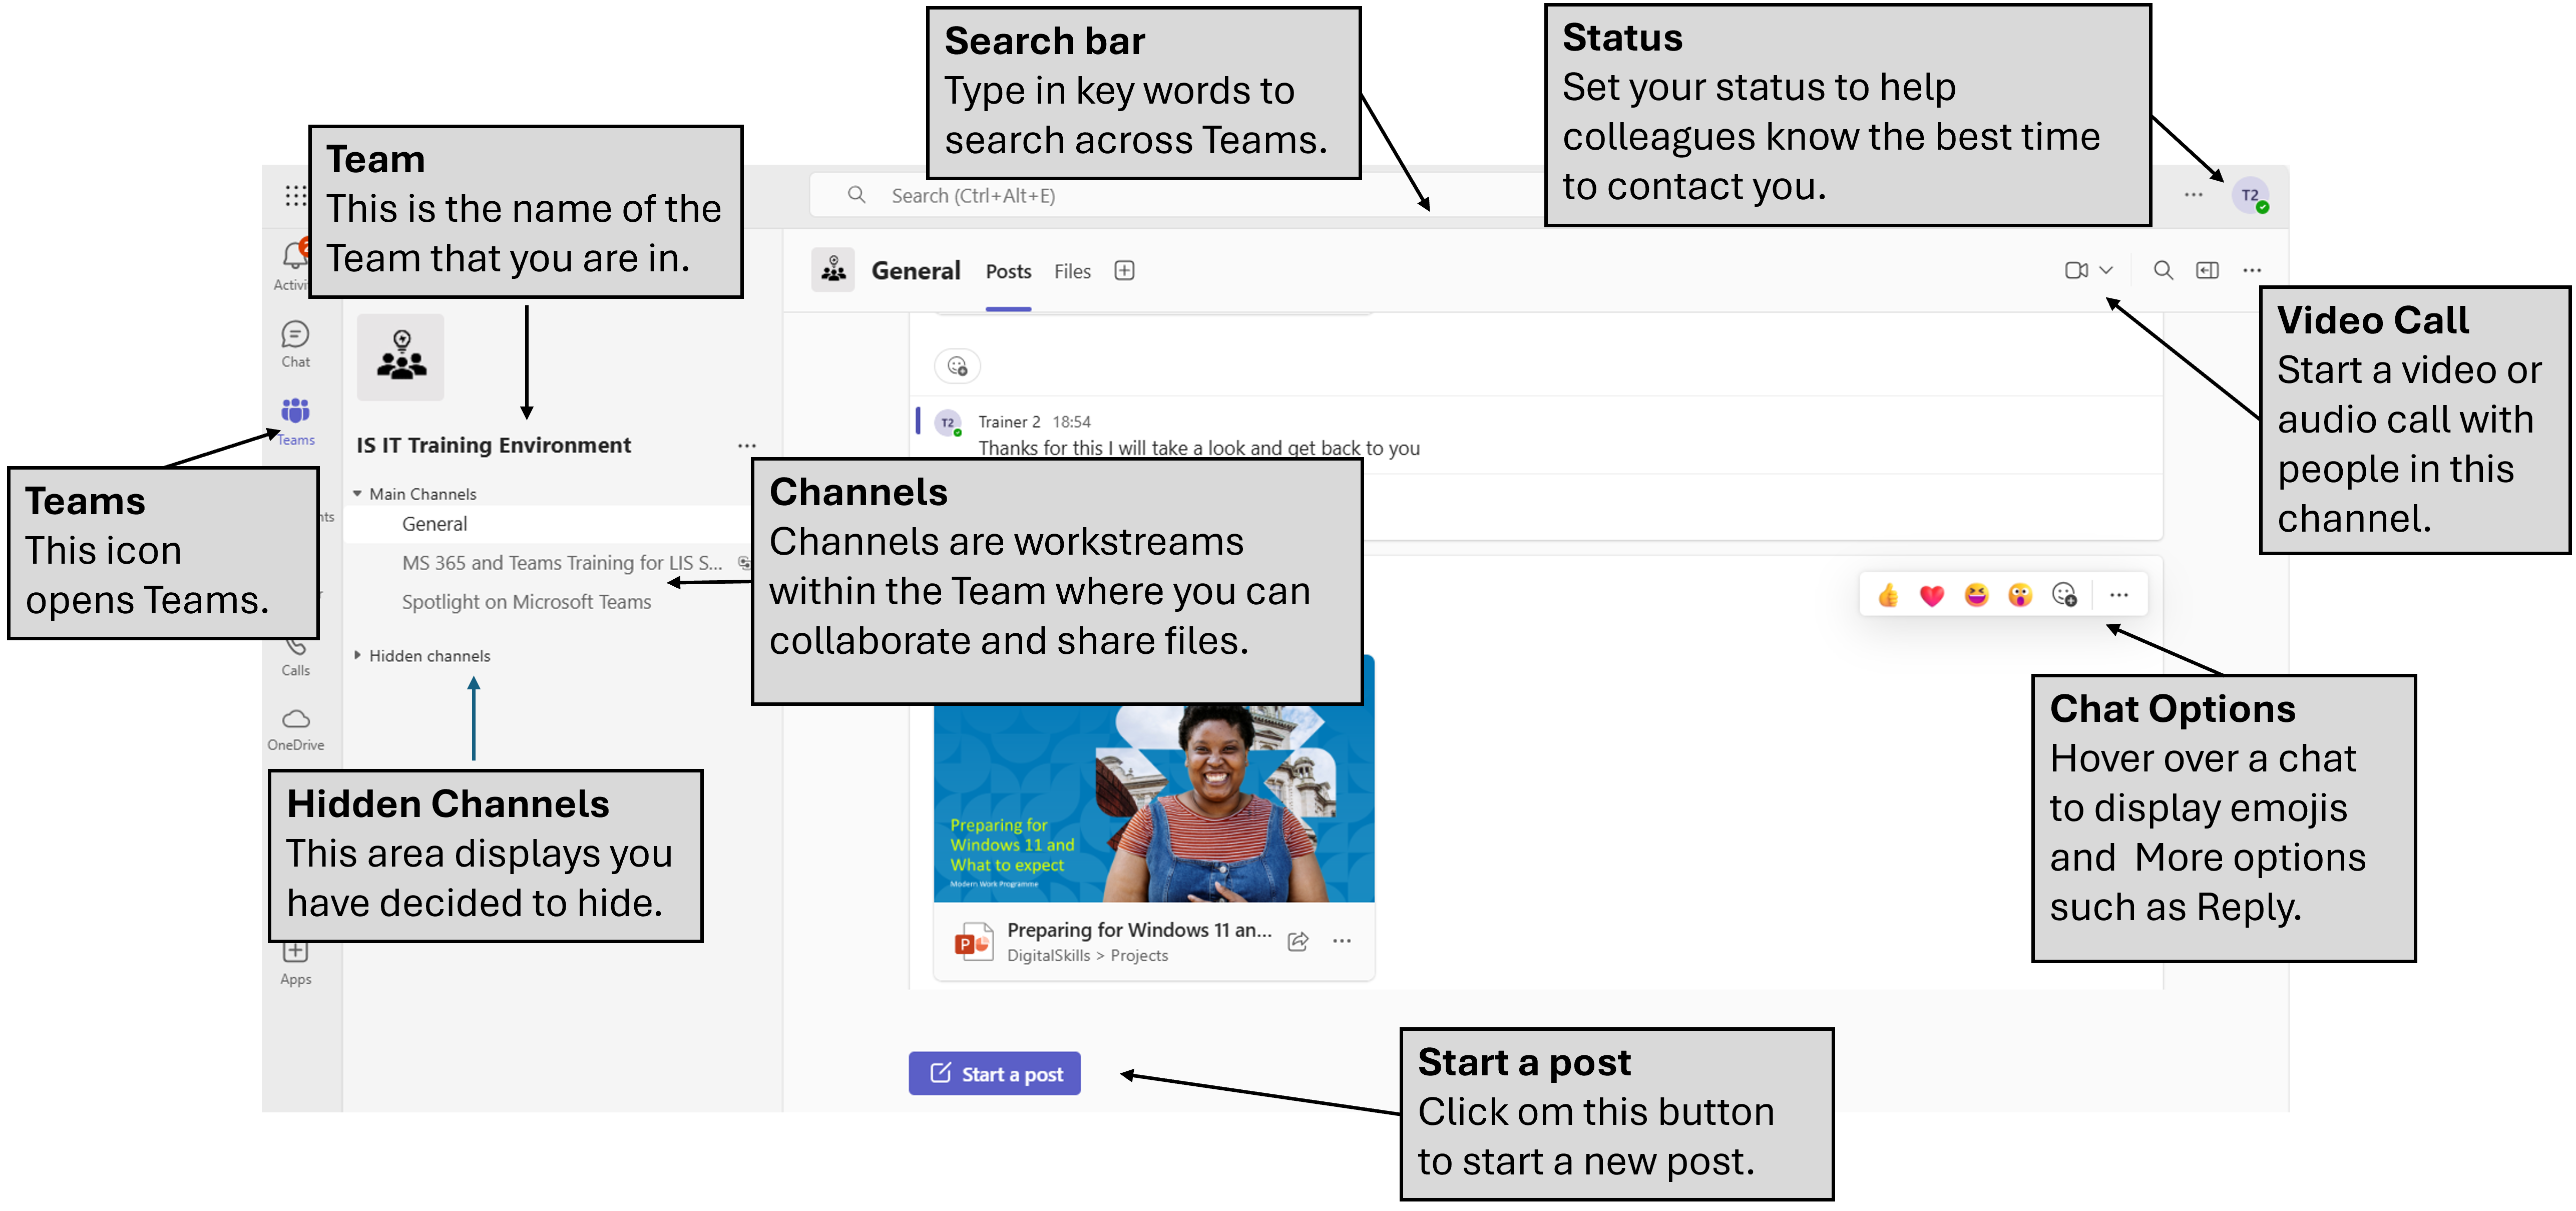
To post in a Microsoft Team Site, you must first be a member of that team. Each team site contains channels, which typically represent key workstreams.
As Microsoft Teams is rolled out, you will gain access to the MWP Launch Community Team Site. This includes a Q&A channel where you can post any questions or queries you may have.
Emojis, GIFs, and Stickers: Add personality and expression to your messages using built-in emojis, animated GIFs, and fun stickers.
Loop Components: Create live, collaborative content (like checklists, tables, or task lists) directly in a chat or channel message, allowing everyone to edit in real time. More training is being developed on this.
Actions and Apps: Includes additional functionality such as 'Schedule message' and 'Attach a file'.
Note:
To keep your posts and their associated conversations together and easy to follow, always select ‘Reply’ when responding to an existing post.
Note:
Microsoft Teams allows you to schedule messages to be posted at a specific date and time, which is especially useful for planning communications in advance or sharing updates at the most appropriate moment.
Microsoft Teams offers two layout options for viewing your team sites: Grid view and List view.
List view displays your teams and their channels in a vertical, collapsible list, making it easier to navigate and manage multiple teams, especially if you’re involved in several projects.
One useful feature in List view is the ability to pin your favourite channels to the top of the list for quick and easy access.
Note: This feature is only available if you view your team sites in List view.
Click on ‘More apps’ (the three dots ...) in the left-hand navigation bar.
Browse or search for the app you want to use. If it’s not visible, use the search bar to find it.
Click on the app to open it.
To pin the app for quick access:
Right-click the app icon in the sidebar.
Select Pin.
To rearrange the app’s position in the sidebar:
Right-click the pinned app.
Choose Move up or Move down.
In Microsoft Teams, you can hide channels that are not relevant to you so you can keep your workspace organised. Hidden channels remain accessible and can be made visible again at any time.
Using emojis is a quick way to indicate acknowledgement, approval, or appreciation of a post. The thumbs-up icon is the equivalent of saying 'okay'.
Sharing files in a Teams channel is a great way to collaborate and ensure everyone has access to the latest documents. You can attach files from your device, OneDrive, or directly from the team’s existing folders.
Click 'Post' to share your message and attached file.
Notes:
Tip
Create a clear folder structure within the Files tab and upload documents directly into the appropriate folders. When referencing a file in a post, use Attach file > Browse Teams and Channels to link to the file. This keeps your file area organised and ensures easy access for all team members.
Team Sites are now being used to support projects such as MWP.
You can check the members included within a Teams site or channel at any time by following these steps:
It is also possible to add a member from this page:
See below of other ways to add a member to a Teams site or channel.
Notes:
If you are a member of a Teams site and wish to request a colleague to be added, please follow these instructions.
Notes:
If the colleague is not already a member of the Teams site, you will first have to follow the steps above in 'Requesting the addition of a new member to a Teams site'.
If they are already a member of the Teams site, please follow these steps:
General tips
The Teams/slash command is a powerful feature that makes using some of the basic Teams commands much quicker and easier. You simply type a '/' into the main search bar in Teams or in the chat box on a chat or channel, then either pick from the resulting list or start typing a known command:
Its easy to incorporate /slash commands into day to day use. The following is a list of the most useful commands but there are many more!
@mentions are a great way to grab someone's attention in a busy channel or chat.
Remember; colleagues will be receiving communications and notifications from a variety of places so if you don't @mention them they may miss the message entirely!
Microsoft Teams now has the ability to schedule messages in a channel. This feature has been available in Teams chat for some time allowing you to plan and send messages at a specific time and its now available in the Channels experience too!
There are some key considerations in scheduling messages:
Scheduled messages can be sent to an entire channel, making them ideal for team-wide announcements or updates. These messages appear in the channel feed, ensuring all members see them. This feature is perfect for planning team communications like project updates, reminders, or announcements.
Scheduled messages can be sent to individual or group chats, appearing only to participants. This feature allows you to send messages at convenient times for recipients, respecting their working hours and time zones.
Creating a clickable hyperlink in Microsoft Teams is a simple way to keep your messages tidy and professional. Instead of pasting long URLs, you can link them to specific text in just a few steps.
Note: This method also works in Outlook.
Use the sections below to expand and view more information
Once you migrate, you’ll be added to a team called Launch Community. Inside this team, you’ll find a dedicated Q&A Support channel. This is your space to ask questions or raise any observations about your Microsoft 365 migration. You can post directly in the channel, and members of the team or support staff will respond to help you as quickly as possible. This channel is designed to give you easy access to help, guidance, and shared knowledge throughout the migration process.
Share your thoughts and feedback
Get help with specific questions
Raise wider issues affecting your team
Contribute to a shared knowledge base for others
Not getting an answer to your question? Choose from the options below to get technical support, 1:1 Microsoft 365 guidance or Digital Skills training:
Contact IT Support Book a M365 WoW Session Attend a Digital Skills training session
Turn on notifications for critical updates like closures, safety alerts, and urgent service disruptions.


