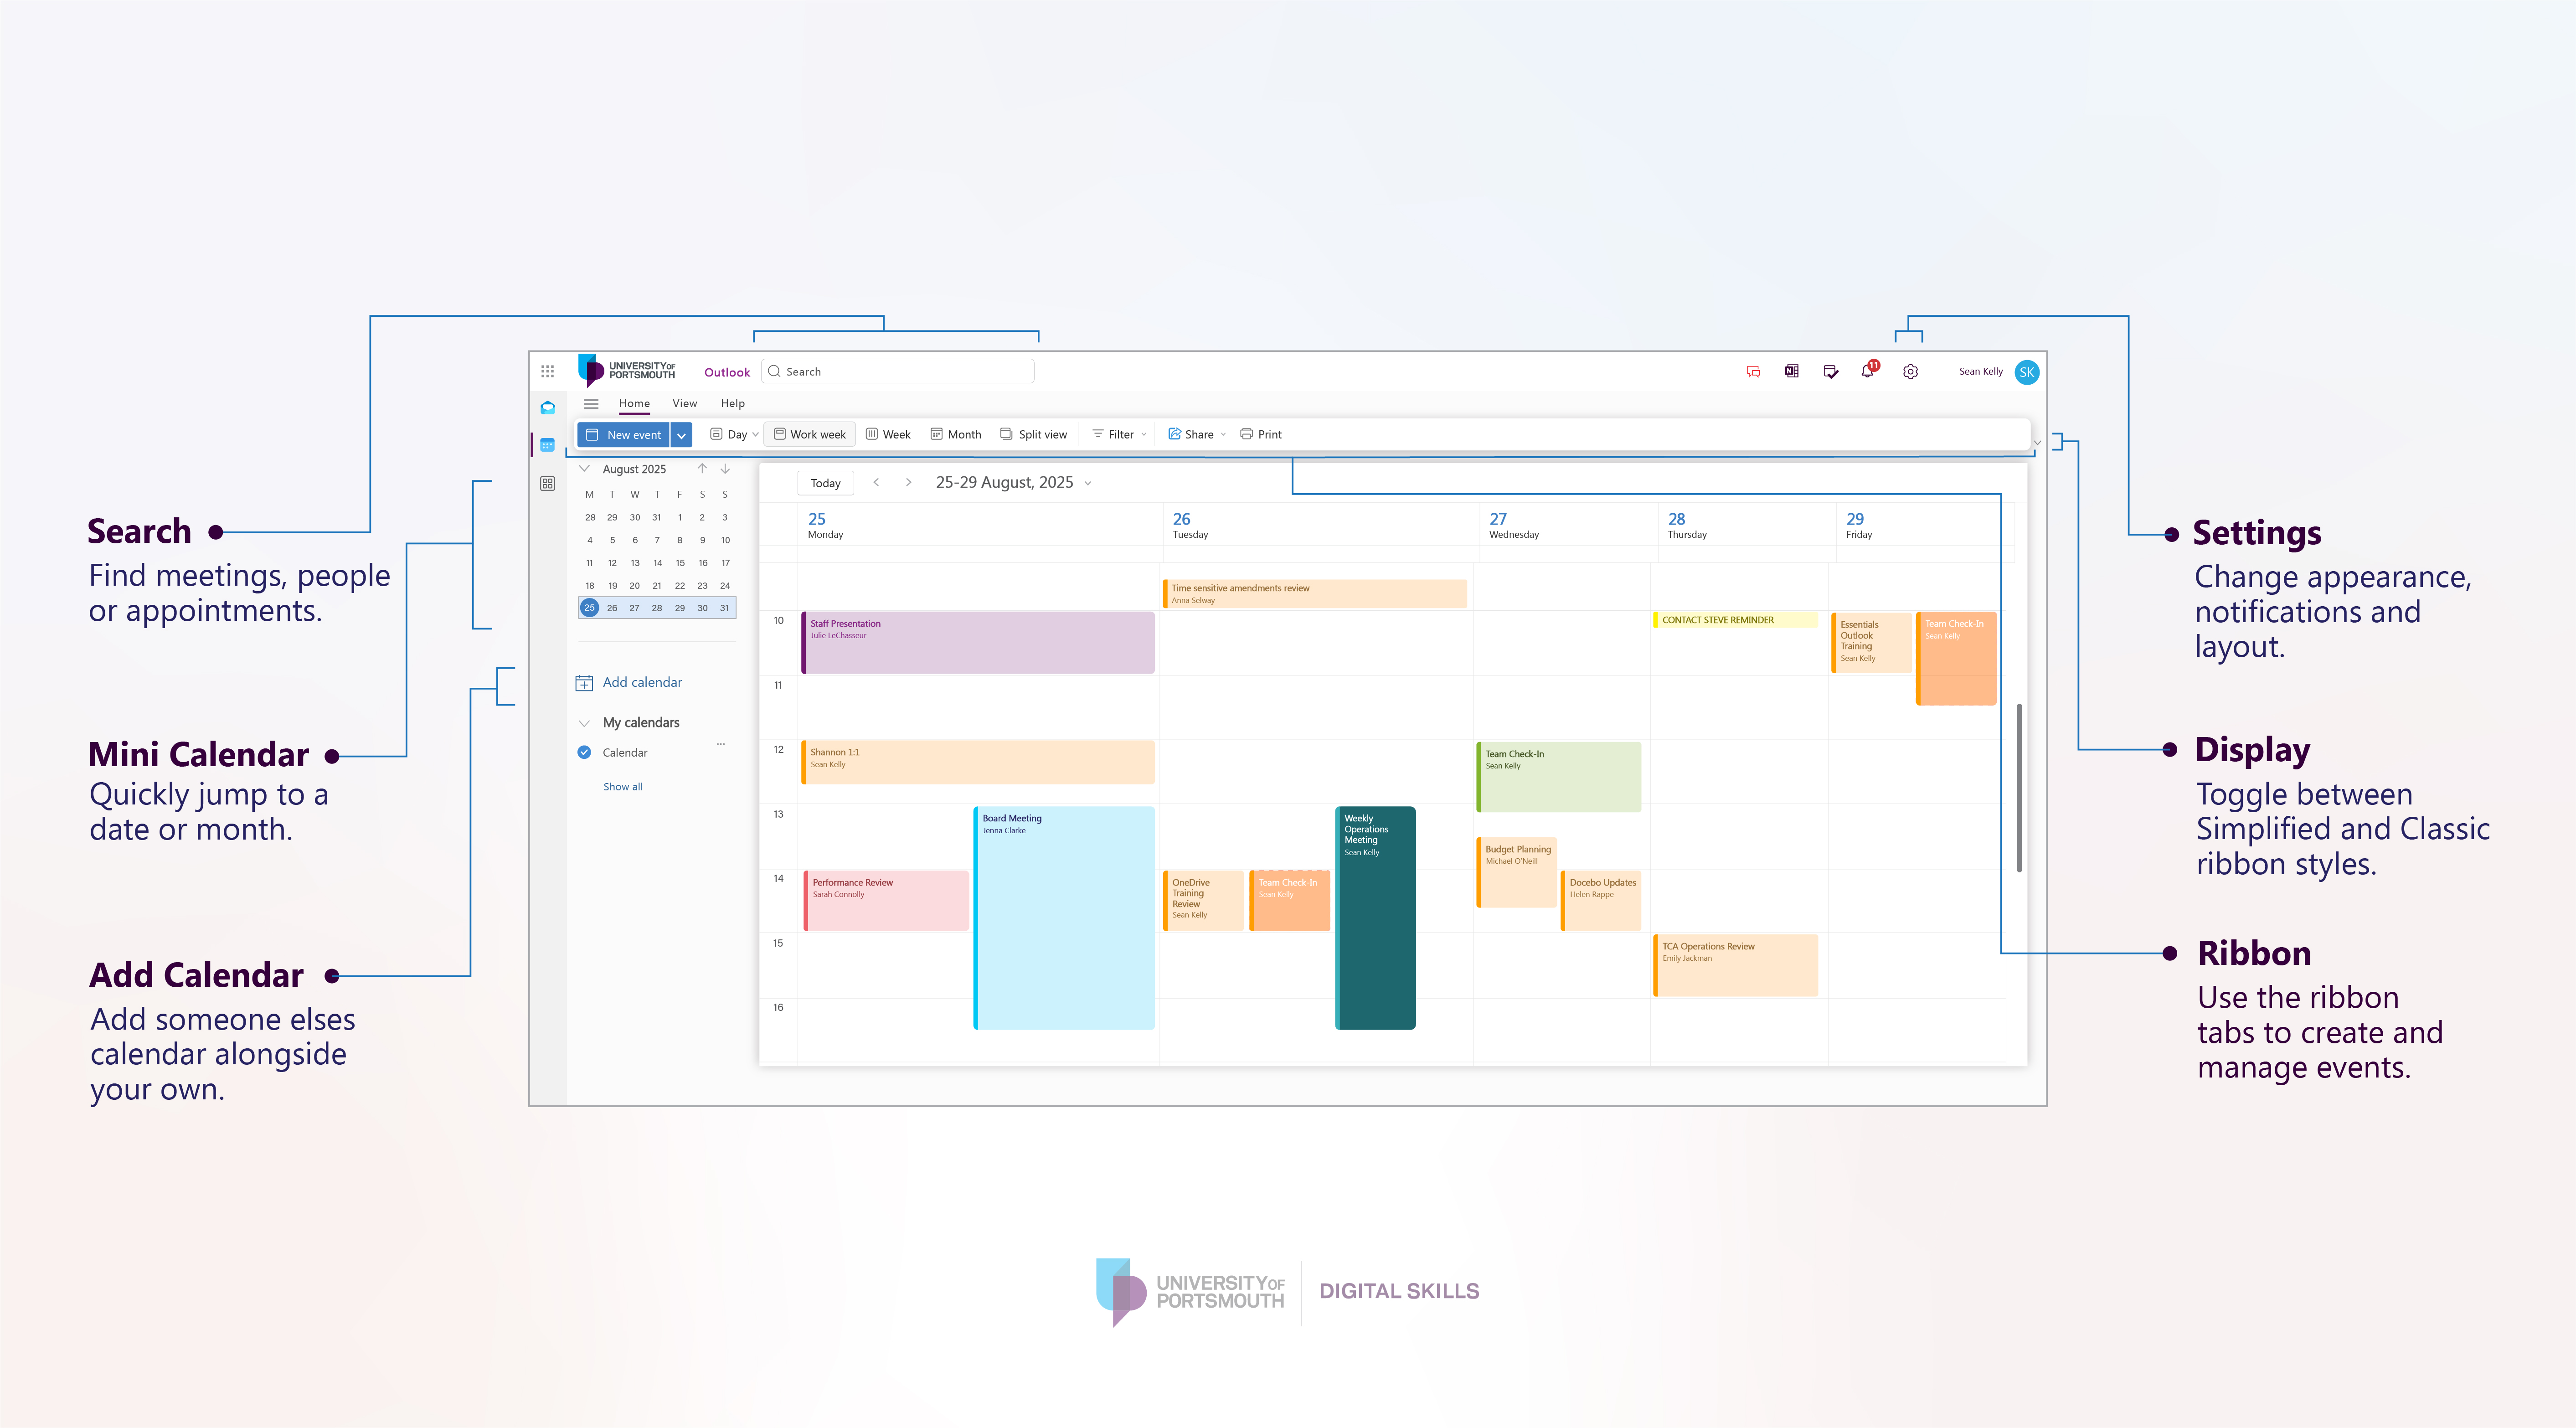
Image

Outlook was introduced in 2025 as the University’s primary tool for managing email and calendars. For migration details, see Migration from Google to Outlook: mail and calendar at the bottom of this page.
Note: The term Outlook refers to both email and calendar applications.
Need more help? This guide provides an overview of Microsoft Outlook, but you can explore further by starting with the Essential Outlook Mail and Calendar training in Docebo. You can also take a deeper look with our Deeper Dive Outlook Mail and Deeper Dive Outlook Calendar sessions.
If you have a quick question, you can chat with your Digital Superhero or post in your Teams Launch Community. For one-to-one support, book a session on the M365 WoW sessions page and choose “How-to Guidance.”
As a member of staff you currently have access to LinkedIn Learning. For information on how to access LinkedIn Learning view this article.
The following courses are available through the 'Modern Work Programme Learning Plan: Essential Training for M365'. The courses have been designed to help you build confidence and capability with Microsoft 365 tools:
Note: The transformation project is being delivered in batches. You will gain access to the Learning Plan approximately one week before your migration date.
If you need assistance finding these courses email [email protected].
There are security policies in place across Microsoft 365 to protect staff, students and University services from malicious attacks such as phishing and malware, suspicious links and unsafe file types.
If an email is blocked or held for review, Microsoft will send you a quarantine notification. This allows you to review certain messages, delete them, or request release where appropriate.
Instructions for both methods are provided below.
Below is a screenshot of how quarantined messages will be shown in your inbox.
If you take no action the emails will be deleted after 15 days.
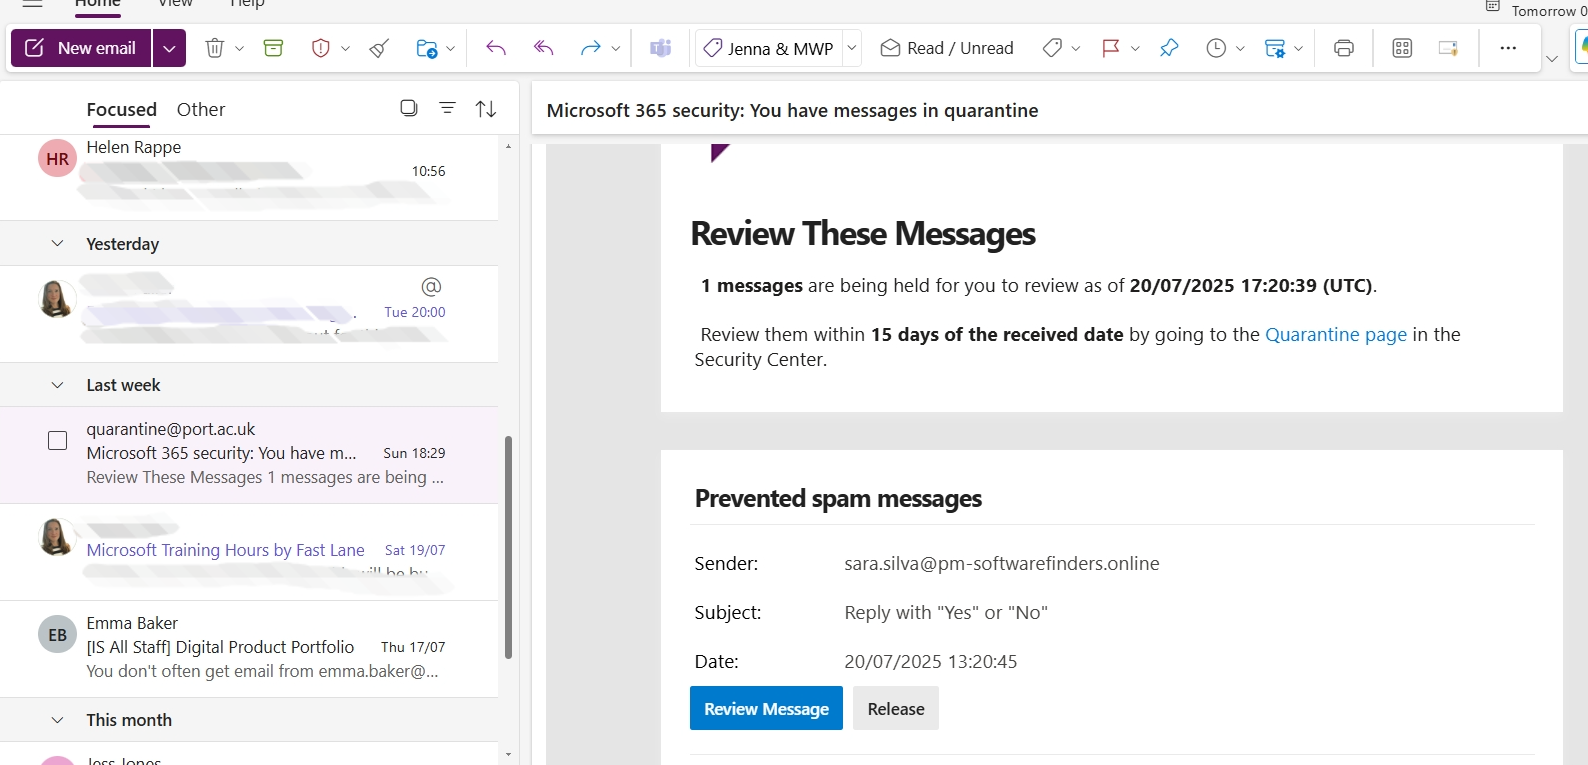
Some emails cannot be released directly. If the email is considered high-risk, selecting ‘Release’ will submit a request for admin review instead.
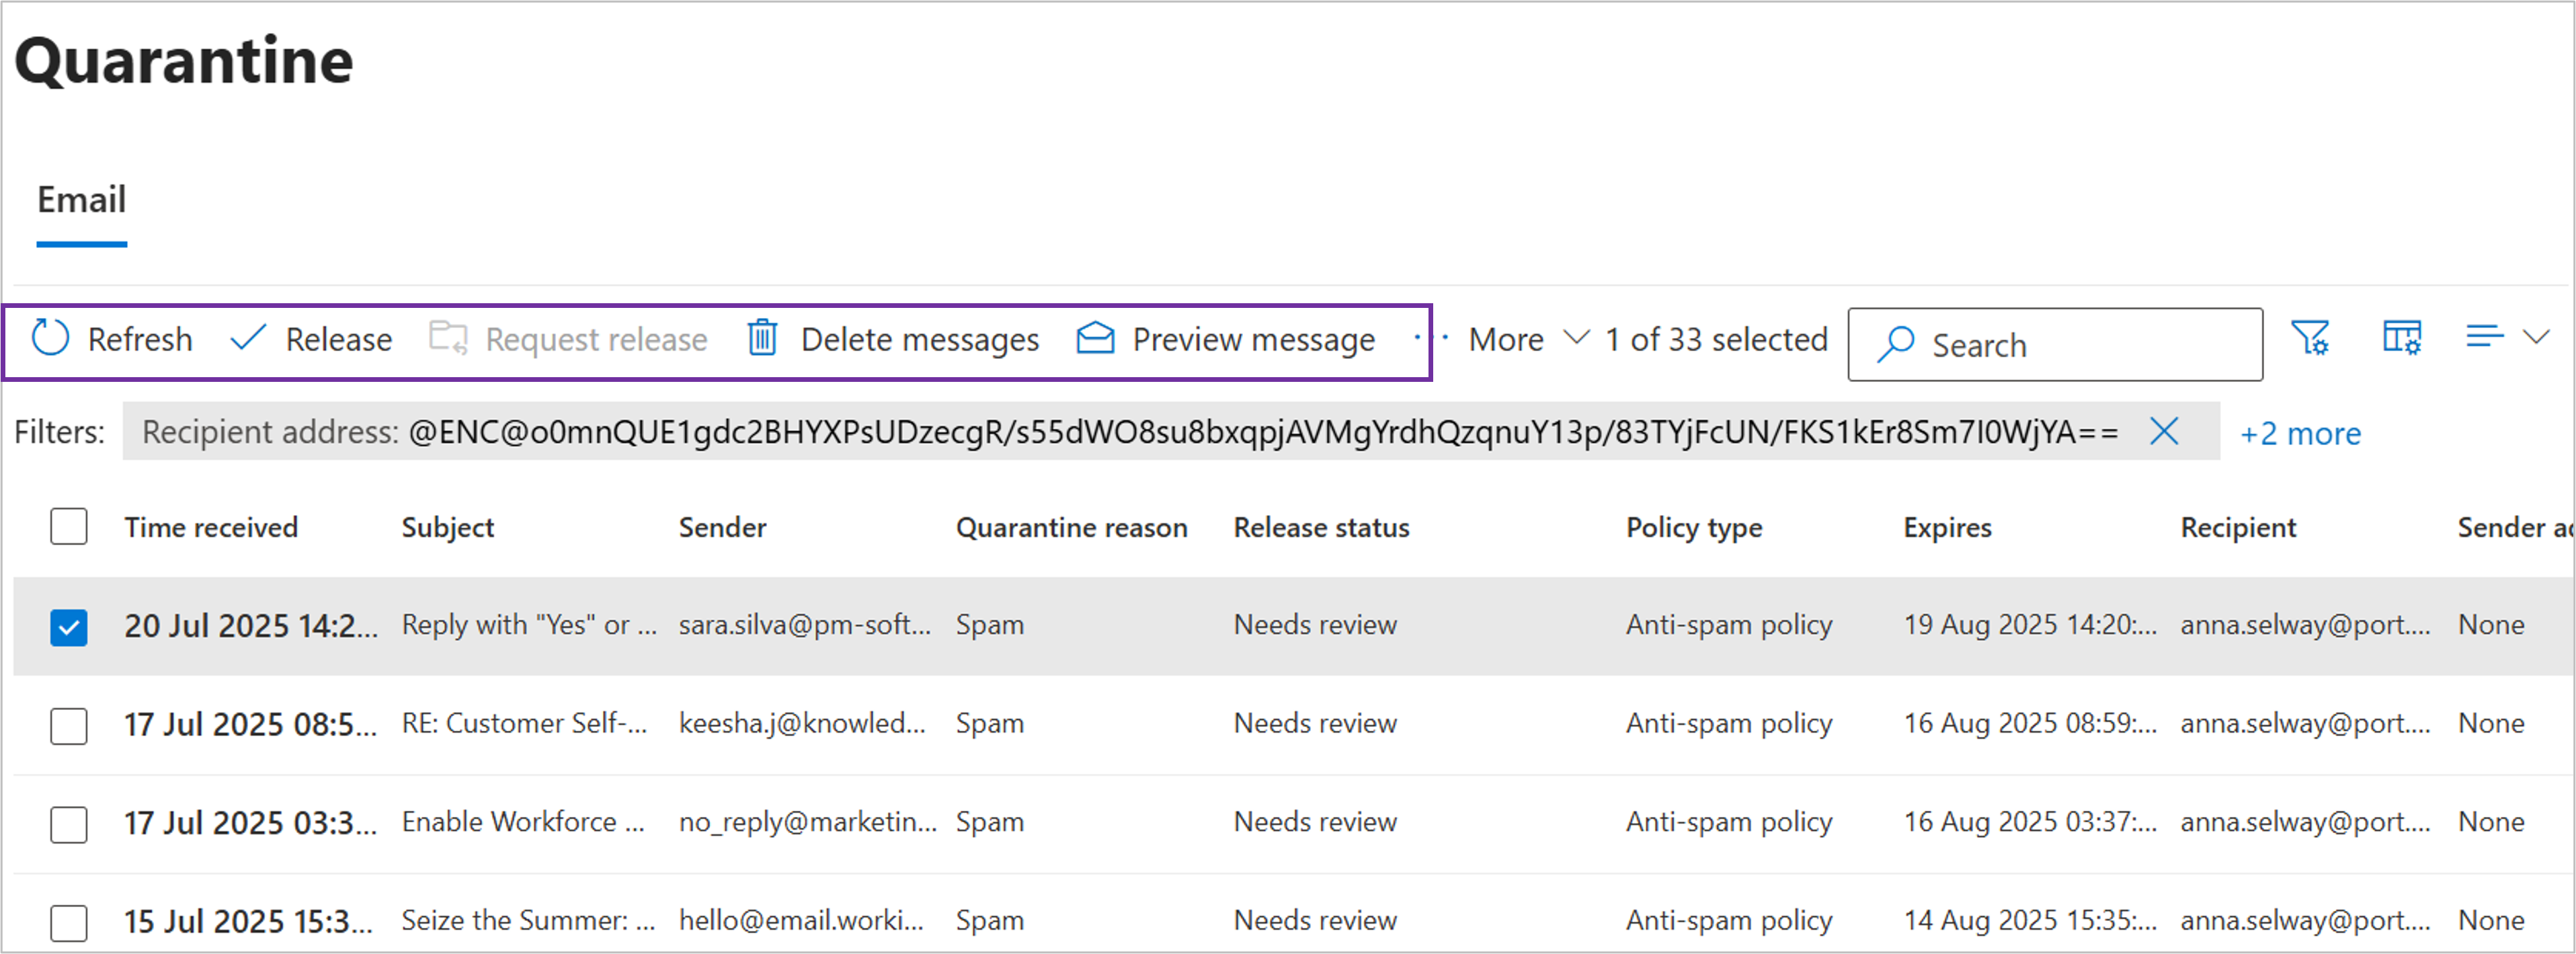
You can also check your quarantine folder at any time by following these steps:
Some quarantined emails can be reviewed and released by you. However, emails identified as high-risk (such as high-confidence phishing or malware) cannot be released directly.
In these cases, selecting Release will submit a request for admin review, and the email will only be delivered if approved.
Outlook now provides clearer warnings to help you spot suspicious emails. Emails that appear unusual or potentially harmful may:
These warnings are designed to help you make an informed decision before replying, clicking links, or opening attachment
To help prevent compromised accounts being used to send spam:
Some file types can’t be sent as email attachments, including executable and script files. If you need to share these files, please use OneDrive instead.
Links in emails, Teams messages, and Office documents are now checked at the time you click:
Follow these instructions to report a suspicious email. There is no need to contact the Service Desk separately.
*Please note: There is no way to customise the order the options are displayed in Outlook.
Outlook has AI embedded that will alert you if you don't normally get mail from someone so that you can then take more time to assess that email in case it is a phishing email.
Once you receive a few emails from that address then the message will disappear.
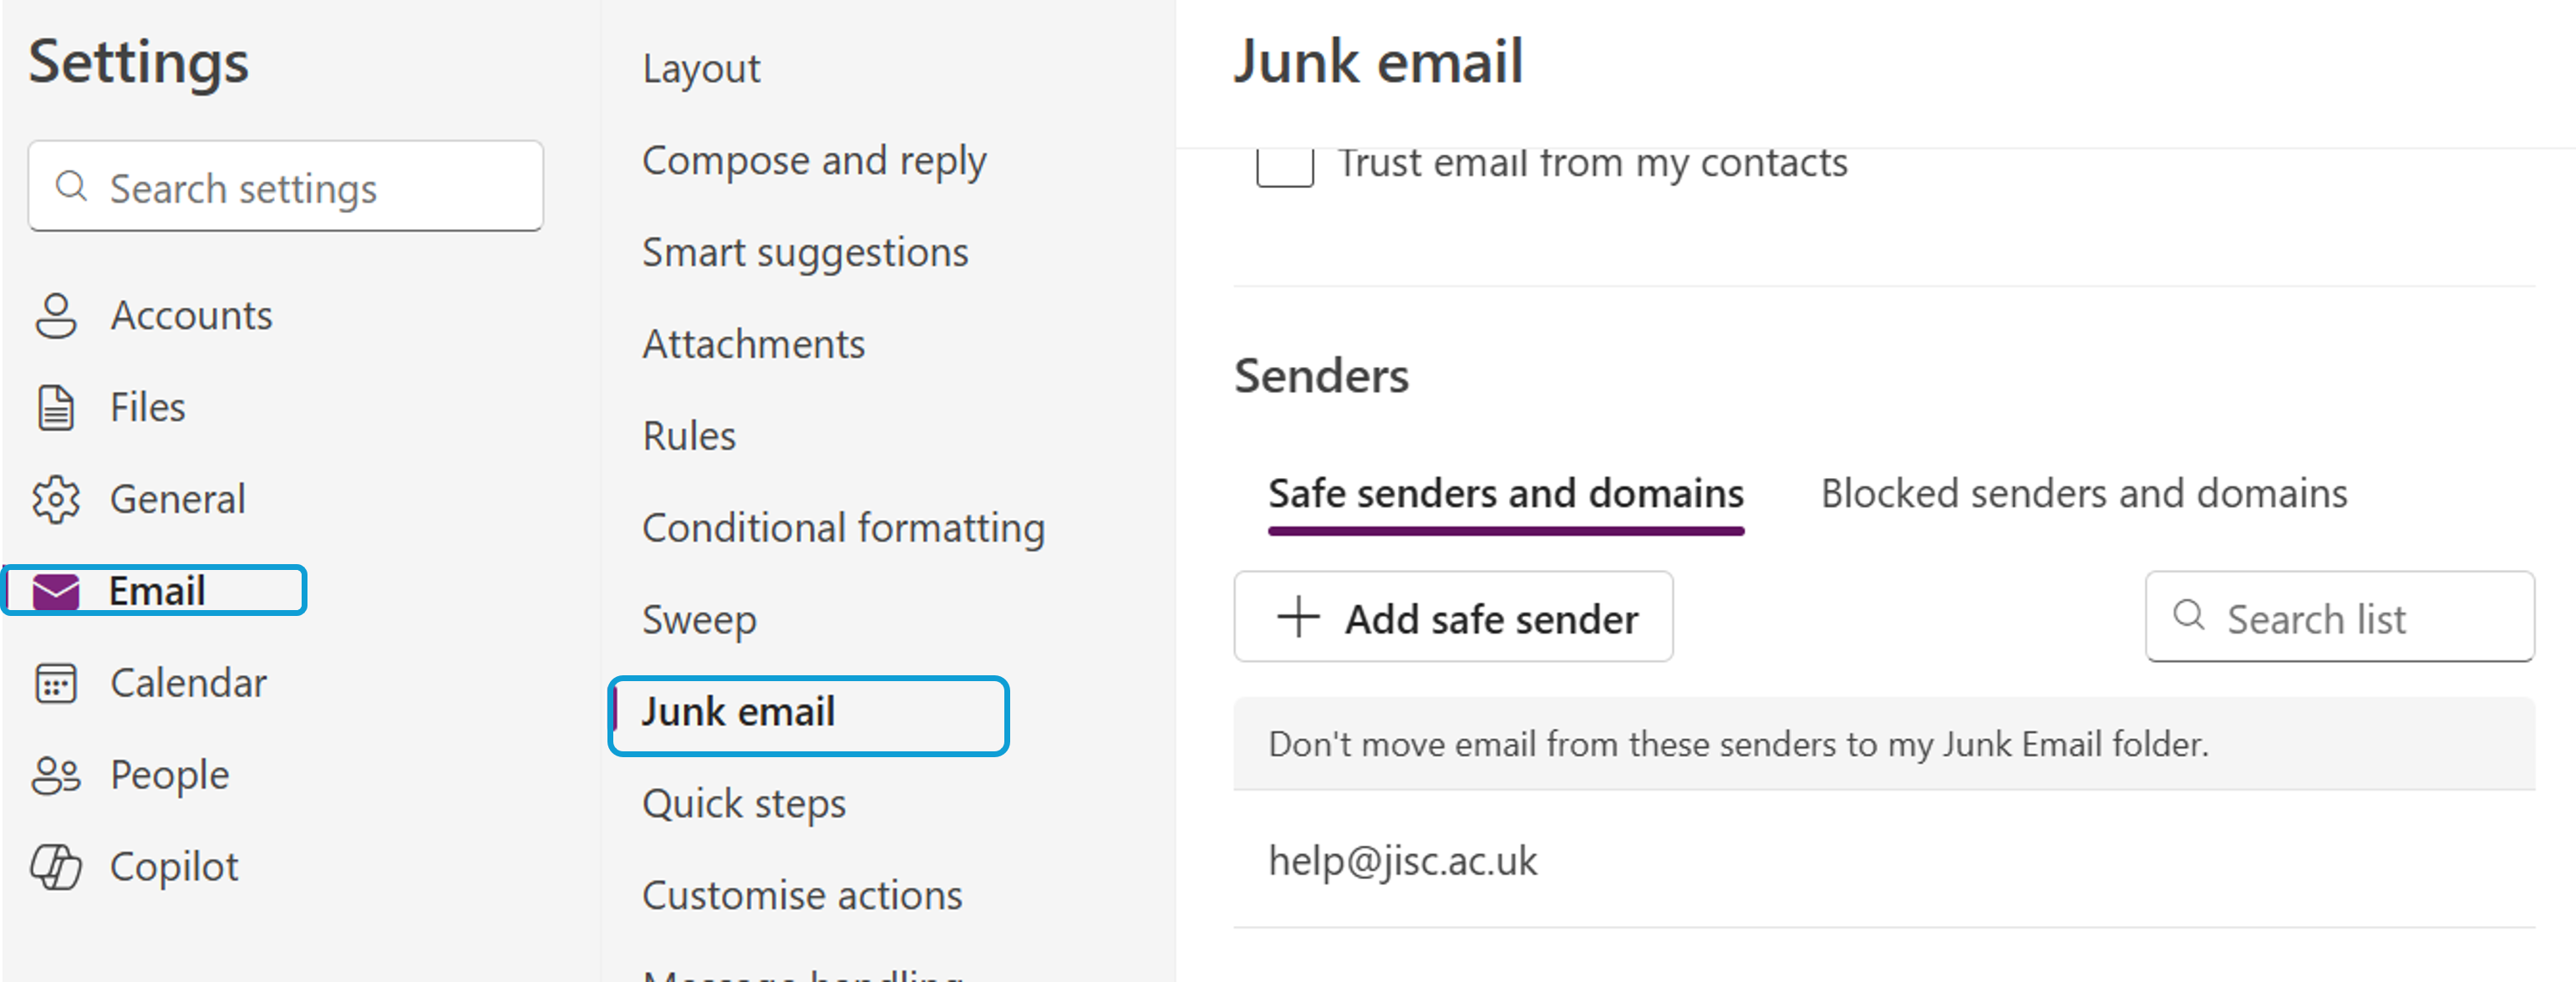
If the email is from an external account you will see this prompt when you open the email

Select Trust Sender to view the email. The email will then be placed in your Trusted Sender list which is available by selecting Settings (cog), select Email and then Junk Mail.
If you are unsure whether an email is genuine, you can report it directly as phishing or junk from Outlook please see the information in the Reporting emails section in this article . This helps improve protection for everyone and means you do not need to raise a separate Service Desk ticket for suspected phishing.
This section guides you through setup tasks to complete when you first start using Outlook
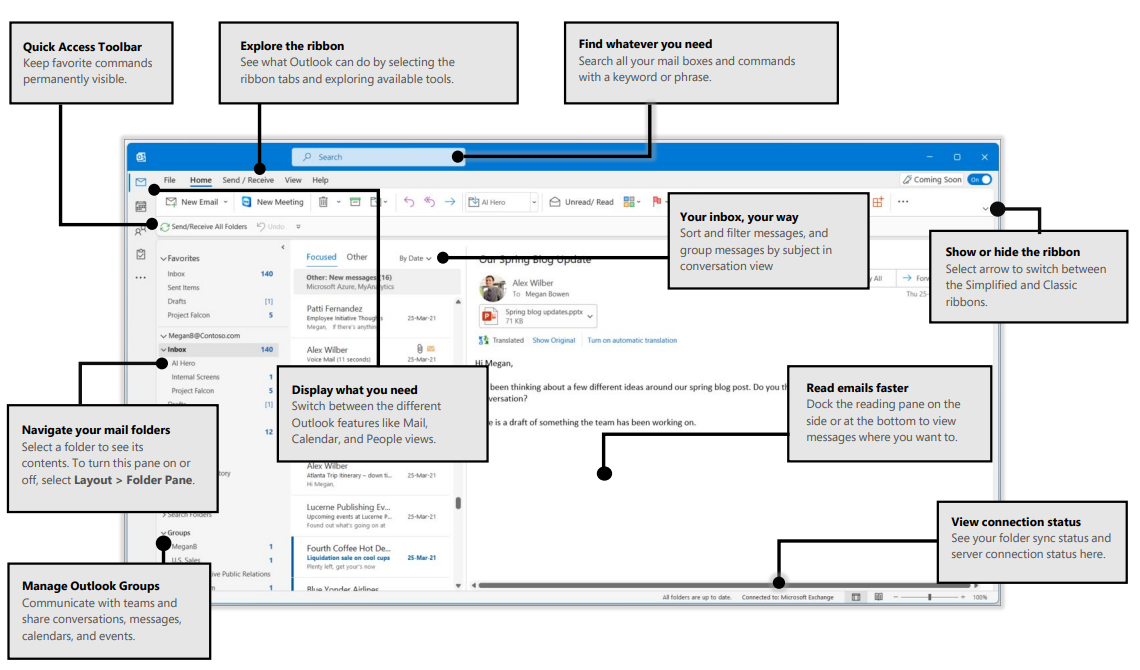
Image from Microsoft Quick Guides
You can access Outlook using any internet browser by going to office.com.
On Windows 10, Outlook and other Microsoft 365 apps are only available via the browser.
On Windows 11, Outlook and other Microsoft 365 apps can be accessed either through the desktop application or via the browser. Microsoft Edge, the default browser in Windows 11, is designed to work seamlessly with Microsoft 365
To open Outlook on the web:
Open your internet browser (Edge, Chrome etc).
Go to www.office.com.
Sign in with your University credentials.
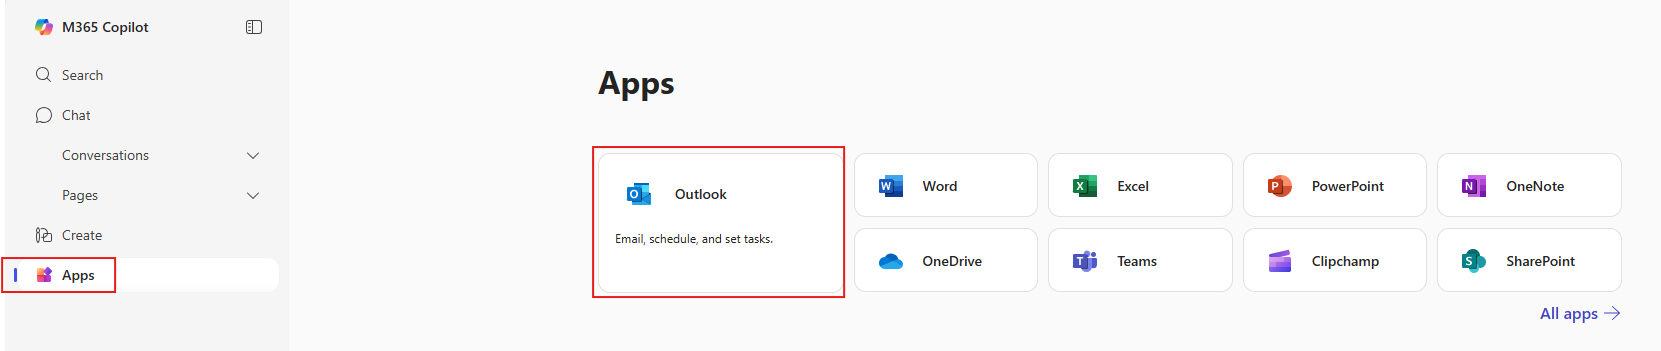
Select Apps from the left-hand menu.
Click Outlook from the list of available Microsoft 365 apps. This will open in a new browser tab.
Step 1: In the Welcome to new Outlook screen type in your University email address and click on 'Continue'.
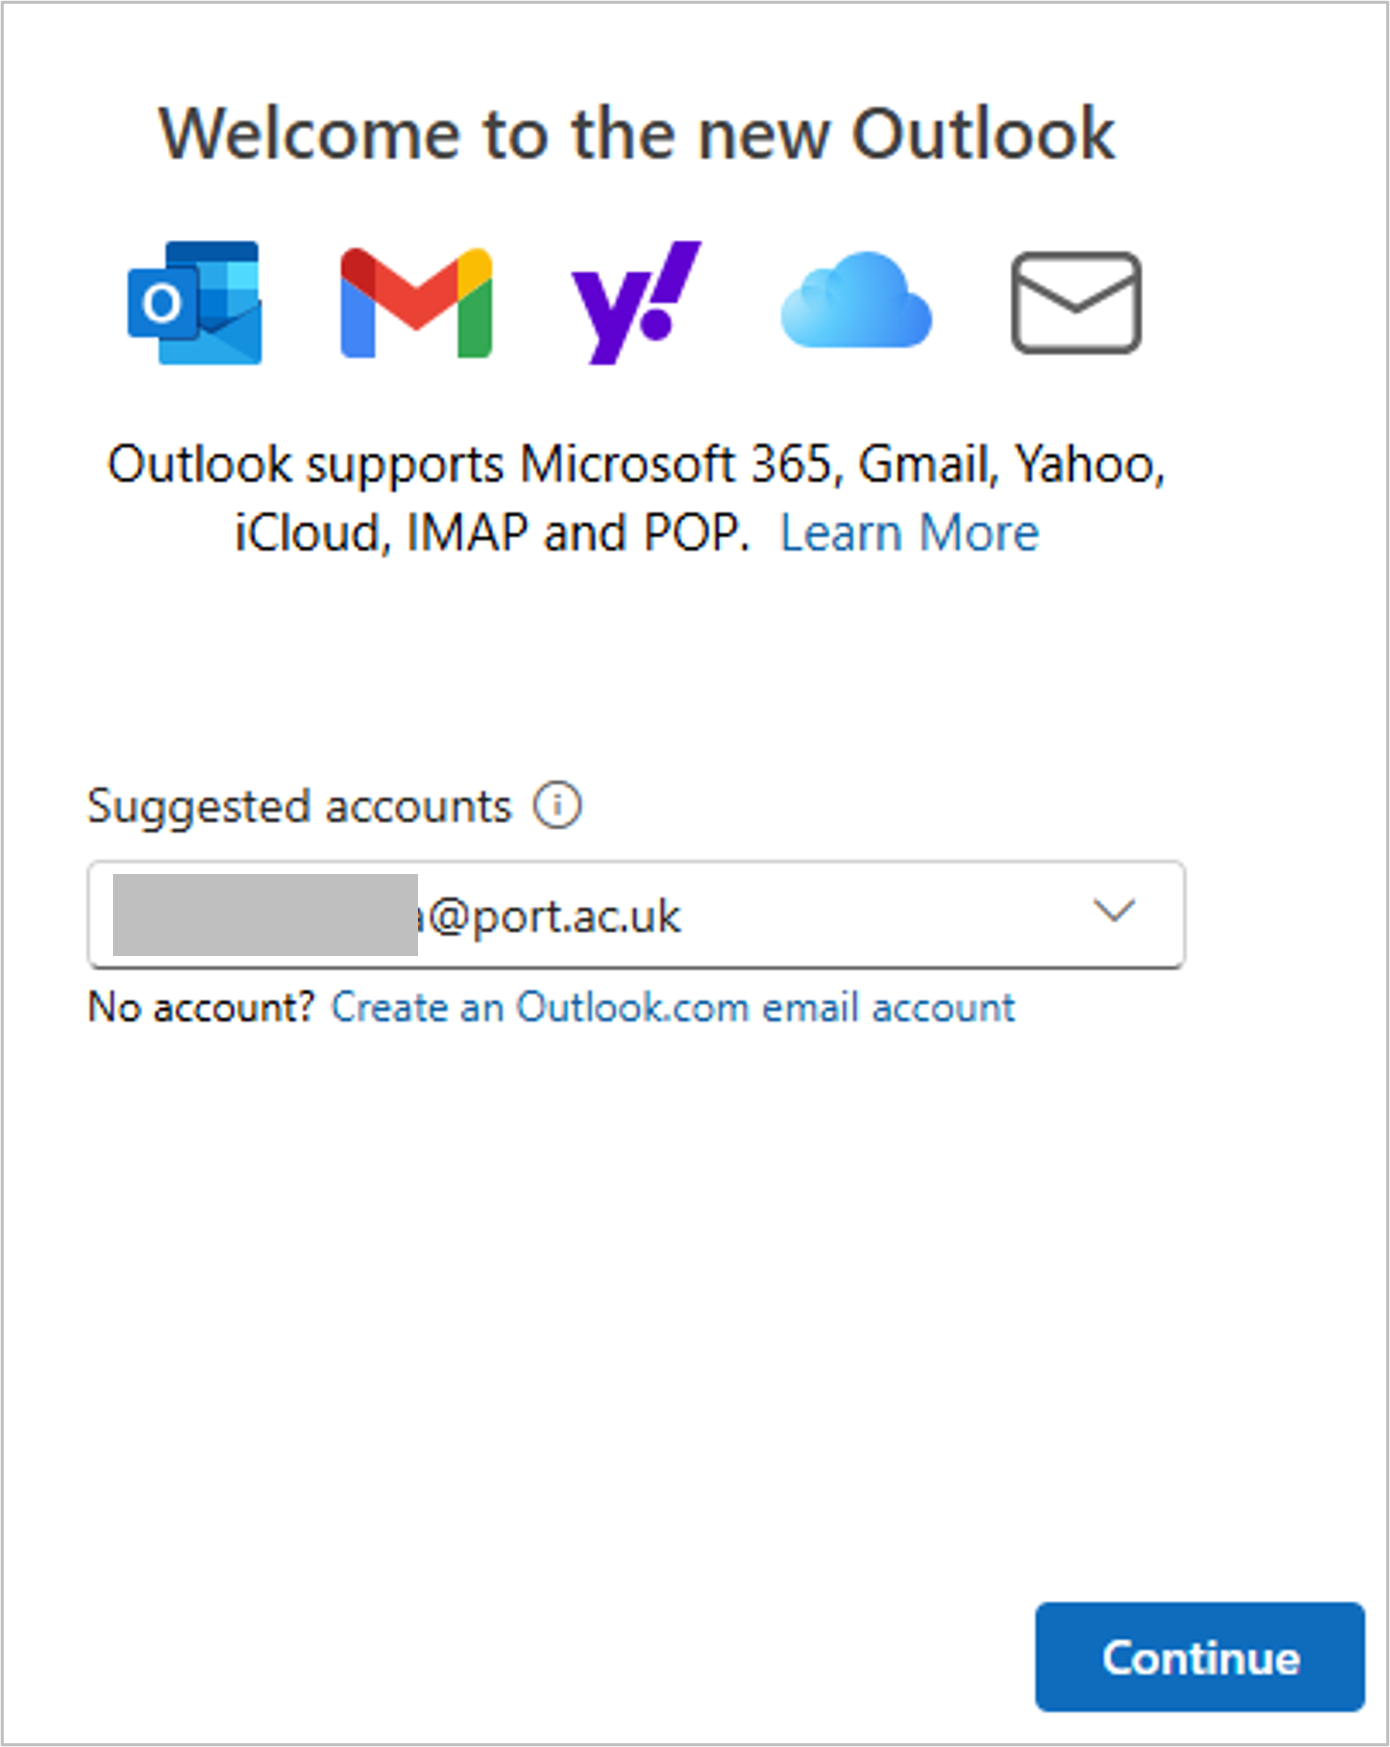
Step 2: A Setting things up screen will display for a few seconds.
Step 3: Outlook will open.
Note: To view your calendar, select the 'Calendar' icon on the left-hand navigation panel. If your calendar is not displayed check that the 'Calendar' radio button is selected.
In line with Microsoft best practice, we recommend using the Outlook app available on the App stores for iOS and Android. The Outlook mobile app offers the richest functionality for accessing your work email and calendar and aligns to institutional information security guidance. It is also possible to configure personal email accounts and calendars to be used within the Outlook mobile app.
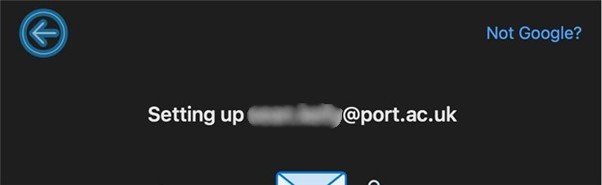
Type in your full University of Portsmouth email address (eg. [email protected]) and tap Continue.
If this screen displays tap 'Not Google' at the bottom. (View image)
Select 'Change account provider'. Choose Microsoft 365 from the list. (View image)
Enter your University password when prompted on the University of Portsmouth sign-in screen, then tap Sign in.
Complete multi-factor authentication by opening the Microsoft Authenticator app and entering the code or approving the sign-in request.
When asked if you'd like to add another account, tap Maybe Later.
You will now see your University email inbox. Tap the Email, Calendar, or Apps icons at the bottom to navigate Outlook. (View image)
If you are having trouble signing in with the above instructions please try the following approach:
You can create your email signature in Microsoft Outlook in two ways:
Current signature guidance can be found on page 12 of the email policy for staff.
https://storage.googleapis.com/edm-email-content/email-signature1.pngName
Job Title
University of Portsmouth
T: Telephone number
E: Email address
W: www.port.ac.uk
University of Portsmouth, Building name, Address line 1, Address line 2, City, Postcode
Setting your working hours and location will help colleagues schedule appointments and contact you at appropriate times.
An Out of Office event in Outlook is a calendar entry that indicates you’ll be unavailable for work during a specific period. Colleagues will be alerted to this when they try and schedule a meeting with you.
Notifications in Outlook are alerts that inform you about new emails, calendar events, tasks, and other updates. These notifications can appear as pop-ups, sounds, or badges on the Outlook icon, helping you stay informed about important activities and messages.
If you would like further information, please refer to the Outlook section of our Managing Microsoft 365 Notifications article.
The Zoom plugin allows you to create Zoom meetings directly from your Outlook or Teams calendar. This means you can schedule the calendar invite as normal, while the plugin creates the meeting in Zoom and adds the Zoom joining details to the invite.
The plugin is being rolled out in phases. When it is available to you, the Zoom drop-down will appear at the top of the meeting window. If you do not see the Zoom drop-down, the plugin has not yet been made available to you.
In Outlook or Teams Calendar, create a new meeting. You can do this by selecting New in the top left corner, or by double-clicking the time slot you want to use.
In the top ribbon, select the Zoom drop-down and choose Add a Zoom Meeting.
If you are prompted to display Zoom in a new window, select Allow.
From the login screen, scroll to the bottom and choose SSO. Do not enter your login details on this screen.
In the company domain section, enter port-ac-uk and select Continue.
You will be taken to the University login screen. Enter your University username and password.
Complete any required MFA, such as a text code or Authenticator app approval.
You will then be asked to connect your M365 account to Zoom.
You will then be asked to sign in to your M365 account.
Once authentication is complete, the final window will confirm that you have successfully signed in to Zoom using SSO.
In Outlook Calendar, create a new meeting. You can do this by selecting New in the top left corner, or by double-clicking the time slot you want to use.
Enter the necessary meeting details, such as the title, attendees, date and time.
In the top ribbon, select the Zoom drop-down and choose Add a Zoom Meeting. The Zoom meeting details, including the meeting link, will be added to the invite.
To edit Zoom meeting details, such as audio and video settings, select the Zoom drop-down again and choose Settings. A panel will appear on the right side with the available options.
When you are happy with the meeting details, select Send. The event will appear in everyone’s calendar as normal.
To join the Zoom meeting, open the meeting event in your calendar and select the Zoom meeting link. This may look something like https://port-ac-uk.zoom.us/...
The link will open Zoom, and you can join the meeting in the usual way.
You can add your CMIS Go academic timetable to Outlook in two different ways. The option you choose changes how your timetable appears in Outlook and how others see your availability when scheduling meetings with you.
You can use both options together. Subscribe from the web to keep track of any timetable changes, and import the file into your main calendar so that others see you as “Busy” during those times.
Please review the instructions below for each option.
.ics).From here, choose one of the following options:
.ics file onto your device..ics file.Keyboard shortcuts are combinations of keys that perform specific actions without needing to use a mouse or touchscreen. They can help you work faster and complete common tasks more efficiently - like sending an email, switching between windows, or formatting text.
It's important to note that keyboard shortcuts can vary depending on the version of Outlook you're using. Outlook on the web has different shortcuts compared to the Outlook desktop application. Details of shortcuts available in both Outlook versions are available on the following Microsoft article.
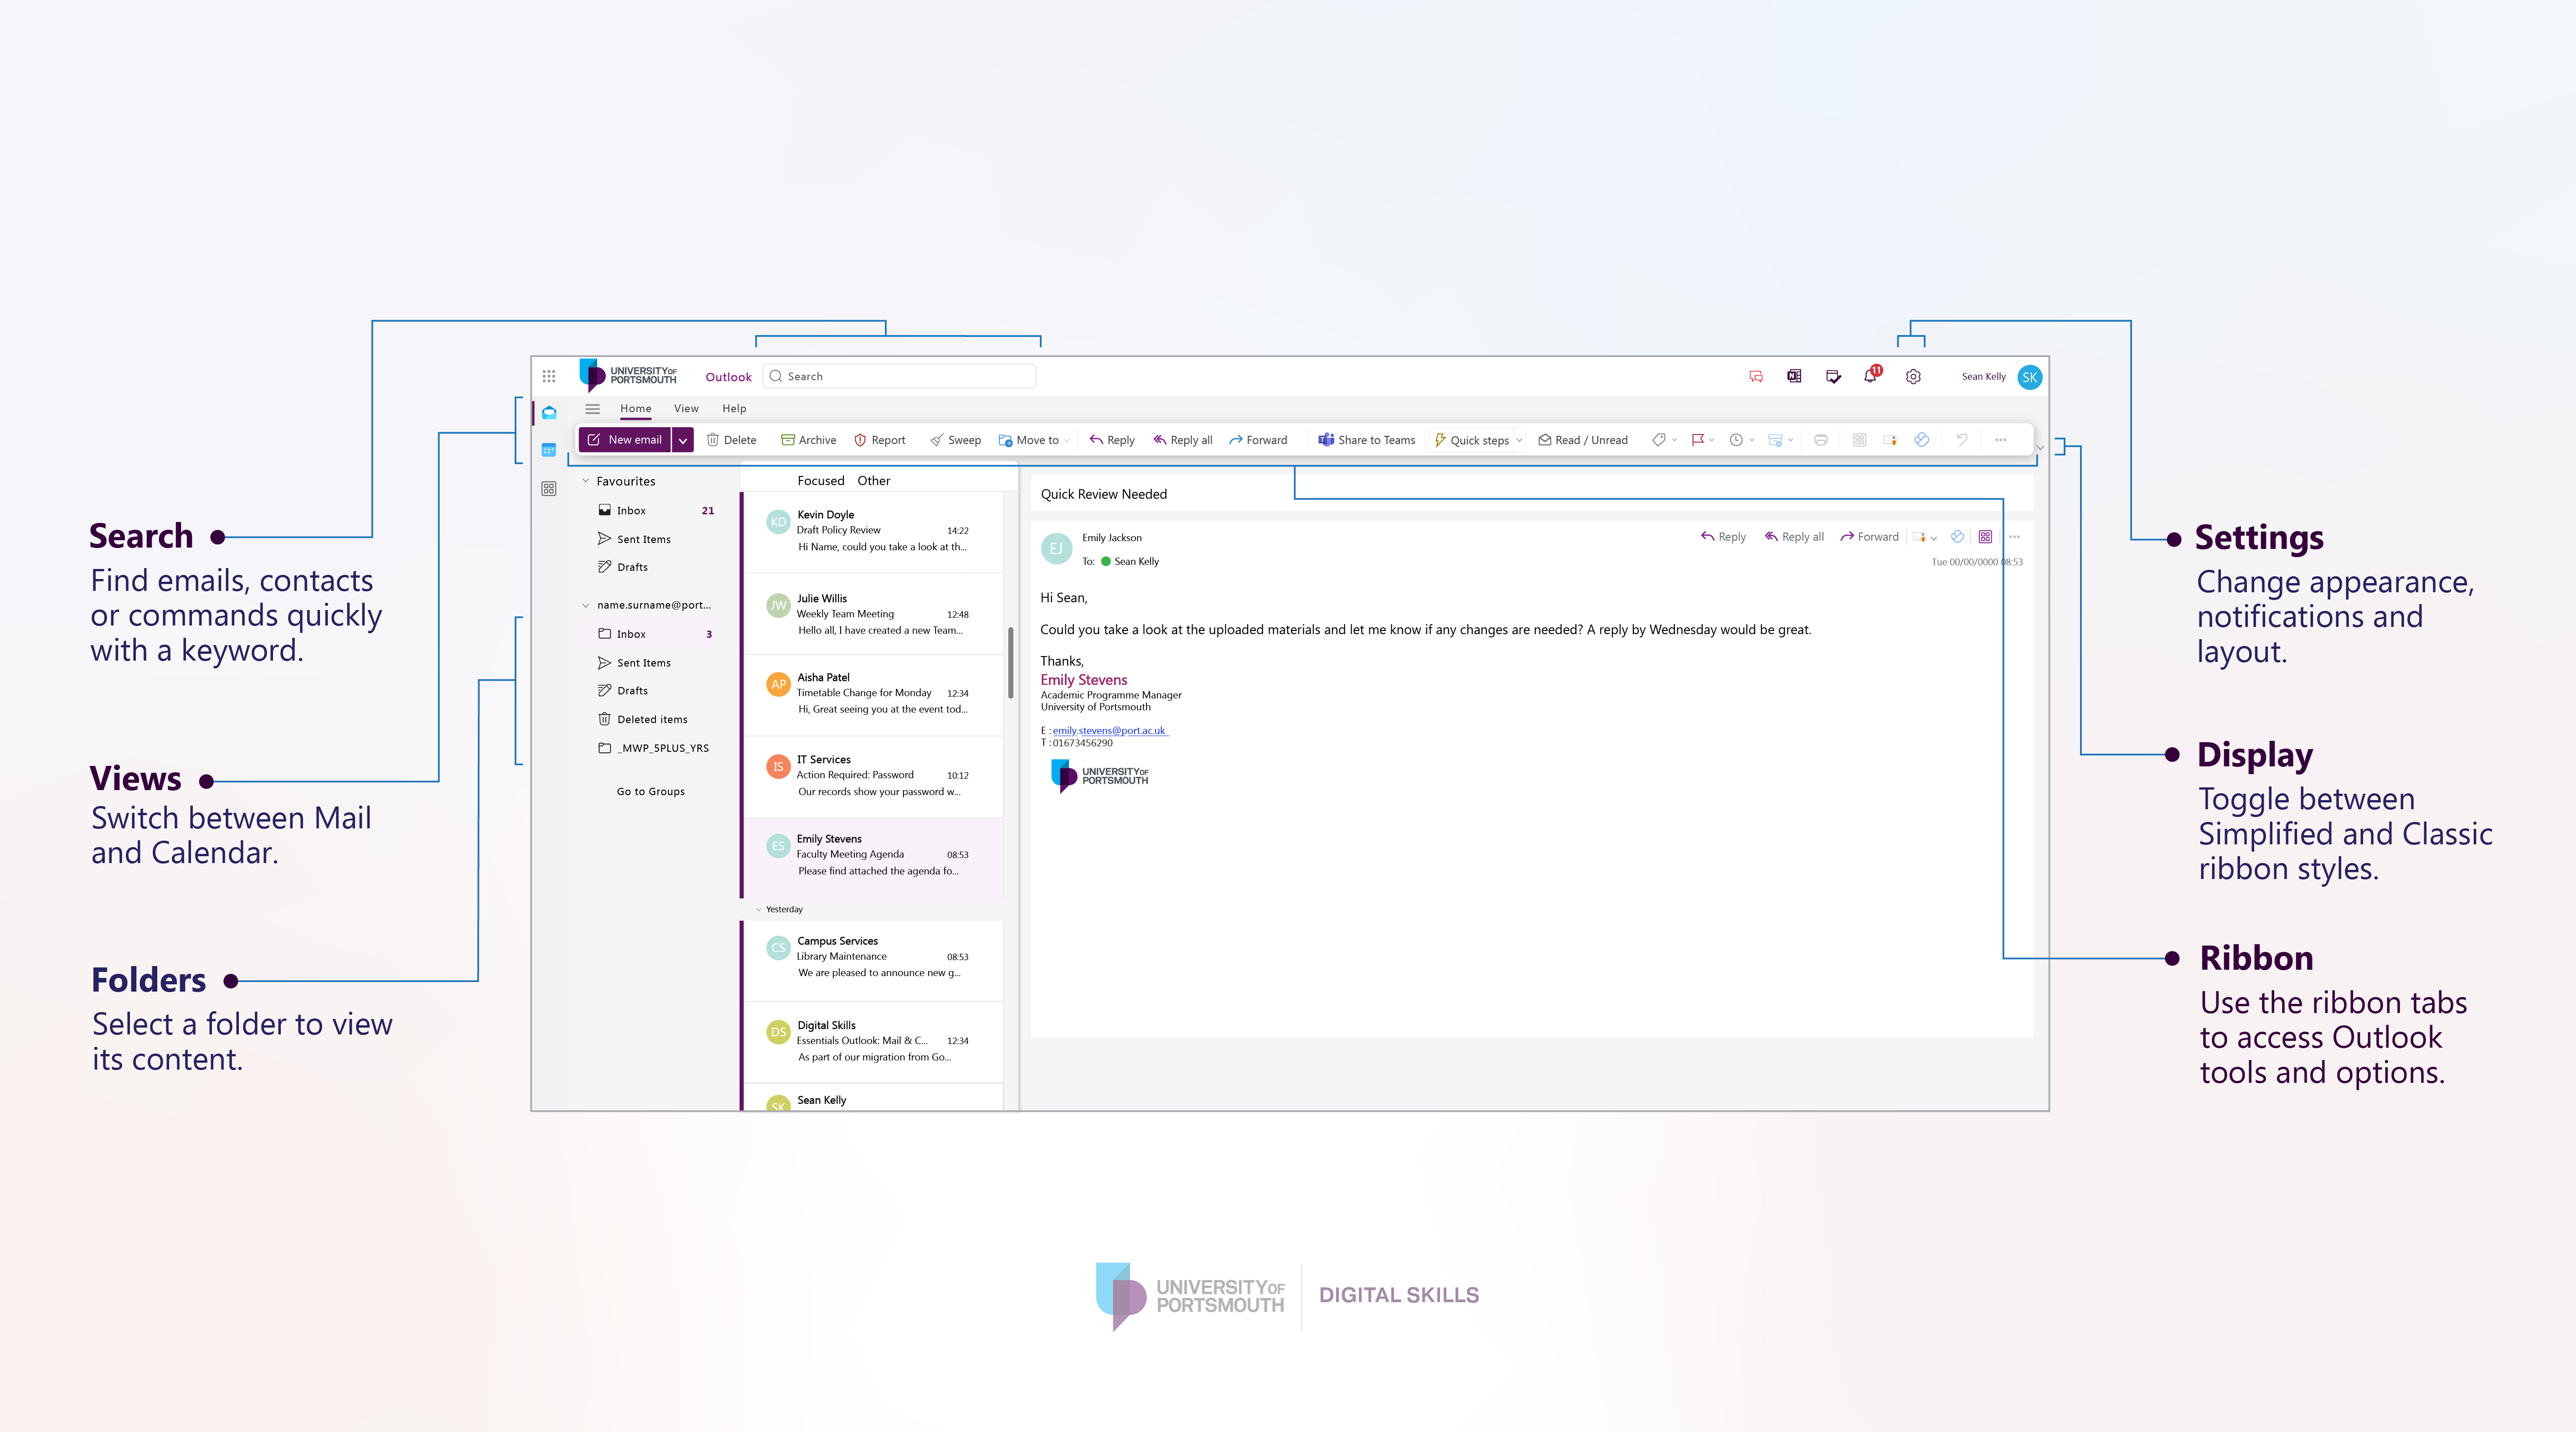
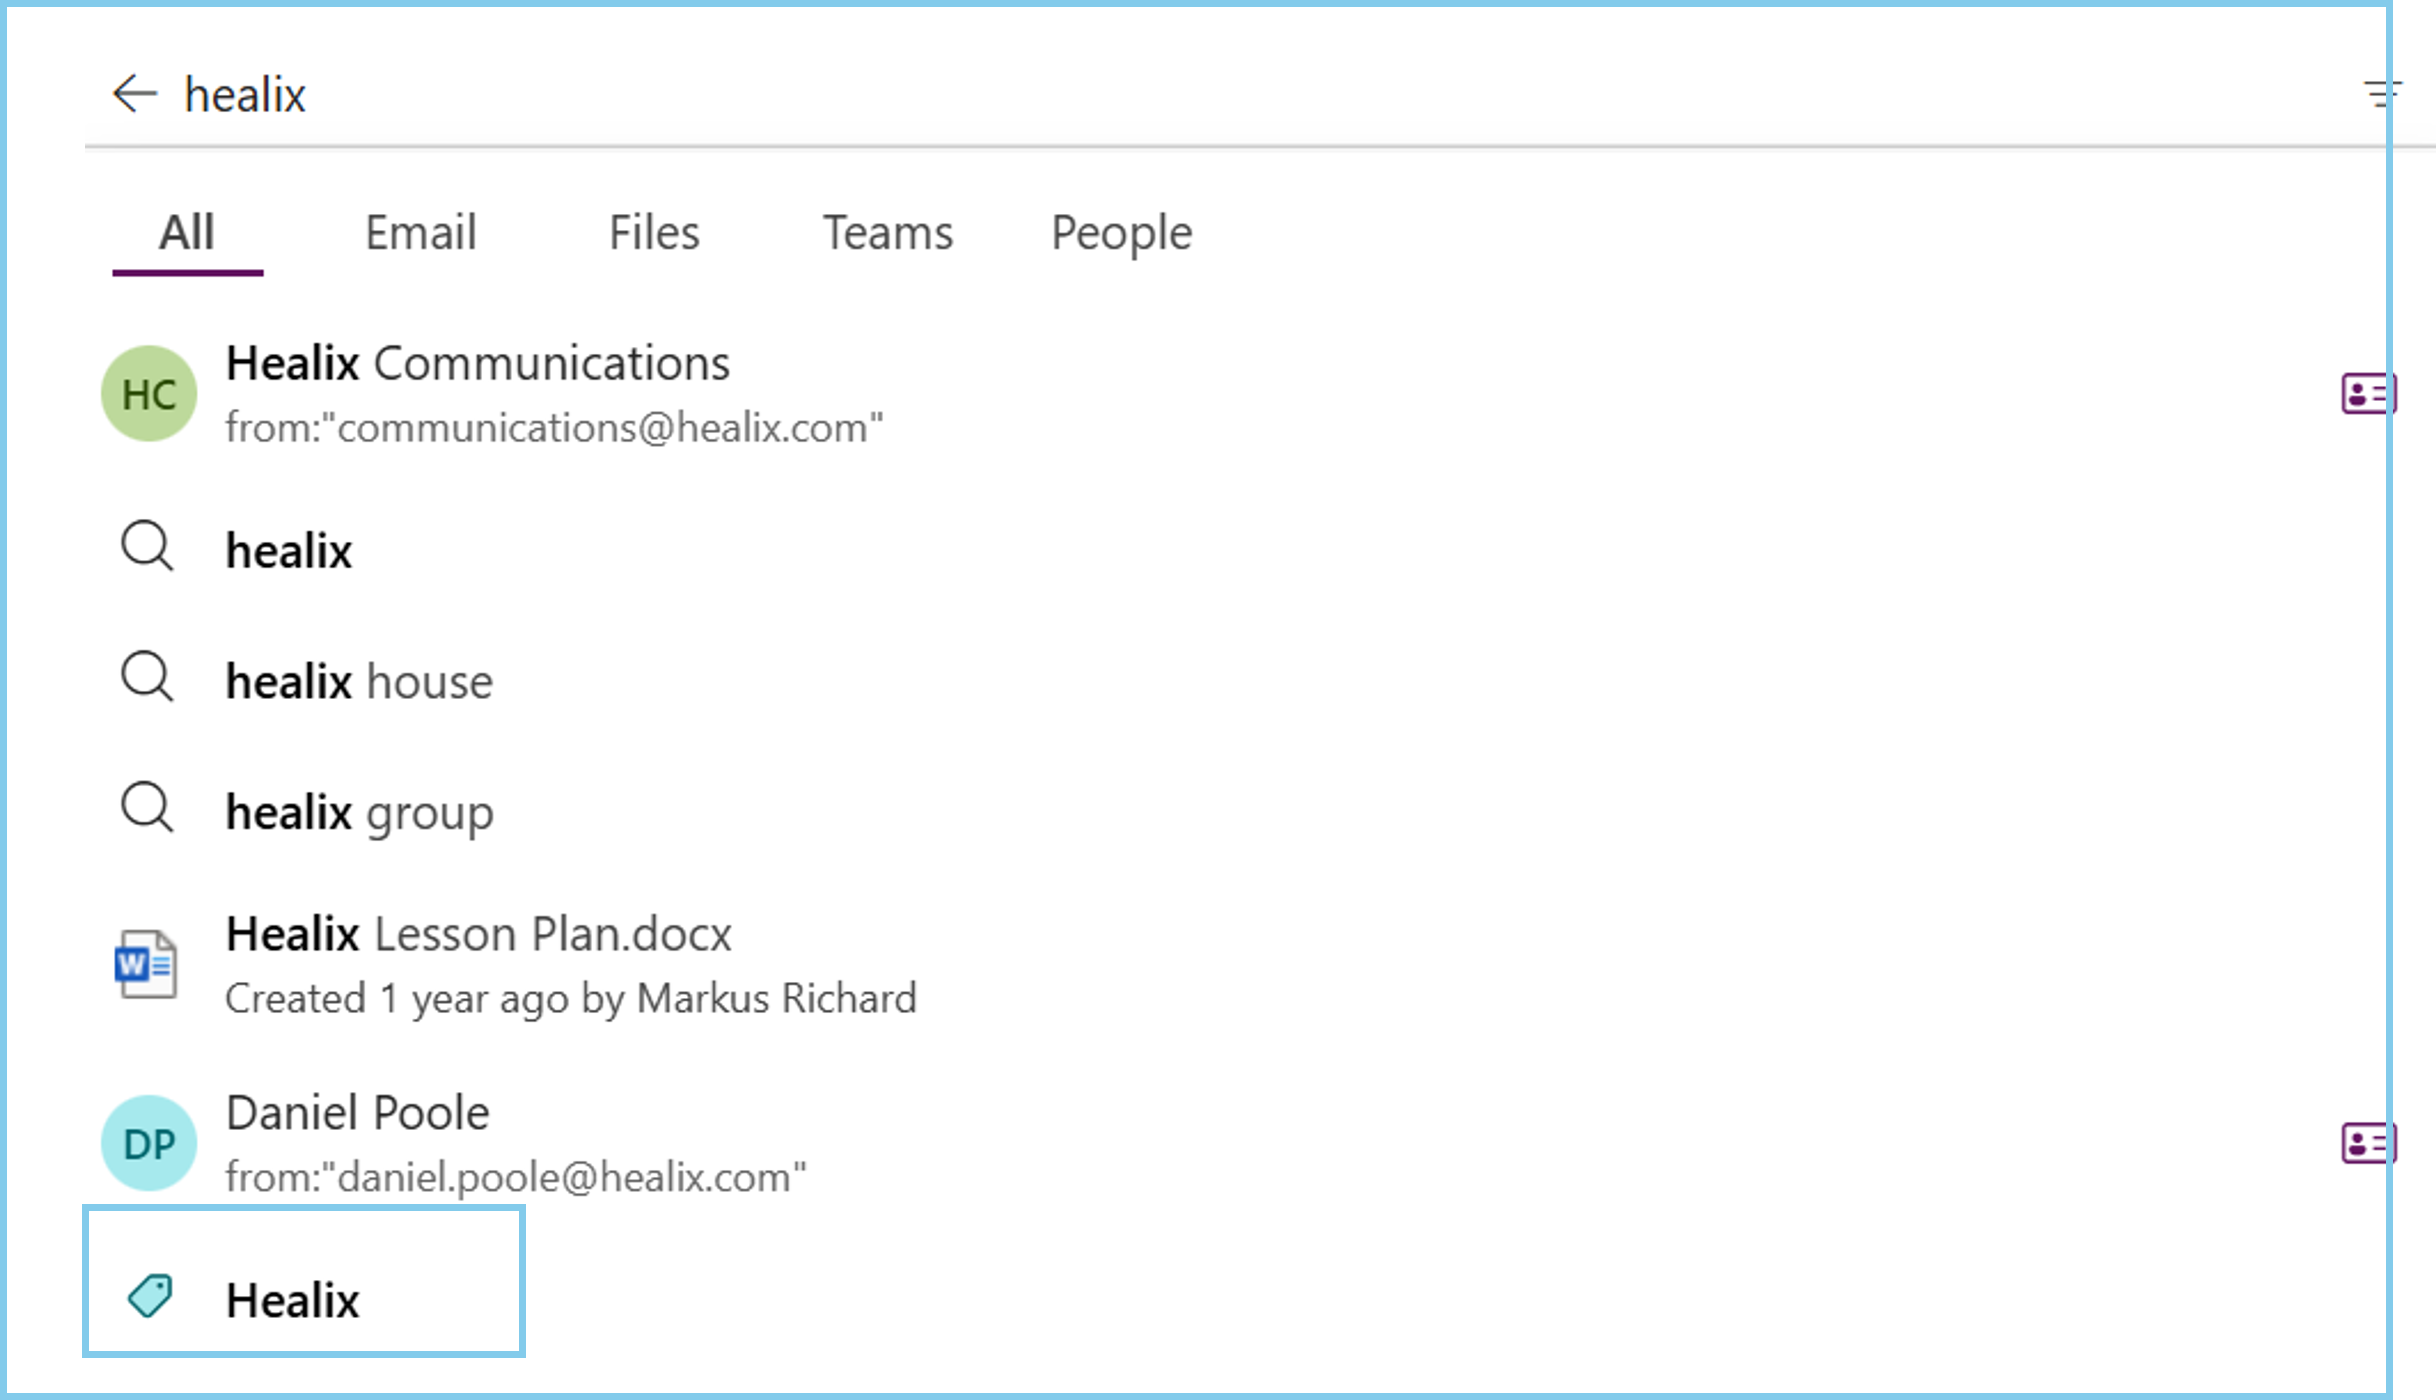
Outlook search helps you quickly find emails, files and people by using keywords, search locations and filters. You can type what you are looking for, choose where Outlook should search, filter the results by type, and then refine the results further if needed.
Within Outlook Mail, select the Search box at the top of the page and type a keyword, name, subject, or phrase.
As you type, Outlook may start showing matching results. These results can include emails, files and people, depending on the keyword you have used.
For example, you could search for:
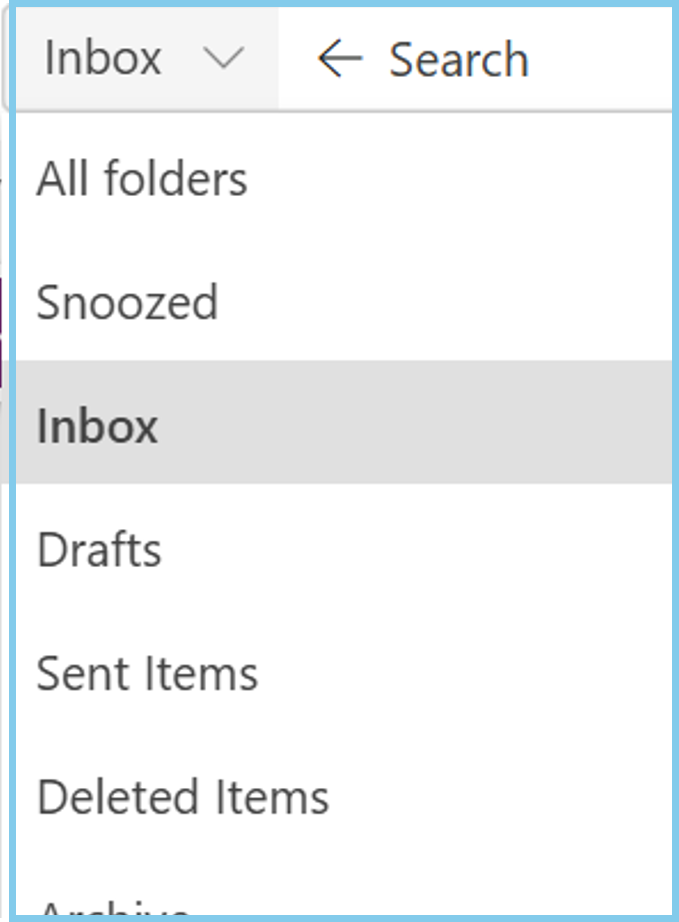
To the left of the search box, there is a drop-down menu that lets you choose where Outlook should search.
Depending on where you are in Outlook, this may include options such as:
If you select a specific folder before searching, Outlook may automatically change the search location to that folder. For example, if you select Sent Items, the search will default to searching within Sent Items rather than your whole mailbox.
You can change the search location at any time by selecting the drop-down menu next to the search box and choosing the area you want Outlook to search.
After you type a search term, Outlook shows tabs that help you narrow the type of result you want to see.
You can choose from:
This is useful when a keyword returns different types of results. For example, if you search for a project name, you may see related emails, shared files and people connected to that project.
When you are ready to run the search fully, press Enter on your keyboard.
After you run a search, Outlook opens a Search tab at the top of the window. This gives you extra filters to help narrow the results further.
You can use these filters to show emails that match specific conditions: Has attachments, Unread, Mentions me, Flagged, High importance and To me.
Select one or more filters to narrow the search results. For example, if you are looking for an email that included a document, select Has attachments.
To return to your normal mailbox view, select Close search from the Search tab.
If you need to search using several details at once, use the filter button at the end of the search box. This opens advanced search, where you can add multiple search fields before running the search.
Advanced search is useful when a keyword search gives too many results. For example, you could search for emails from a specific person, with a particular subject, during a set date range, and with attachments.
Copilot is built into Outlook and can help you work with your emails in a more conversational way. Instead of only searching by keywords or filters, you can ask Copilot questions about your Outlook content and use it to help find, summarise or prioritise information.
This is different from using the standalone Copilot Chat. In our University environment, standalone Copilot Chat cannot search against or have direct visibility of Outlook content in the same way. If your question is specifically about emails, calendar items or actions in Outlook, use the Copilot option inside Outlook. to do this:
Copilot can help when you are not sure exactly what to search for, or when you want to understand the content of your emails rather than only find a matching keyword.
You can use Copilot to help find emails, identify actions, summarise long conversations, highlight deadlines, catch up on missed messages, and decide which emails may need your attention first.
Copilot works best when you give it enough detail to understand what you are looking for. A useful structure is:
What you want + who or what it relates to + timeframe + what you want Copilot to do with the results.
For example, instead of asking: Find training emails.
You could ask: Find emails from the last two weeks about staff training. Summarise the key points and tell me if there are any actions I need to take.
You can ask Copilot questions in plain English. These examples show how you can use Copilot to search, summarise and prioritise Outlook content.
| What you want to do | Example prompt |
|---|---|
| Find emails about a topic | Find recent emails about [topic or project name]. |
| Search by topic and timeframe | Find emails from the last two weeks about [topic]. Summarise the main points and tell me which emails I should read first. |
| Find emails from a person | Show me recent emails from [person name] about [topic]. |
| Summarise a conversation with someone | Summarise recent emails between me and [person name]. Highlight any actions, decisions or dates I should know about. |
| Find emails that need action | Review my recent emails and list anything that appears to need a reply, action or follow-up from me. |
| Find deadlines or dates | Search my emails about [topic] and create a short list of any dates, deadlines, decisions and next steps mentioned. |
| Catch up after time away | I have been away since [date]. Summarise the key emails I received, group them by topic, and identify anything urgent or action-based. |
| Prioritise your inbox | Review today’s emails and give me a short priority list: urgent actions, useful information, and anything I can read later. |
You can also use Copilot when you have a specific email or email thread open. This allows Copilot to focus on that conversation, rather than your wider mailbox.
This can be useful when you want to quickly understand a long thread, ask questions about the conversation, or identify actions, decisions and next steps.
Example questions you could ask include:
To view this image in more detail, right-click it and select Open image in new tab. You can then zoom in for a closer look.
From 16th June 2026, Focused Inbox will be switched off, bringing all emails into one inbox view. To restore the Focused and Other tabs, you can turn this feature back on using the instructions below.
If your inbox now appears busy, tools such as Sweep and Outlook Rules can help you quickly organise messages.
Focused inbox is an Outlook feature that separates your inbox into two tabs:
Outlook uses your email activity and interactions to decide how messages are sorted. It automatically filters messages based on:
Over time, built-in Outlook intelligence will improve as it learns your preferences. You can further refine sorting manually:
Note: When using a Focused inbox, it is important to review all messages in both the Focused and Other tabs regularly.
A Focused inbox can be turned on or off, depending on how you prefer to work with your messages. To switch the layout, follow the following steps:
If you use the Outlook app on a mobile device, you will need to manage whether the Focused Inbox is turned on or off through the settings within the Outlook app.
Drafting and sending an email in Outlook is simple and efficient. Additionally, Outlook offers enhanced formatting options, including the ability to insert tables and check accessibility.
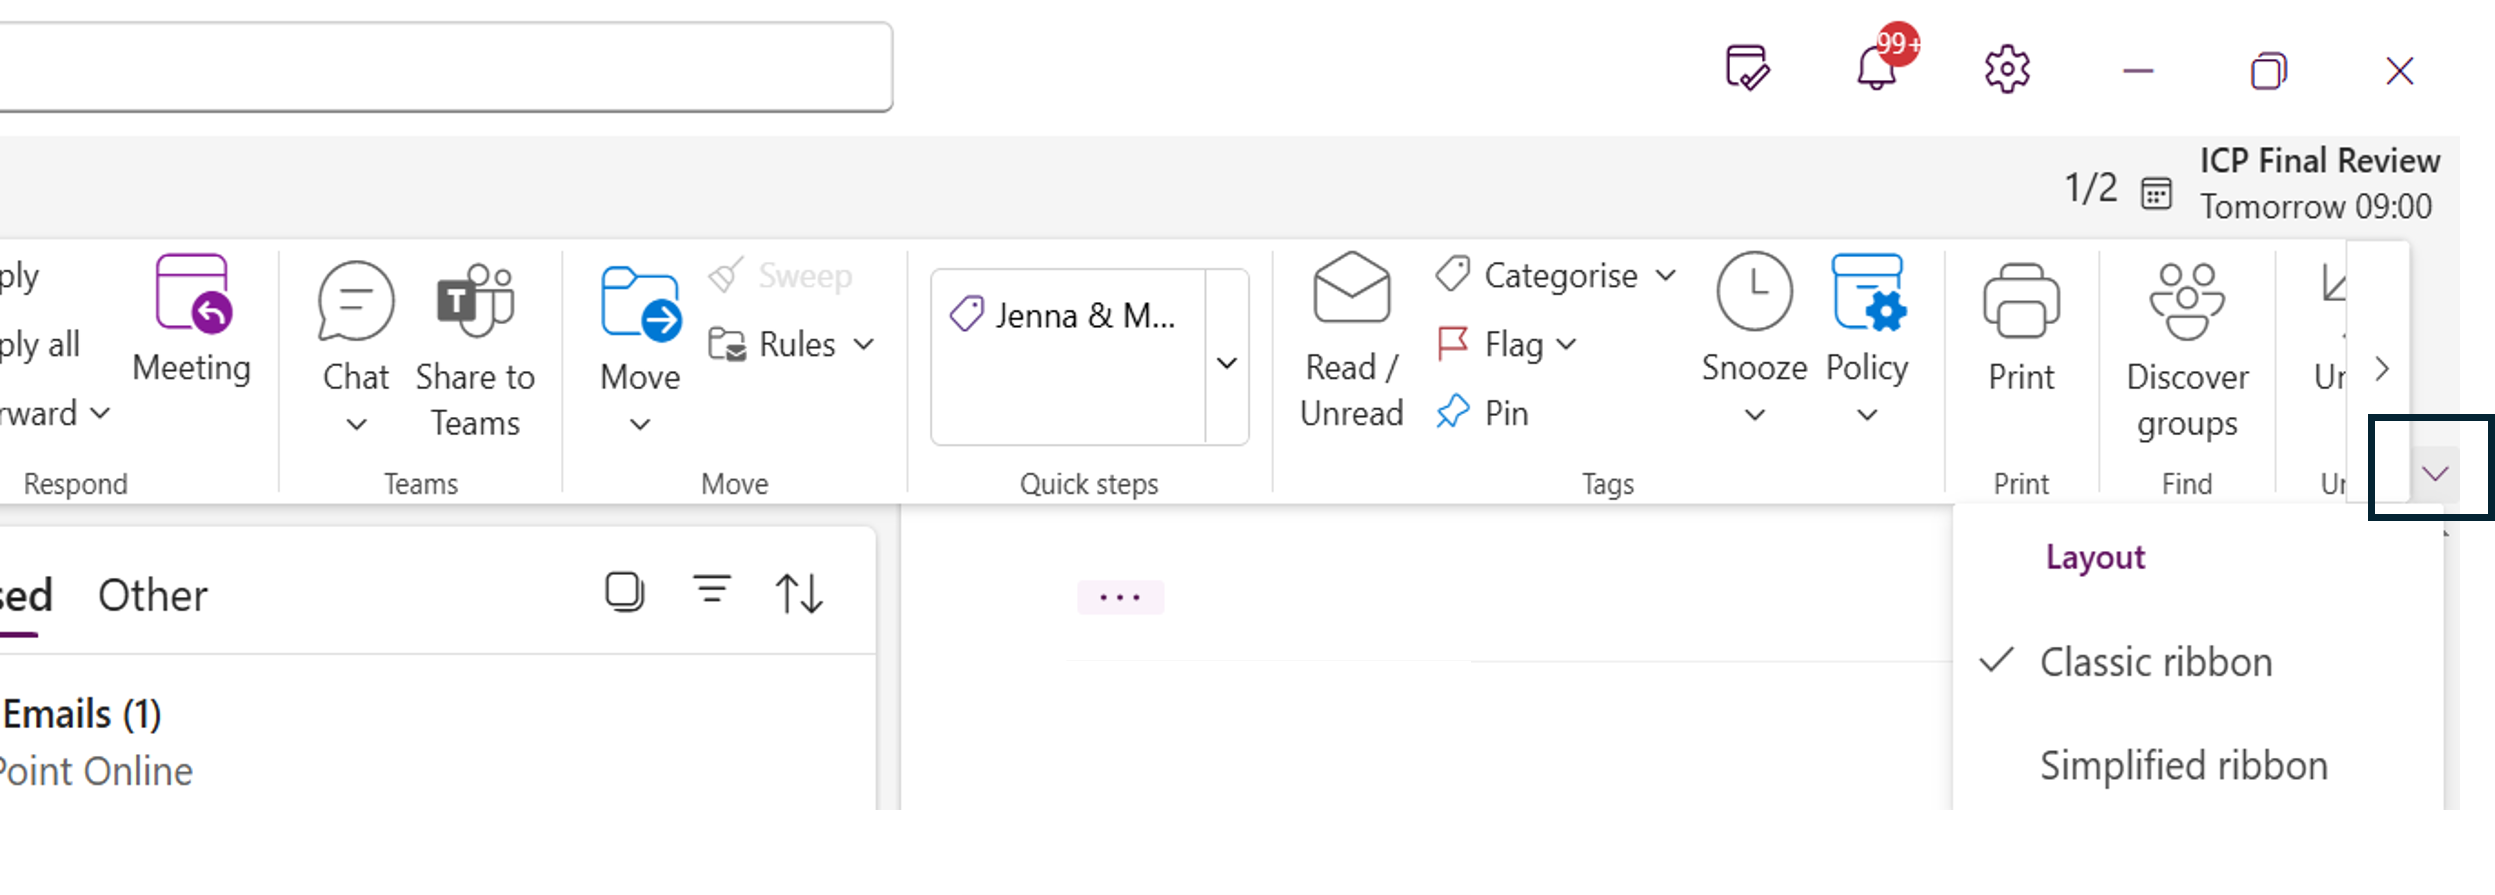
Note: If you cannot see all the options mentioned above, click on the ... at the end of the ribbon.
Please note: There is no way to customise the order the options are displayed in Outlook.
Snoozing an email in Outlook is a feature that allows you to temporarily remove an email from your inbox and have it reappear at a later time. This can be particularly useful for managing emails that you want to address later without cluttering your inbox.
Note: The Snoozed email will be stored in a Snoozed folder that appears above your inbox.
Sorting and filtering emails in Outlook can help you manage your inbox more efficiently.
Flagging emails identifies emails that are important or that need follow up actions by a date.
The Sweep feature in Outlook is a tool designed to help you quickly manage and organise your inbox by automatically handling emails from specific senders. It provides several options for dealing with unwanted or less important emails, making it easier to keep your inbox clutter-free.
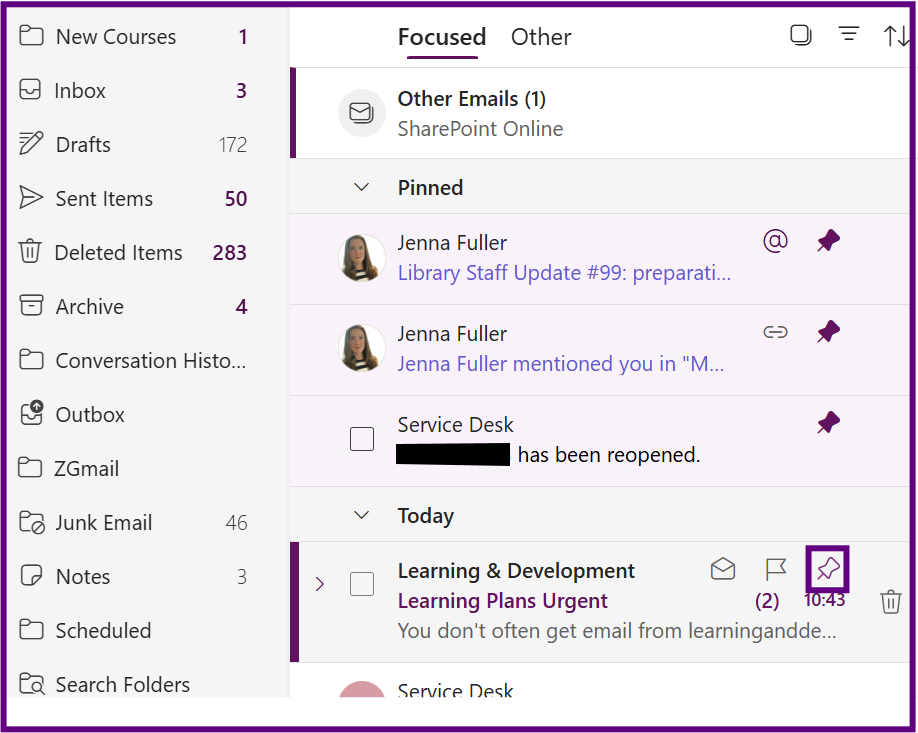
A pinned email is a message that has been marked to stay at the top of your inbox or folder for easy access. Pinning is typically used to highlight important emails that you want to keep visible, such as reminders, key information, or ongoing conversations. Unlike regular emails that move down as new messages arrive, pinned emails remain fixed in place until you choose to unpin them.
Scheduling an email to be sent later in Outlook is a handy feature that allows you to compose your message now and have it sent at a specific time in the future.
Some settings in Outlook on the Web (OWA) do not to apply to the Outlook desktop app, and vice versa. We recommend you either allocate some time to set both desktop app and outlook on the web to fit your needs as soon as you migrate, or you initially set the version you’re likely to use the most.
The Out of Office feature in Outlook allows you to set an automatic reply to incoming emails when you are unavailable, such as when you are on leave, sick leave, or attending a conference.
Notes:
When you first open Outlook, the default layout may show only the list of emails without a reading pane, where the message content is displayed alongside the inbox. You can enable the Reading Pane so you can preview emails without opening them in a new window.
Outlook offers two toolbar display options, Classic and Simplified allowing you to choose the layout that best suits your working style.
In Microsoft Outlook, emails become minimised into tabs at the bottom of the window when you open multiple messages or items (like emails, calendar events, or tasks) in separate windows. This feature has been designed to reduce window clutter and make multitasking within Outlook more manageable.
Organising and managing emails
Migrating to Outlook is a great opportunity to rethink how you organise your inbox. While the tools are a bit different from what you're used to in Gmail, Outlook offers powerful features to help you stay on top of your messages.
In Gmail, you used labels to organise your emails. You could apply multiple labels to a single message, the email would appear under each of those labels, like placing one document in several folders at once.
Outlook uses a combination of folders and categories:
Folders can be created which will help you organise your emails.
Note: emails can only exist in one folder.
Open Outlook.
You can categorise emails with multiple categories in Outlook, which is the closest feature to Gmail labels. Categories however do not put emails into folders.
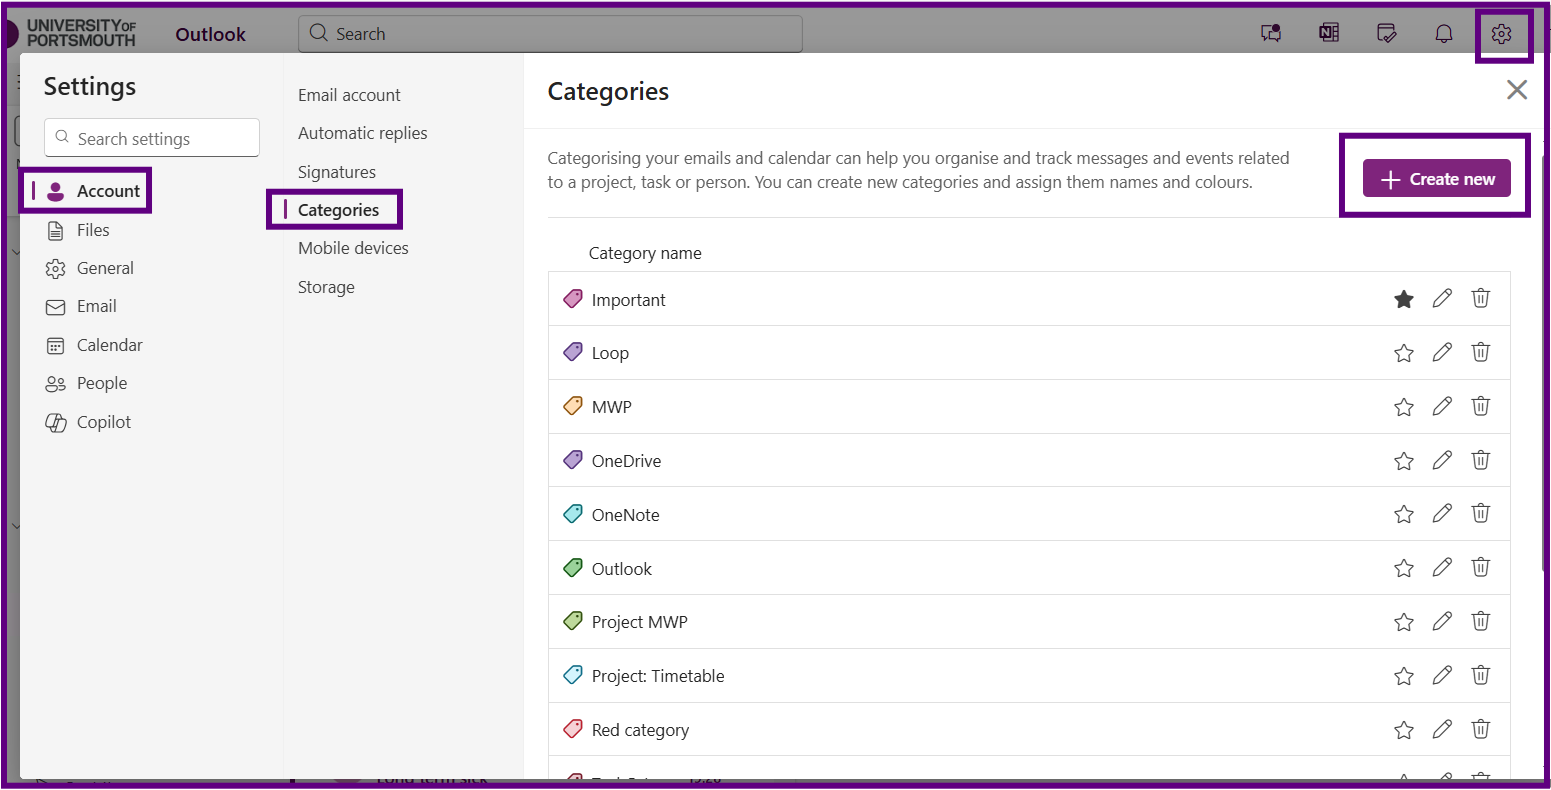
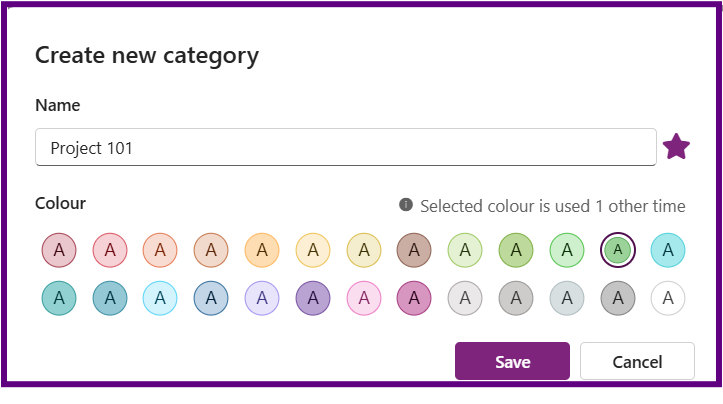
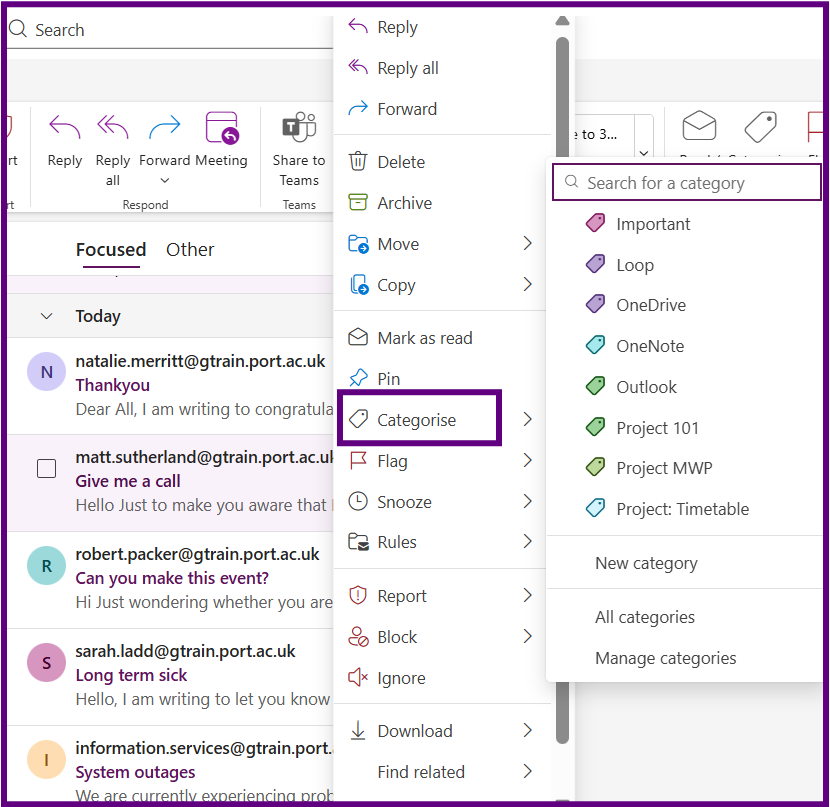
Note: Emails can have multiple categories, but they can only exist in one folder at a time.
Search Folders in Outlook are virtual folders that provide a view of all email items matching specific search criteria. They don’t move or duplicate emails but offer a convenient way to access categorised or filtered messages. The instructions below show to create a Search Folder for categorised emails:
Sorting and filtering emails in Outlook can help you manage your inbox more efficiently.
By default when you search using the Search bar, Outlook will search all folders .

If you select the dropdown arrow you can limit the search to a particular folder (note the dropdown will show all the folders you have created but not sub-folders).
Outlook has AI embedded that will alert you if you don't normally get mail from someone so that you can then take more time to assess that email in case it is a phishing email.
Once you receive a few emails from that address then the message will disappear.
If the email is from an external account you will see this prompt when you open the email
Select Trust Sender to view the email. The email will then be placed in your Trusted Sender list which is available by selecting Settings (cog), select Email and then Junk Mail.
The Share to Teams feature in Outlook allows you to send emails and attachments directly into a Teams chat or channel. It’s a useful way to bring relevant information, such as student queries, meeting notes, or shared documents into ongoing discussions with colleagues or course teams, without needing to forward emails or switch between apps.
In Outlook, open the email you want to share.
Click the Share email using Teams button.
Choose the person, group chat, or channel you want to share it with.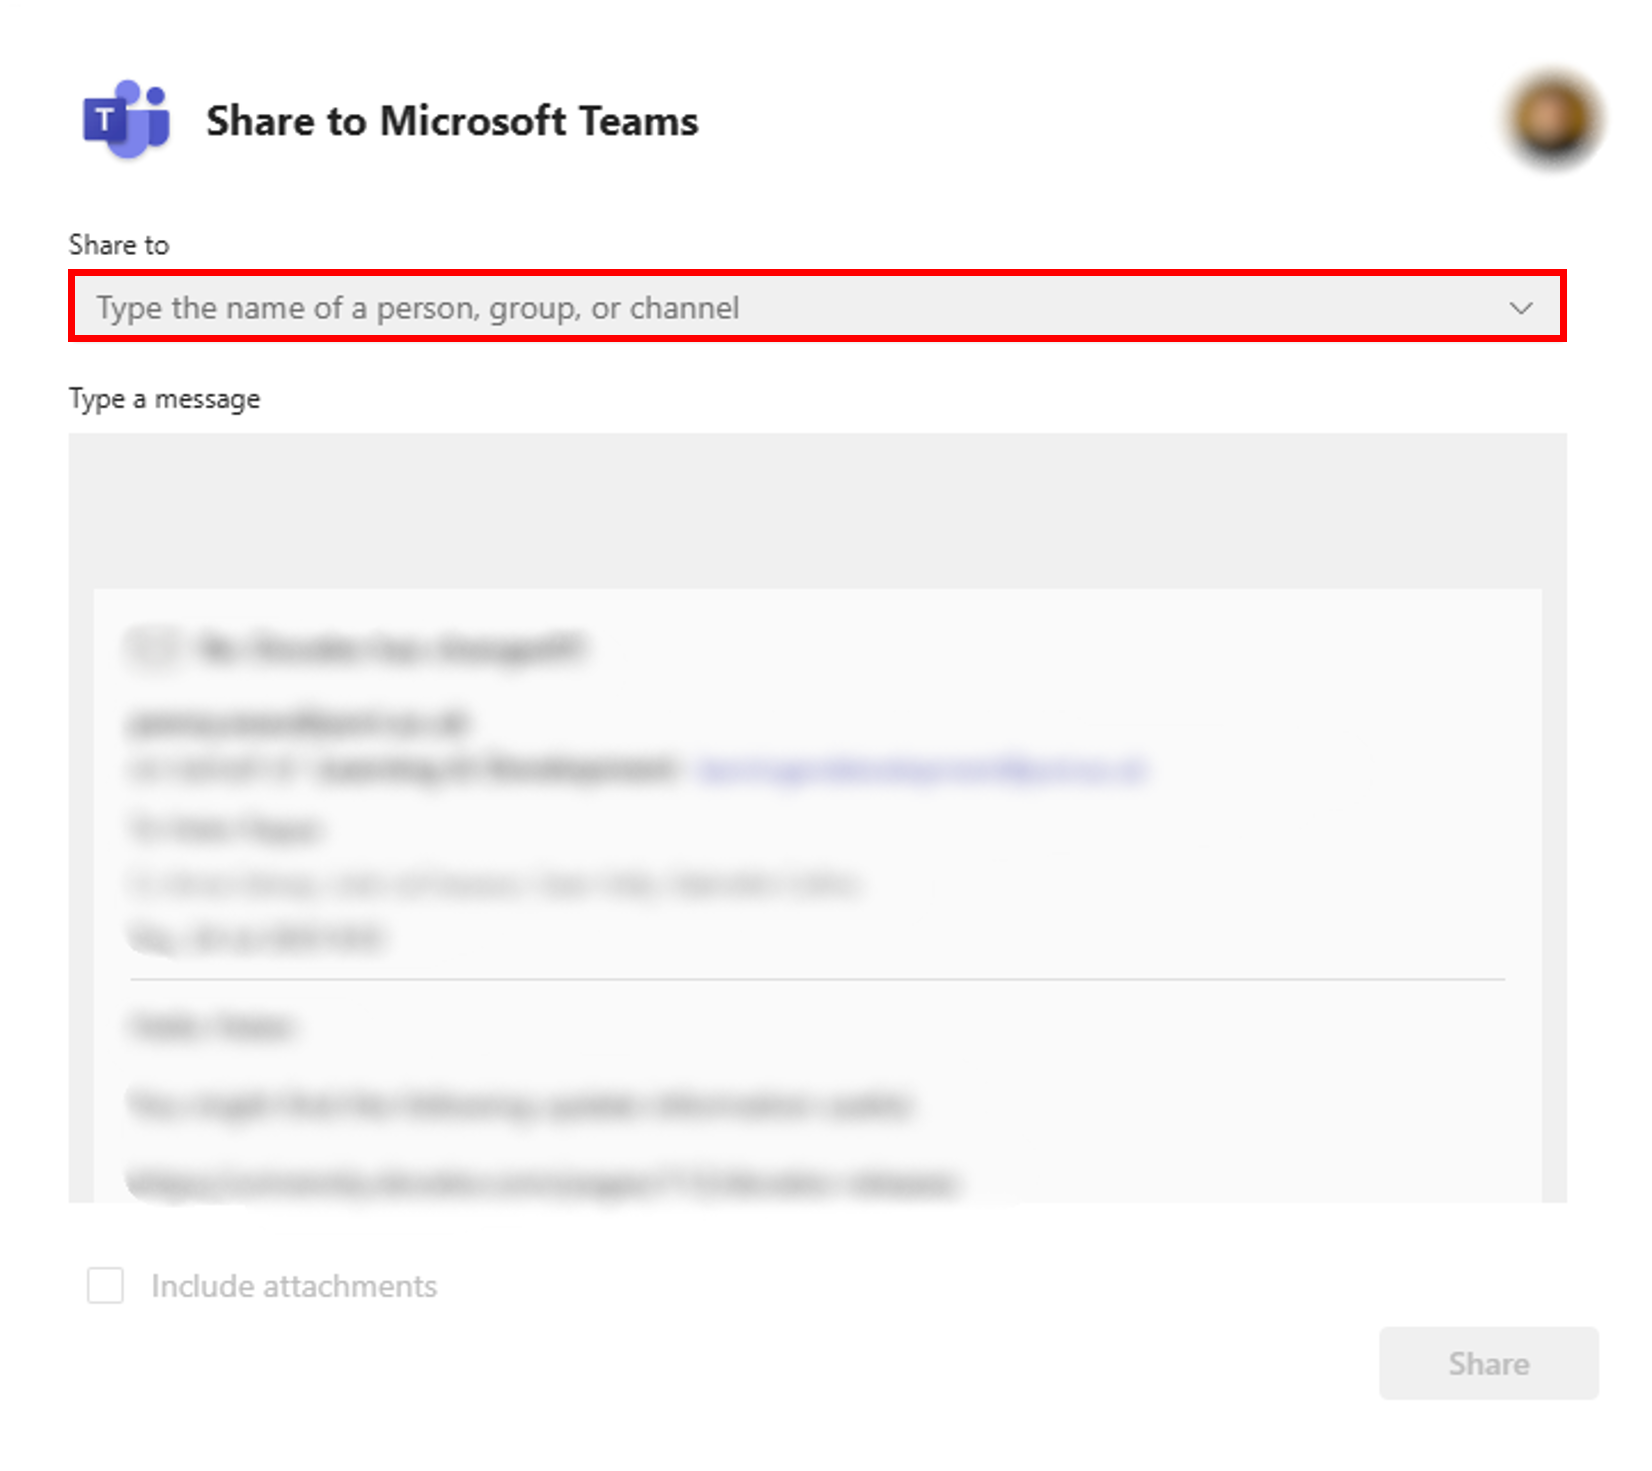
Add a message if needed, then click Share.
This sends the email content and any attachments into the selected Teams conversation, helping keep discussions and context in one place.
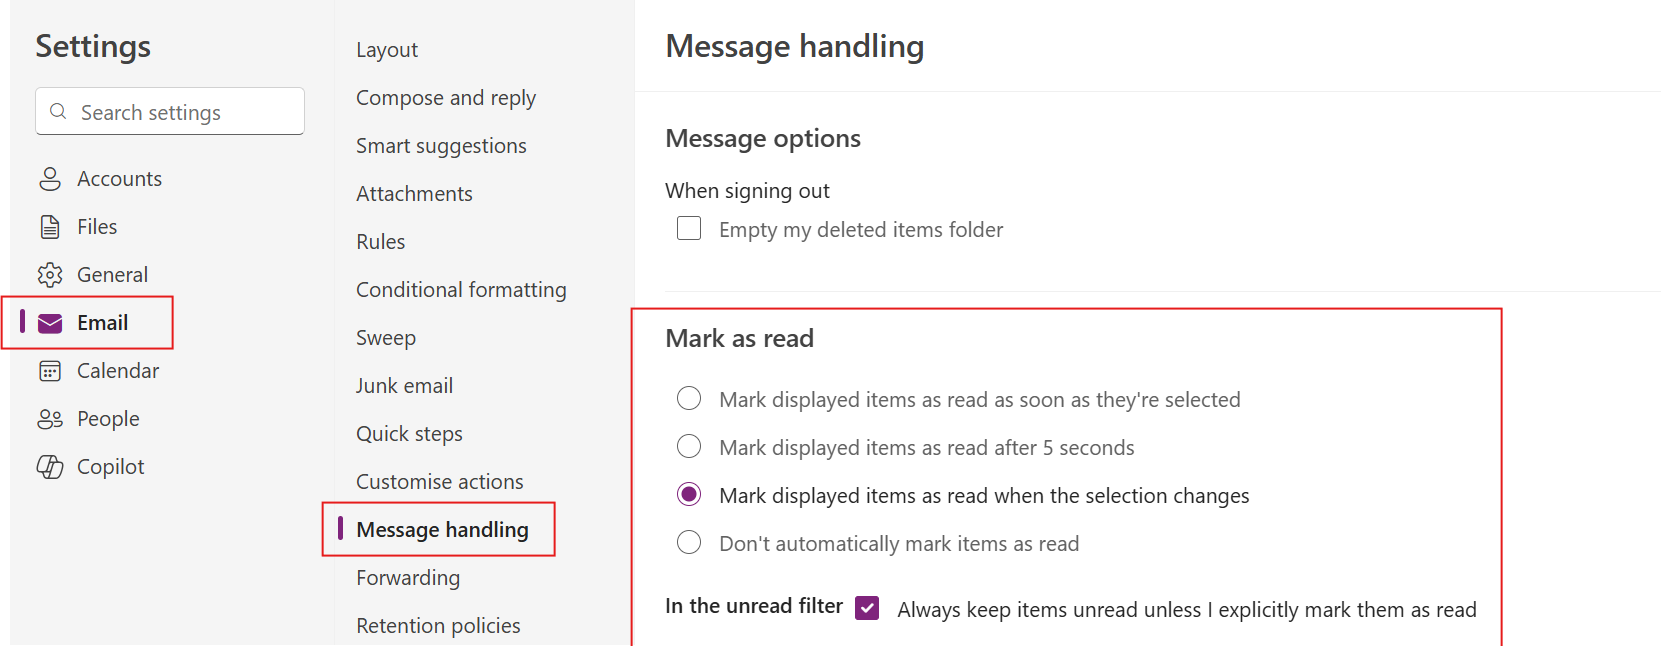
If you open an email and move it to a new location, such as a folder, before it has been marked as read, Outlook will continue to display it as unread in the folder. This can lead to confusion about how many unread or outstanding emails you actually have.
To prevent this, you can change when Outlook marks emails as read in the Reading Pane.
Select the Settings icon in the top-right corner.
Click Email, then select Message handling from the left-hand menu.
Under Mark as read, choose one of the following:
Mark displayed items as read as soon as they're selected (recommended if you want emails marked read instantly)
Or choose another option, like after 5 seconds or when the selection changes
(Optional) Untick Always keep items unread unless I explicitly mark them as read if it’s enabled.
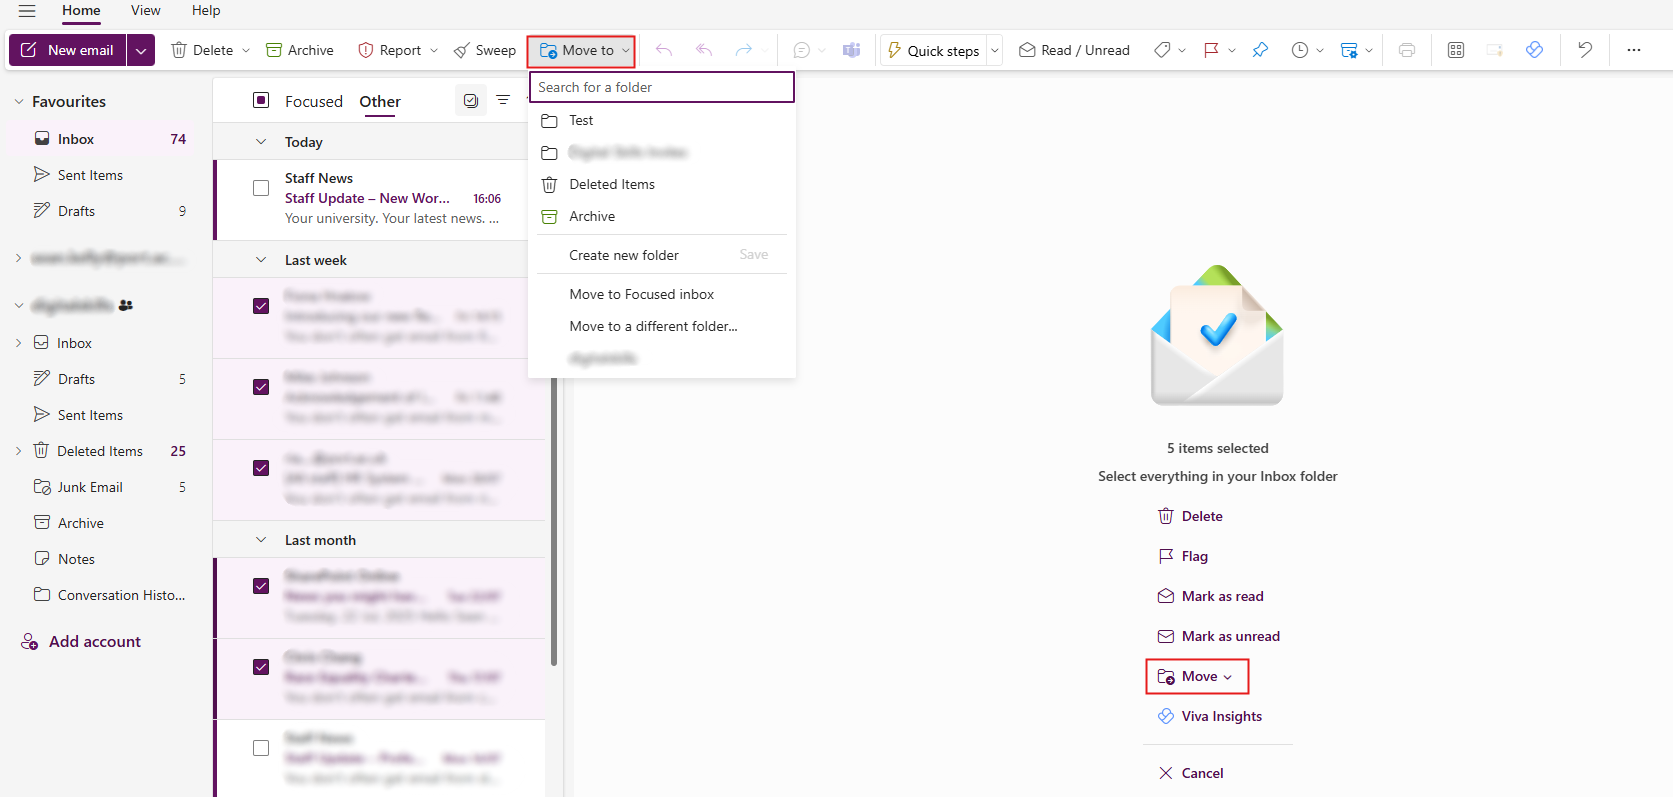
If you want to organise your inbox, you can move large numbers of emails to another folder using either manual selection or a rule.
Open your Inbox in Outlook.
Tick the checkbox beside the first email in the list.
Scroll down, hold Shift, and tick the checkbox beside the last email you want to select. This will check all emails between the first and last selection.
Click Move to in the top toolbar, or from the right selection options. Choose Move, then select your folder.
Outlook rules can be used to help automatically manage your inbox. Rules can be applied to existing items in your inbox and future emails as they are received. When creating a rule, the conditions you select act as the search criteria used by Outlook to identify the relevant emails, and actions you select instruct Outlook how to handle the messages.
To create a rule to bulk move emails from your inbox to a folder, follow the steps below.
When moving from Google Gmail to Microsoft Outlook, one of the biggest differences you’ll notice is how email conversations (threads) are handled.
If you’re used to Gmail, you might expect the whole thread to move when you file an email. In Outlook, you need to move each email you want to keep together.
To keep conversations organized:
If you want to keep related emails together, move all relevant emails from the conversation into the same folder. Outlook does not automatically keep them grouped when you move just one.
This guide explains how retention labels work in Microsoft Outlook to help you manage unwanted mail and keep your mailbox organised.
Retention labels in Outlook operate through a periodic activity that runs at a fixed time each week. This activity is a batch process that checks whether items with a retention label have reached the end of their retention period and removes the item if it has.
To illustrate how this works, let's consider an example where the batch process runs on a Thursday (note that actual dates may vary):
If an item has not yet reached the prescribed wait time, it will be skipped until the next run. This can result in items remaining in your mailbox a little longer than expected, especially for the 1-week label.
Using Templates
Both the built-in Templates feature and the My Templates add-in let you reuse content in Outlook, but they are designed for different purposes.
| Built-in Templates | My Templates add-in |
|---|---|
| It saves full emails, including recipients, subject, body, formatting and attachments. | It stores short text snippets for quick insertion into an email. |
| Supports rich formatting, images, tables and attachments. | Only supports plain text with basic styling (bold, italics, underline). |
| Ideal for complete, repeatable emails such as newsletters, announcements or formal messages you send regularly. | Best for inserting short reusable phrases such as standard replies, instructions or frequently used lines. |
| Only you can see and use your templates. | Only you can see and use your snippets, and they sync across Outlook on the web and desktop. |
| Works only when composing a new email; cannot be used in replies or forwards. | Can be used while composing emails and usually while replying or forwarding, directly from the add-in panel. |
| Changes require recreating and saving a new version of the template. | Snippets can be edited instantly inside the add-in panel. |
| Suitable for longer, structured or formal communication. | Suitable for short paragraphs, repeated lines or simple standard responses. |
Template behaviour in shared mailboxes depends on whether the shared mailbox has been promoted to a full mailbox in the new Outlook on Windows.
You can create a template from any email you compose. This is useful when you have a message you send regularly and want to save its layout, formatting or wording for quick reuse.
Note: Everything currently in your email will be saved as part of the template. This includes images, links, body text, the subject line, and any recipients in the To, CC or BCC fields. Remove anything you do not want to reuse before saving.
You can insert a saved template whenever you start a new email. This allows you to quickly reuse standard wording, layouts or messages without recreating them each time.
Note: Outlook’s built-in Templates can only be used when creating a new email. They cannot be applied to replies or forwards.
You can view, organise and delete your saved templates from Outlook’s settings. This allows you to keep your list up to date and remove templates you no longer use.
Note: Templates cannot be renamed or edited directly. To update a template, you must recreate it from a new email and save it as a replacement.
You can use the My Templates add-in to create short reusable snippets that you can quickly insert into emails. This is helpful for standard replies, repeated paragraphs or frequently used instructions.
You can quickly insert any snippet you’ve saved in the My Templates add-in while writing an email. This is useful for standard phrases, repeated instructions or common responses.
Contact and distribution lists
Both contact lists and distribution lists let you email a group of people at once, but they are designed for different purposes.
| Contact List | Distribution List |
|---|---|
| Personal. Only you can see and use it. | Managed centrally and available for organisational use. |
| Best for small informal groups such as friends, a project team or frequent contacts. | Best for departments, services or larger groups where consistent communication is needed. |
| Created and managed by you in Outlook People. | Created by IS Service Desk in Exchange. Membership managed by DL Owners. |
A distribution list is a centrally managed group email address that lets you send one email to multiple recipients at once. They are best for announcements or one-way communication.
Distribution lists are different from contact lists, which are personal and only visible to you. See the Contact Lists section for more details.
Distribution lists were previously known as Google Groups. During migration to Outlook, the people who were “Owners” in Google Groups were carried over as Owners in distribution lists.
It is important to note that ownership works differently in Outlook:
Submit a request using the Outlook: Request a new shared resource or calendar Service Manager form.
Note: If you are a distribution list owner and would like support managing the settings, please email [email protected]. We can then arrange a one-to-one call to guide you through the process.
In the To field of an email message, type the name of the distribution list. Compose your message and click Send. Your email will go to everyone in the list.
Once a distribution list is created, specified individuals will be granted Owner permissions to manage the membership of the list.
A contact list is a personal group of email addresses that only you can use. It lets you send one email to several people without typing each address individually.
To view this image in more detail, right-click it and select Open image in new tab. You can then zoom in for a closer look.
To install the Zoom for Outlook add-in:
Now that the add-in is installed, learn how to schedule and edit meetings through the add-in.
Please note: It can take up to 24 hours for the Zoom add-in to appear in Outlook once it has been installed.
Loop components are live, collaborative lists or pages that everyone invited to the meeting can view and edit directly within the event. They are useful for shared agendas, notes, or action items, allowing updates without sending new meeting notifications.
Note:
If an email needs more than a quick reply, convert it to a calendar event. This lets you schedule time to work on it and keeps the original message attached for easy reference.
When creating meetings in Outlook, the creator has the option to make the meeting a Microsoft Teams Meeting. The following options are available for Team meetings:
|
Meeting option |
What it does |
|---|---|
|
Who can bypass the lobby? |
Decide who gets into meetings directly and who should wait to be let in by using the lobby.
|
|
People dialing in can bypass the lobby |
Turn the People dialing in can bypass the lobby toggle on to allow anyone joining your meeting by phone to enter without waiting in the lobby. |
|
Who can admit from the lobby? |
Choose who can let people into your event from the lobby. By default, organizers, co-organizers, and presenters can admit people from the lobby. |
|
Announce when people dialing in join or leave |
Turn the Announce when people dialing in join or leave toggle on to receive alerts when people calling in by phone join or leave your meeting. |
|
Require unverified participants to verify their info before joining |
When you turn on the Require unverified participants to verify their info before joining toggle, unverified participants will receive an email with a one-time passcode they'll need to enter to join the meeting. |
|
Meeting option |
What it does |
|---|---|
|
Choose co-organisers |
After you invite people to your meeting, add co-organisers to give them most organiser capabilities.
|
|
Who can present |
See Roles in a Teams meeting for details about selecting presenters and changing someone's role before and during a meeting. . |
|
Enable language interpretation |
Turn on the Enable language interpretation toggle to add a professional interpreter to your meeting who can instantly translate the speaker’s language into another in real-time. |
|
Meeting option |
What it does |
|---|---|
|
Enable Green room |
The Green room allows organizers and presenters to join an event while attendees wait in the lobby.
|
|
Meeting option |
What it does |
|---|---|
|
Allow mic for attendees |
Turn the Allow mic for attendees toggle on or off to change attendee mic permissions.
|
|
Allow camera for attendees |
Turn the Allow camera for attendees toggle on or off to change attendee camera permissions. |
|
Meeting chat |
Change this setting to let attendees chat anytime, during a meeting only, or not at all. By default, anyone invited to a meeting can participate in the meeting chat before, during, and after the meeting. |
|
Q&A |
Enable Q&A to allow attendees to ask questions, post replies, and post anonymously during a meeting. Q&A can be unmoderated or moderated by meeting co-organisers. |
Allow reactions |
By default, attendees can send live reactions during a meeting to express how they feel about what’s being shared. |
Allow attendance report |
Attendance reports contain meeting attendance details, including how long attendees stayed, and how long your meeting lasted, and more. Turn on the Allow attendance report toggle to generate, view, and download attendance reports. |
|
Meeting option |
What it does |
|---|---|
|
Record and transcribe automatically |
Turn on the Record and transcribe automatically toggle to record and transcribe your meeting as soon as it starts.
|
|
Meeting option |
What it does |
|---|---|
|
Allow Copilot |
Choose when to allow Copilot during a meeting or event by selecting an option from the Allow Copilot dropdown menu.
If you choose Only during the meeting, Copilot can work without turning on transcription. If you turn on transcription, Copilot can always be used after the meeting.
|
|
Meeting option |
What it does |
|---|---|
|
Provide CART Captions |
Turn on the Provide CART Captions toggle to use Communication access real-time translation (CART) captions during a meeting. CART captions are generated by a trained CART captioner who listens and translates speech into text instantly.
|
Information taken from Microsoft support
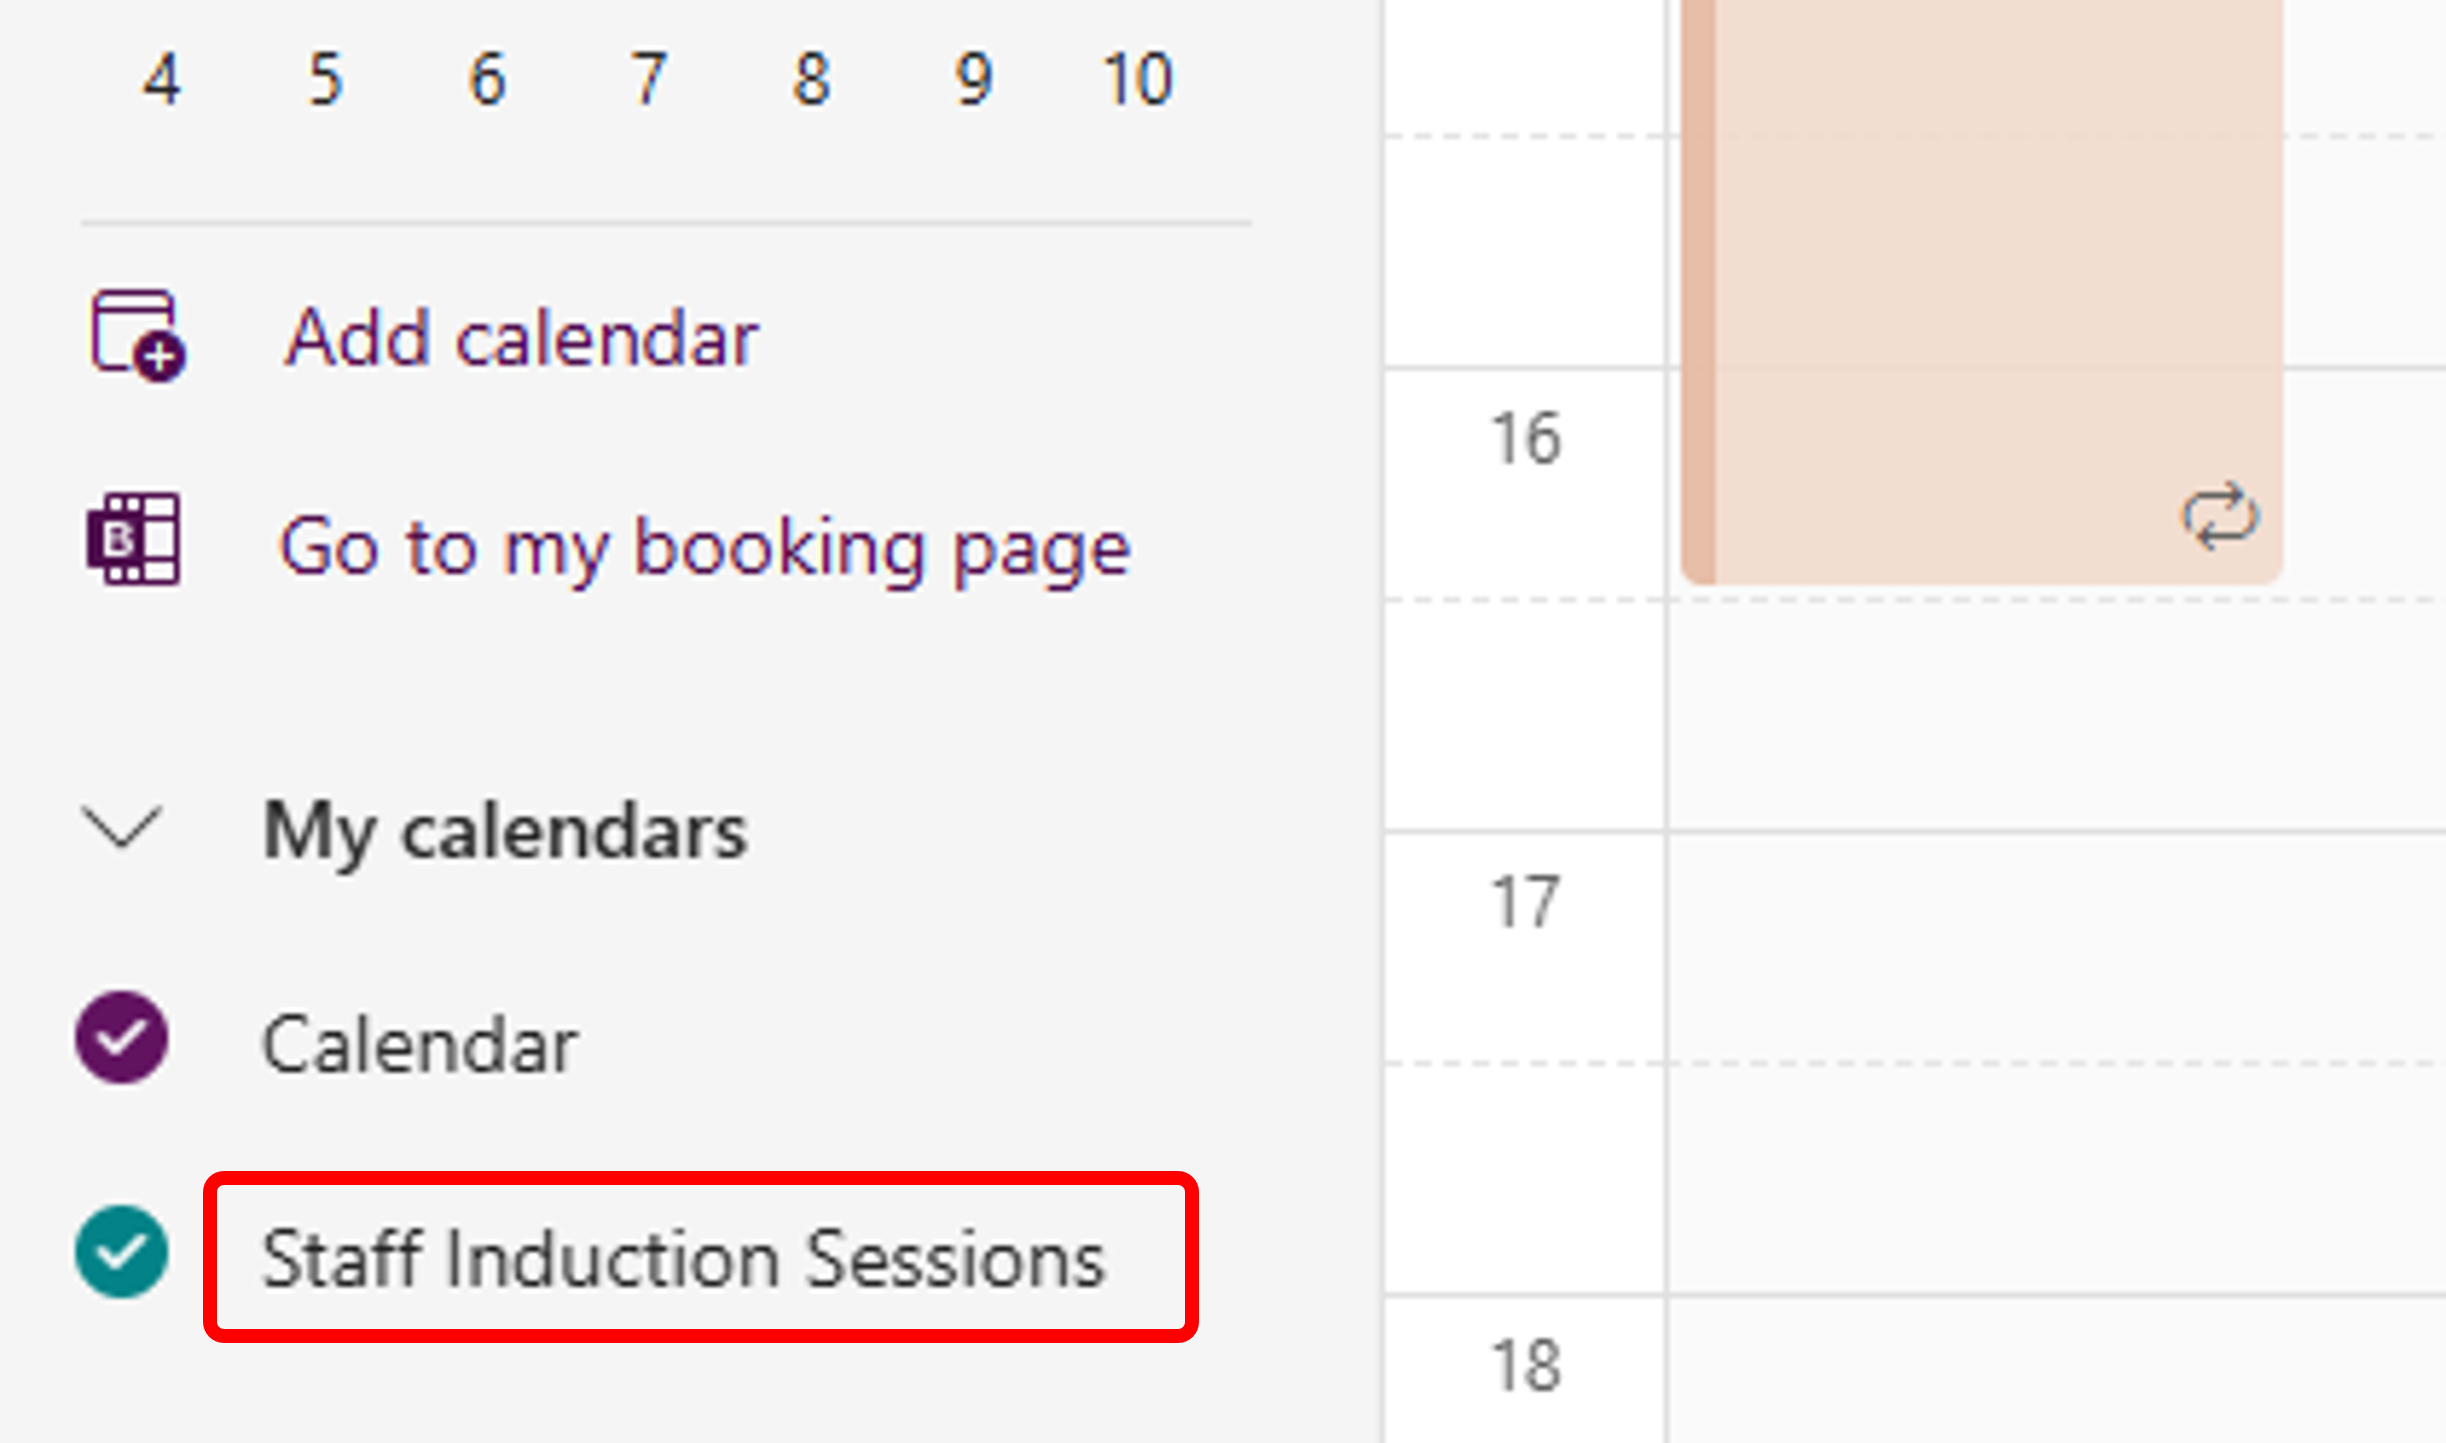
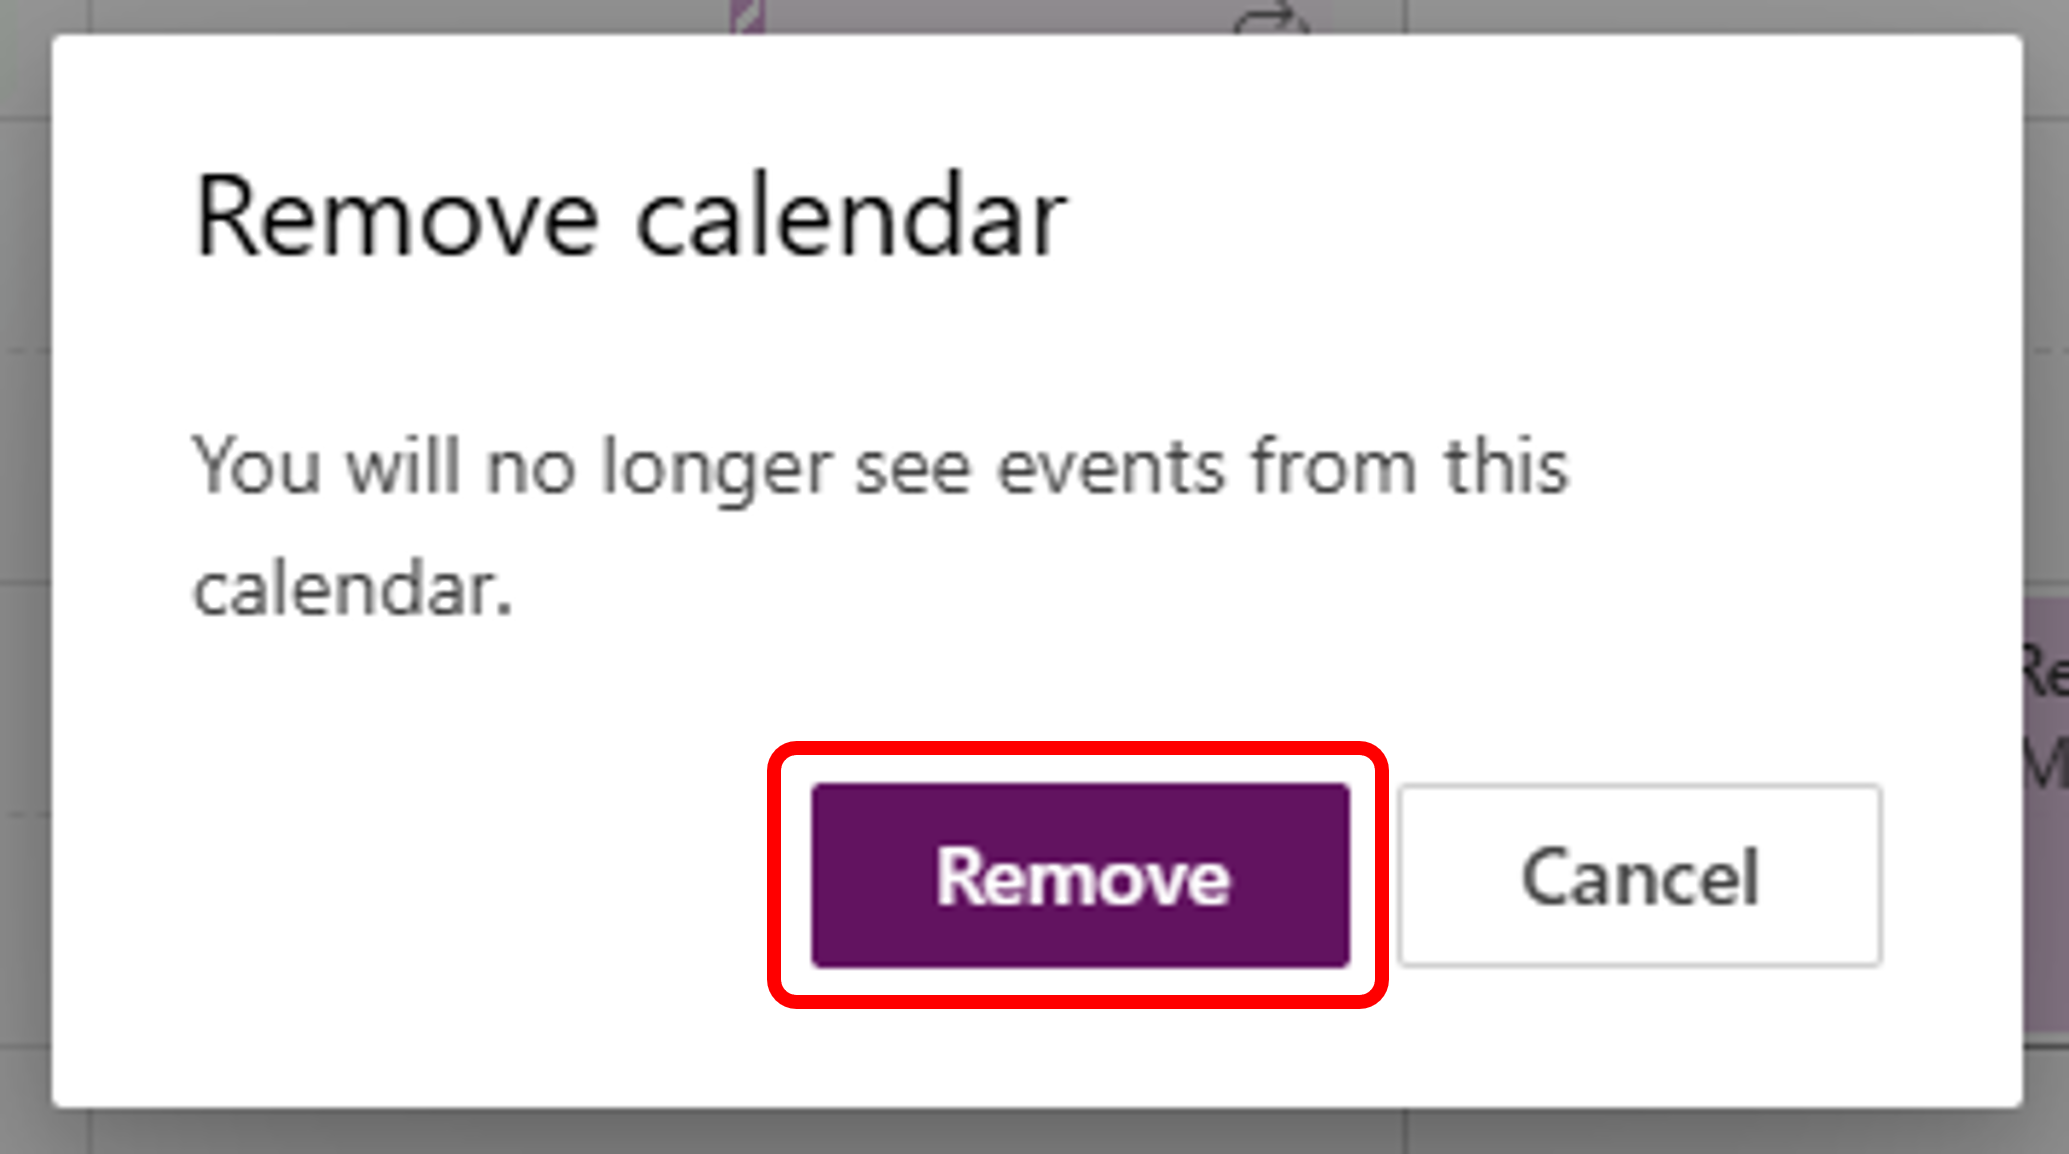
If you have extra calendars listed in Outlook that you no longer need, such as duplicate calendars created during migration, you can remove them in just a few clicks.

Outlook’s Personal Booking Page is a convenient and professional way to manage appointments and meetings. It allows others to view your availability and book time with you directly, without the need for back-and-forth emails. Whether you're scheduling one-on-one meetings, consultations, or catch-ups, your booking page streamlines the process by syncing with your Outlook calendar in real time.
Checking colleagues availability will depend if they have moved to Outlook or still on Google.
Once all users are fully migrated to Outlook, this workaround will no longer be necessary—free/busy visibility will work seamlessly across the organisation.
By default, calendar events will be visible* to University staff to encourage collaboration and simplify scheduling. Staff however can make an event private by following these instructions.
*Please note there will be some exceptions to this default setting
Any meetings you previously declined in your Google calendar will not appear in your Outlook calendar after the move. This is expected behaviour and not a fault with the migration. In Outlook you can specify if you want to see declined events in your calendar by following the steps below:

In Outlook, an event is a calendar entry used to block out time for activities such as meetings, appointments, or focused work. Events help you manage your schedule and coordinate with others by reserving time and sharing availability.
These instructions will guide you through the process of creating a new event in Outlook, including how to fill out the event details, use the scheduling tools, and customise event settings to suit your needs.
This will start by completing the Event Options section, followed by an overview of the Event Toolbar and the Scheduling Assistant, a powerful feature that helps you find the best time for your attendee.
The Event Toolbar at the top also displays options:
The Scheduling Assistant in Outlook is a powerful tool designed to help you find the best time for meetings by checking the availability of all attendees.
When you register for an external event (for example, a webinar or conference), you will often see an option to "Add to calendar". To ensure the event appears correctly in your Outlook work calendar, follow the steps below.
This section contains guidance on using shared resources within Outlook
Everyone inside the University can view your personal work calendar either by adding it from the directory in Outlook or via tools like Scheduling Assistant. By default, people within the organisation can view your calendar events. You can make an event private be following the instructions below.
If you wish to give someone access to your personal work inbox to manage on your behalf, you will need to request delegate access. For example, an Executive Assistant will need delegate access to the Leadership Team member's inbox they support.
Please note: The request needs to come from the owner of the email account. Otherwise, the request will be referred to Corporate Governance for approval.
Delegate access request form: Outlook: Request a new shared resource or calendar
A shared mailbox allows multiple people to read and send emails from a single shared email address (for example, [email protected]). This is useful for teams who need to manage emails together and provide a consistent point of contact.
Shared mailbox request form: Outlook: Request a new shared resource or calendar
Please note: Each mailbox includes an Outlook calendar, which can be used for scheduling. However, if you need a calendar for a specific purpose, such as managing team leave, we recommend requesting a Standalone shared calendar instead.
You can access the shared mailbox by adding it in Outlook:
The shared mailbox will now be visible in the folder pane below your personal work account.
You can open a shared mailbox account outside of your personal work account to access full features and functionality via Outlook on the web:
The shared mailbox will open in a new browser tab, where you can manage features and work with the account separately to your personal work account.
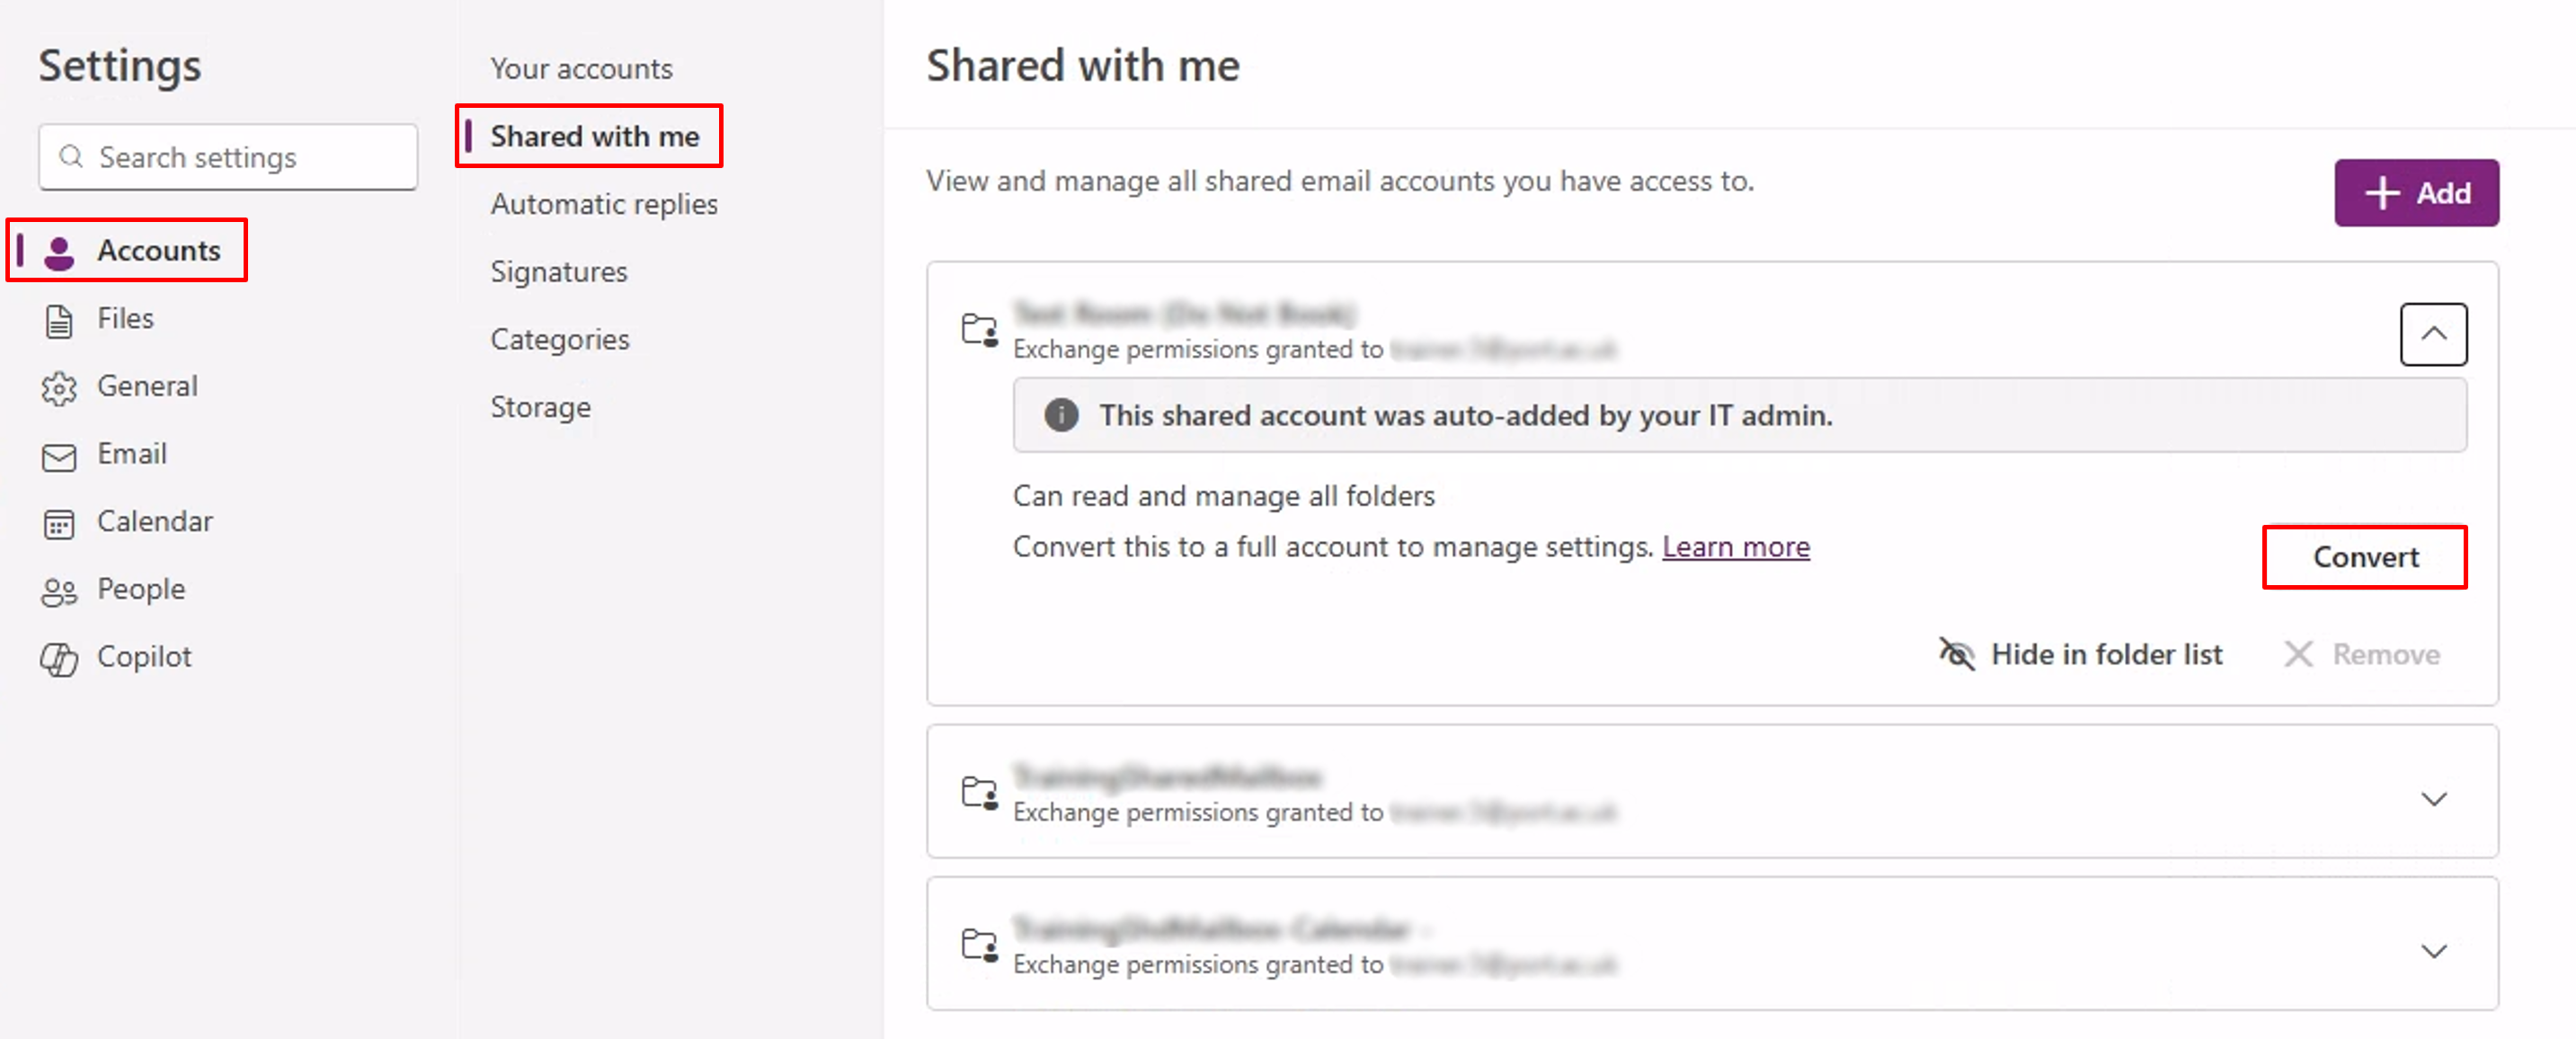
Please note: Once you have access to your shared mailbox, we recommend converting it to enable features such as Categories, Rules, Signatures, and Automatic Replies. See the Working with a converted shared mailbox section below.
When you send an email from a shared mailbox in Outlook, a copy of the message is saved in two places:
This is the default Microsoft behaviour. It ensures that everyone who has access to the shared mailbox can see what has been sent, but it also means you will see duplicates of the same message in your own Sent Items.
This setup can be useful for teams, since it makes shared communication more transparent. However, it can also lead to:
At present, there are limits to how much we can customise Sent Items:
While you cannot turn this feature off, you can manage your Sent Items more effectively:
Sign in to your primary account in Outlook for iOS or Android.
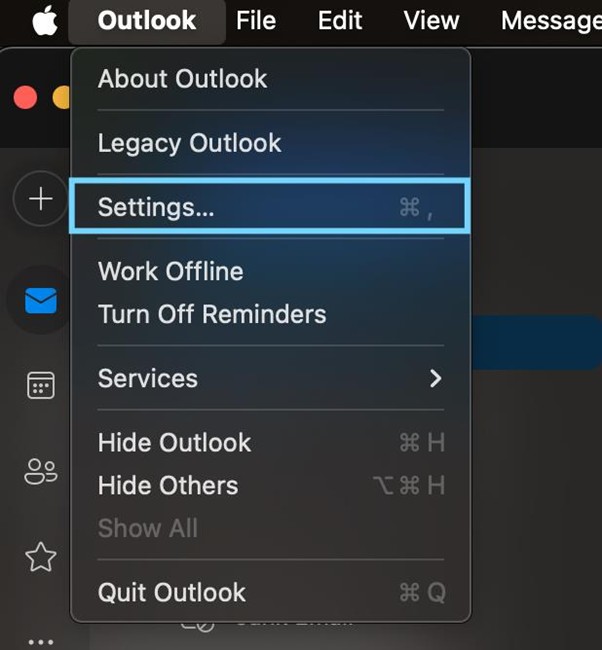
Open Settings (on iOS click the home button top left of the device and select the settings cog).
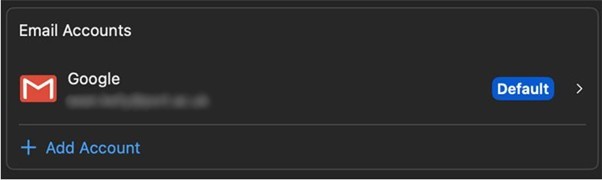
Select Accounts.
Tap the Add Account button in the left navigation pane, then tap Add a Shared Mailbox.
Select Shared Mailbox.
Type in the name of the shared email.
Select Add Shared Mailbox.
The email account will be available for you to select from the Home screen
Microsoft instructions for this can be located here.
A shared mailbox is a single email address (for example, [email protected]) that multiple people can access. It is commonly used by teams so messages can be read and replied to from one central inbox.
By default, shared mailboxes have limited features in the Outlook. While you can read and reply to emails, some of the tools you may expect from a personal mailbox are not available.
For this reason, we recommend converting a shared mailbox into a full mailbox. A full mailbox behaves like a personal mailbox and gives you access to the full set of Outlook features.
If you choose not to convert the shared mailbox, you can still read and reply to emails as normal, but you will not have access to the additional features listed below.
In Outlook, you can add a shared mailbox as an account. This allows it to appear alongside your own mailbox and unlocks the additional features for managing it.
To convert a shared mailbox in Outlook:
After converting the shared mailbox, you can manage it in the same way as your personal mailbox. This includes:
Using these features in a converted shared mailbox works in exactly the same way as using them in your personal mailbox. Full step-by-step instructions for these features are available elsewhere on this page.
Important: Converting a shared mailbox only changes how you use and manage it in Outlook. It does not affect the mailbox for other users or change anyone else’s access or permissions. Other people will continue to use the mailbox in the usual way unless they also choose to convert it.
A standalone shared calendar allows multiple people to create and edit events collaboratively.
When a standalone shared calendar is created, it will include an associated mailbox, however, we highly recommend not using the mailbox for communications. Instead, a standalone shared mailbox should be requested for email purposes. Refer to the What is a shared mailbox and how to request one section for information.
A new standalone shared calendar should be requested for each calendar you require. Examples may include:
Shared calendar request form: Outlook: Request a new shared resource or calendar
Please note: Phase1b of the MWP migration will introduce Team Sites which will allow teams to create their own shared calendars. Until then, if a shared calendar is required for operational reasons the recommendation is to request the creation of a standalone shared calendar.
If you have been given a new standalone shared calendar in Outlook and need to move or recreate events from an older calendar, please review our Adding events to your new standalone shared calendar article.
You can add a shared calendar using Add calendar button in Outlook. This will give you view-only access:
You can share a calendar you own and set the level of access for each person:
See Microsoft guidance: Share and access a calendar with edit or delegate permissions in Outlook.
Note: when you share the calendar, the recipient will receive an email and can add the calendar to their list.
Once the shared calendar is added, you can create an event directly in that calendar (if you have edit permissions):
Important: If you can view the shared calendar but cannot select it in the Calendar dropdown when creating an event, you likely have view-only access. Ask the calendar owner to grant edit permissions.
By default, people within the organisation can view when you are busy. If needed, you can share your personal work calendar with specific individuals, indicating a level of permission for each person.
You can create additional calendars within your own account and share them with colleagues. These calendars remain linked to your personal work account.
Important: If the owner of a personal shared calendar leaves the organisation, the shared calendar will no longer be accessible. For calendars required for operational activities or long-term use, we recommend requesting a Standalone shared calendar instead. Refer to the Working with and requesting a standalone shared calendar section for more information.
A Room or Equipment Mailbox in Outlook is used to manage the scheduling of physical resources such as meeting rooms, lecture spaces or shared equipment. Each resource has its own mailbox and calendar so it can be added to meetings and booked like an attendee.
Preparing for your migration
The Personal Productivity project aims to transition staff from using Google mail, calendar, chat and meet to equivalent Microsoft products — Outlook, Teams and OneDrive. The project is separated into two parts that will be delivered in series:
This article will help you with part 1 and we also have a Working with OneDrive article.
You will receive an email explaining when your migration from Google Mail and Calendar will happen.
The migration will:
More information on what to expect after migration, including frequently asked questions, can be found on the Modern Work Programme Information Site.
To help ensure a smooth transition, we recommend completing the following steps before your migration:
By default, only emails from the past 5 years will be migrated to Outlook. If you have older emails you'd like to keep, you can label them with _MWP_5Plus_YRS. This label will be created for you automatically before the migration begins.
If you accidently delete the _MWP_5PLUS_YRS label, please recreate by following these steps:
_MWP_5PLUS_YRS
Note: the label name needs to be exact, it starts with an underscore and ends with S, be careful not to add an extra space at the beginning or end.
Tip: To quickly find emails older than 5 years, type older_than:5y in the Gmail search bar.
Take a moment to review your Gmail labels and remove any that you no longer use. This will ensure only relevant labels are carried over to Outlook and will make it easier to manage your inbox.
Now’s a great time to do a final clean-up of emails you no longer need. Here are a few quick searches you can use in the Gmail search bar to find and delete common types of clutter:
The Digital Declutter article contains more advice about managing your data.
If you’ve created calendars in Google that you no longer use, you can delete them before the migration.
If you are the owner of a delegate (shared) email account that is no longer required either call the service desk or raise a ticket to get the account deleted.
More information on what to expect after migration, including frequently asked questions, can be found on the Modern Work Programme Information Site.
Due to the Personal Productivity Project now being complete, the previous pre-migration form is no longer in use. Instead, staff should now use the new Request a MWP Migration form to request:
If your request relates to an issue with something that has already been migrated, please continue to log this through the Service Desk.
To ensure attendees can easily join the meeting via a calendar "Join" button, follow these steps:
If you had shared your calendar in google with a colleague you will need to reshare once the recipient has been migrated to Outlook. For more instructions see the 'Sharing your Calendar' section in this article.
If you used colour-coded events in your Google Calendar, it’s important to know that these do not automatically transfer to Outlook during migration. You will need to recreate the colours using categories in Outlook and manually apply to your existing events in Outlook calendar. For instructions see the 'How to create an event' and 'Using Categories' sections in this article.
If you have created Google calendar Focus Time events these will not be migrated to Outlook. You will need to recreate these events using in calendar, selecting Busy to indicate that you are not available at this time.
The project team are working to make the migration of email from Google into Outlook as seamless as possible. As the project progresses some of the information below may not be relevant.
Enter a meaningful name for the rule in the 'Name your rule' text box.
Select the 'Run Rule' now tick box.
Emails that have been migrated may appear with a red flag icon, indicating they are marked for follow-up. To remove the flag, please follow the steps outlined below:
Working between Google & Outlook: coexistence tips and workarounds
As we transition from Google to Outlook staff email accounts will be migrated in batches. During this time, both Google and Outlook will be in use across the University which may require some temporary adjustments to how we work. We appreciate your patience during this phase, this article contains guidance to assist with this phase. Once the migration is complete, everyone will benefit from a more streamlined, integrated, and efficient email experience.
The Modern Work programme has some more Information on coexistance:
As we transition from Google to Outlook, some colleagues will still be using Google Calendar while others will have already transitioned to Outlook. During this temporary period of coexistence, please follow these steps to ensure a smooth and reliable calendar management experience
Note: You may have to open the event fully in the calendar to access links to join the meeting.
✅ When you send an Outlook invite to someone still using Google Calendar, it will automatically appear in their Google Calendar once they accept the invite.
⚠️ If you make any changes to the meeting (time, location, etc.), let your Google Calendar invitees know. Their calendars may not update automatically when the changes are made.
✅ They will receive the invite by email, and once they accept it, the event will appear in their Outlook calendar.
⚠️ If you make any changes to the meeting (time, location, etc.), let your Outlook Calendar invitees know. Their calendars may not update automatically when the changes are made.
There are two ways of booking meeting rooms. Some rooms use shared calendars, whilst others are bookable in Google calendar and will be available through Outlook Room Finder.
Rooms that currently are booked using shared calendars will remain unaffected. Please continue booking these rooms through their associated calendars.
A built-in feature that makes it easy to find and book available meeting rooms directly within Outlook or Teams. When creating a new meeting invite, you can use Room Finder to browse rooms by building, capacity, or available equipment, and add the booking to your calendar instantly.
All rooms that were previously bookable in Google Calendar have now migrated to Outlook. Room bookings should now be made using Outlook’s Room Finder when creating a meeting invite. These rooms are no longer available in Google Calendar.
Troubleshooting
If Outlook isn’t working as expected, it may be signed into your old Google account instead of your Microsoft 365 account. Some staff may also see a Google account connection if they previously used Outlook to view their work emails. This can cause issues such as:
Seeing ads in Outlook
Inbox not updating properly
Unable to schedule Teams meetings via the calendar
To resolve this, remove the Google account and set up Outlook using your Microsoft 365 account.
The video below shows how to check and update the setup in Windows 11 desktop application.

When migrating from Gmail to Outlook, you may notice that many of your emails are marked as important (!). This behaviour is due to how Gmail’s Smart Inbox feature works and how the migration tool interprets it.
A rule has been created for you in your Outlook mailbox which you can rum to remove the important tag.
Click the Settings icon in the top-right corner of Outlook.
In the settings menu, select Email, then click Rules from the sidebar.
Choose Add new rule.
Configure the rule settings as follows:
- Name the rule something identifiable (ex. ImportanceRule).
- Under Add a condition, select Importance and set it to High.
- Under Add an action, choose Mark with importance and set it to Normal.
- Leave other options (ex. Stop processing more rules, Run rule now) unticked for now.
Click Save. The rule will be enabled automatically.
Next to the newly created rule, click the three dots, and select Run rule now to apply it to existing emails.
Once the rule has completed, return to the Rules menu and either disable or delete the rule to prevent it from affecting future incoming emails.
Important Notes:
• This rule will affect all emails currently in your mailbox when you run it.
• It will also apply to new incoming emails if the rule is enabled.
• You can disable the rule anytime by going to Manage Rules & Alerts and unchecking it.
Not getting an answer to your question? Choose from the options below to get technical support, 1:1 Microsoft 365 guidance or Digital Skills training:
Contact IT Support Book a M365 WoW Session Attend a Digital Skills training session
Turn on notifications for critical updates like closures, safety alerts, and urgent service disruptions.


