

Image

OneDrive is the University’s online space for storing and managing your files. Use it to save coursework, organise documents, share files and work with others. You can access OneDrive through your web browser, Microsoft 365 apps or a University computer, making your work available wherever you study.
To help you make the most of OneDrive, we offer free, on-demand courses through LinkedIn Learning. Whether you're new to OneDrive or looking to refine your skills, these courses are designed with students in mind.
OneDrive Quick Tips
Discover quick, practical tips to help you work more efficiently in OneDrive, from saving time on file management to sharing and collaboration tools.
Learning OneDrive
Gain a complete understanding of how to manage all your files in OneDrive, including creating, organising, sharing, and accessing your documents from anywhere.
Visit LinkedIn Learning via the University portal.
Log in with your University credentials.
Search for the OneDrive courses above and start learning at your own pace.
These courses are a great way to improve your file management skills and get the most out of OneDrive throughout your studies.
Find your way around OneDrive and learn how to access, organise, share, delete and restore your University files.
Expand the sections below to view the instructions and additional information
To view this image in more detail, right-click it and select Open image in new tab. You can then zoom in for a closer look. Using a mobile device? Pinch to zoom in and make the image easier to read.
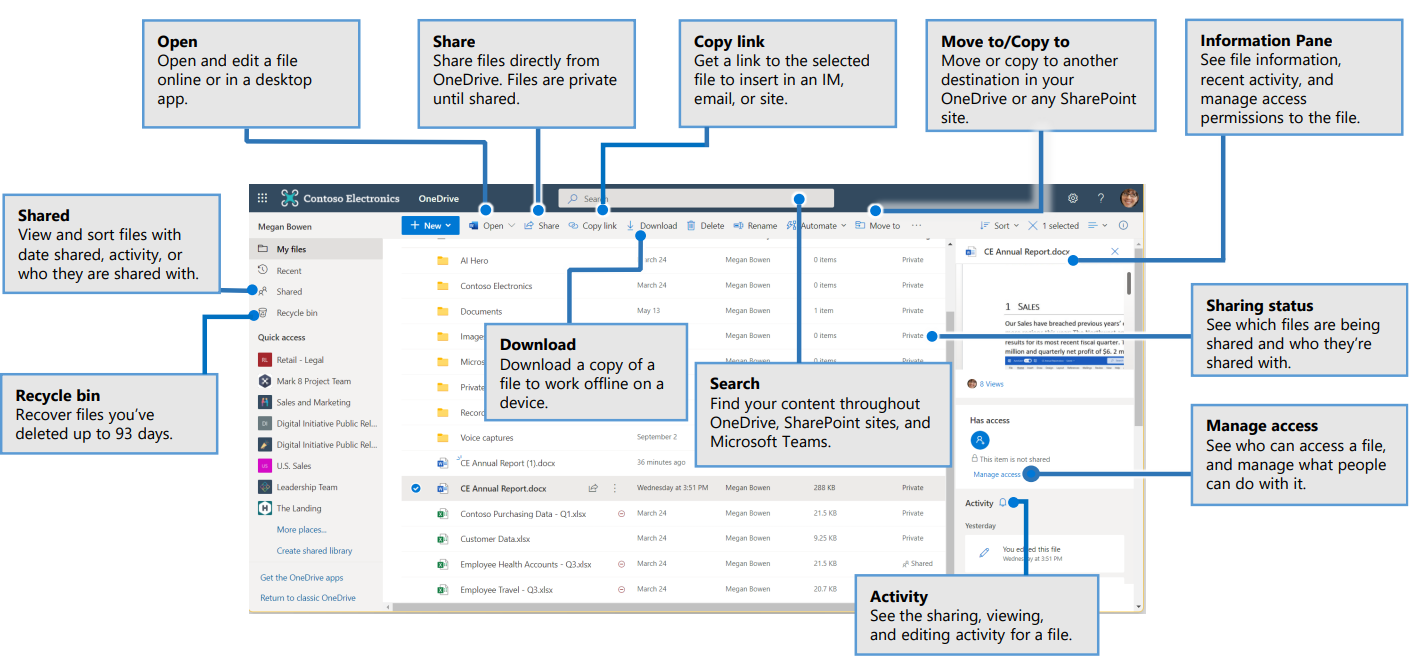
Source: Microsoft Quick Start Guides
You can access OneDrive directly from your web browser. This is the quickest way to open and manage your files online.
Open your internet browser (Edge, Chrome etc).
Go to www.office.com.
Sign in with your University credentials.
Select the App Launcher menu from the top of the navigation menu.
Click OneDrive from the list of available Microsoft 365 apps. This will open in a new browser tab.
Managing files in OneDrive is a simple and efficient way to keep your documents and other files organised and accessible.
You can move files into folders in two different ways:
Drag and drop the file into the folder you want.
Hover over the file, right-click and choose Move to, then select the destination folder and click Move here.
Hover over the file, right-click and select Add to Favourite.
When working with OneDrive, you may need to delete files or folders you no longer need. If something is deleted by mistake, you can restore it from the recycle bin so it returns to its original location.
Hover over the file, right-click and select Delete. Deleted items move to the recycle bin.
If you accidentally delete a file or folder, you can usually restore it from the OneDrive recycle bin. If you are a Microsoft 365 subscriber, you may also be able to restore your entire OneDrive if something goes wrong.
Sharing files in OneDrive makes it easy to collaborate with classmates and teaching staff. You can control who has access, set permissions, and ensure everyone is working on the most up-to-date version of your document.
Y
ou can watch the video below for a step-by-step visual guide.
OneDrive notifications let you know when changes are made to your files, such as edits, comments, or sharing updates. Managing these settings helps you stay informed without being overwhelmed by unnecessary alerts.
You can watch the video below for a step-by-step visual guide.
Explore additional OneDrive features that can make files easier to manage, protect and work with.
Use the tabs below to explore key features and functionality available in OneDrive.
Dark mode can improve both comfort and usability. It helps reduce eye strain in low-light environments, while also offering a sleek, modern look that many users find visually appealing.
You can watch the video below for a step-by-step visual guide.
AutoSave in Microsoft Office 365 (Word, Excel, and PowerPoint etc) automatically updates your file in real time, ensuring your latest changes are always stored in OneDrive.
Tip: If you need to keep an original version unchanged, use ‘Save a copy’ before editing.
OneDrive has two recycle bins that act as safety nets if you delete files by mistake. Both bins have retention periods that give you time to restore files before they are permanently removed.
When you delete a file from OneDrive, it first moves into the main recycle bin. This includes:
Files remain here for up to 93 days. You can restore or permanently delete them at any time during this period.
If you delete a file from the main recycle bin, it moves to the second-stage recycle bin. This acts as a final backup before permanent removal. Files remain here for another 93 days before being removed completely.
Note: Once files are deleted from the second-stage recycle bin after the combined 186-day retention period, they are permanently unrecoverable.
OneDrive’s web interface offers specialised views, like “Recent,” “For you,” and “Shared", to help you locate files quickly.
Tip: These views are great when you’re rushing to access group tasks or recent feedback.
Version History in OneDrive allows you to view, restore, or download earlier versions of a file. This is especially useful if:
OneDrive automatically saves versions whenever changes are made to a file stored in your OneDrive. This includes documents created in Word, Excel, PowerPoint, and other compatible formats. You can access version history at any time, and restoring a version will replace the current one while keeping a copy of it, so nothing is lost.
Turn on notifications for critical updates like closures, safety alerts, and urgent service disruptions.