Image

OneDrive was introduced in 2025 as the University’s primary tool for file storage and sharing. For migration details, see Migration from Google Drive to OneDrive at the bottom of this page.
Google Drive should continue to be used for shared files and folders. OneDrive is intended only for personal work files and individual storage, and is not designed to support shared file ownership.
Need more help? This guide provides an overview of Microsoft OneDrive, but you can explore further by starting with the Essential OneDrive training in Docebo.
If you have a quick question, you can chat with your Digital Superhero or post in your Teams Launch Community. For one-to-one support, book a session on the M365 WoW sessions page and choose “How-to Guidance.”
As a member of staff you currently have access to LinkedIn Learning. For more information, view this article.
The following course is available through the 'Modern Work Programme Learning Plan: Essential Training for M365' which is located on Docebo. The course has been designed to help you build confidence and capability with Microsoft OneDrive.
Note: The transformation project is being delivered in batches. You will gain access to the Learning Plan approximately one week before your migration date.
If you need assistance finding these courses email [email protected].
Use the sections below to expand and view more information
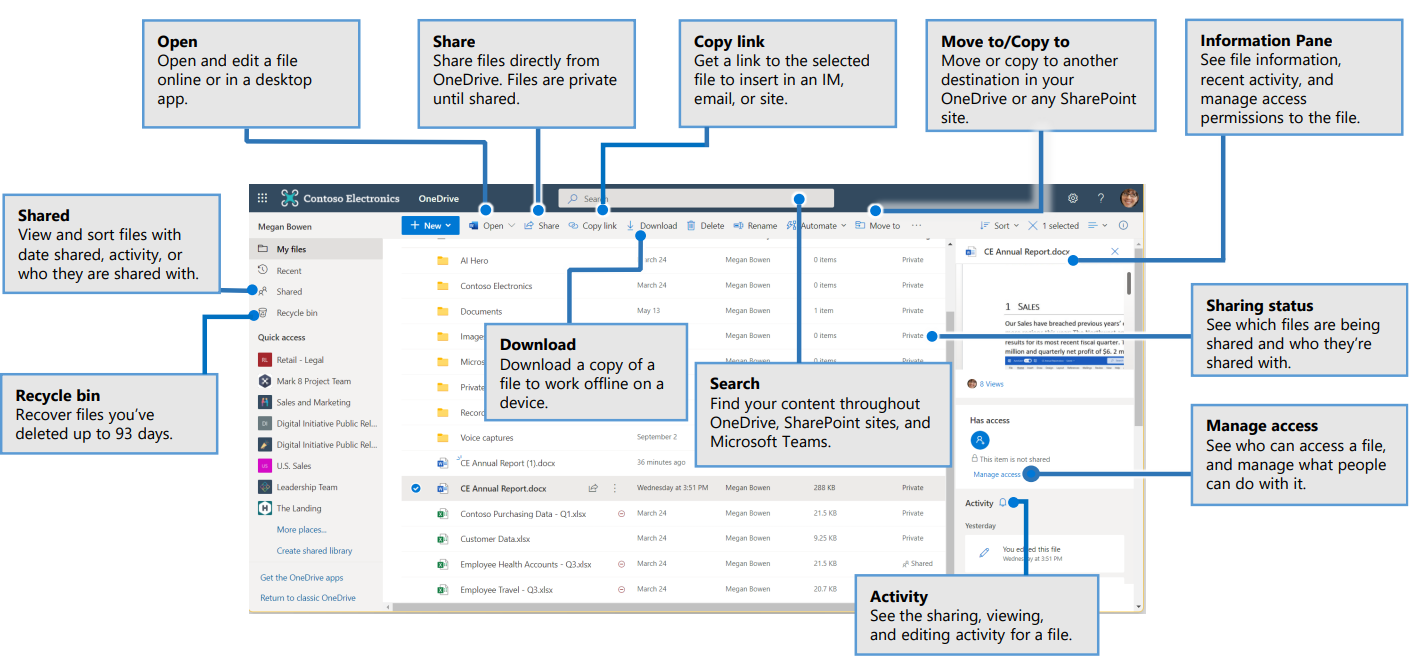
Taken from Microsoft Quick Start Guides
Here’s a summary of the default folders Microsoft 365 may automatically create in your OneDrive, based on the services you use
📁 Attachments
Created when you save email attachments from Outlook or create Loop components in emails.
📁 Notebooks
Stores OneNote notebooks created via the Microsoft 365 portal or apps.
Note: Notebooks created directly via “Add New” may be stored outside this folder.
📁 Loop Files
Holds Loop components created in OneNote (Windows or web).
📁 Whiteboard
Contains whiteboards you create.
Includes a Components subfolder for Loop components used in whiteboards.
📁 Apps
Includes subfolders like:
📁 Videos
Includes a Clipchamp subfolder for screen and camera recordings made via the Clipchamp app.
Note: Recordings made via the M365 portal may bypass this folder and land directly in OneDrive.
📁 Loop
Includes a Workspace Uploads subfolder for files (Word, Excel, etc.) uploaded to Loop pages.
📁 Microsoft Teams Chat Files
Stores files shared in Teams chats and Loop components created in chats.
📁 Microsoft Copilot Chat Files
Stores files related to prompts launched in Copilot chats.
📁 Recordings
Stores recordings of Teams meetings and calls.
📁 Meetings
Stores collaborative Loop meeting notes from Teams meetings.
Managing files in OneDrive is a simple and efficient way to keep your documents, and other files organised and accessible.
Open OneDrive.
There are a couple of methods to move files to folders.
Drag the file to the desired folder and release.
Hover over the file and right-click, select 'Move to'.
File Explorer, is a built-in application that allows you to navigate, manage, and organise your files and folders which includes OneDrive.
File Explorer is a built-in application that enables you to navigate, manage, and organise your files and folders efficiently.
Sharing Office files on OneDrive is a convenient way to collaborate with others, ensuring everyone has access to the latest version of your documents with the permission level you set.
OneDrive notifications help you stay informed about changes and activities related to your files.
Following the migration from Google Drive to OneDrive, the files you added to the _MWP_Migration folder, should already be available in your OneDrive account. If you still have files left in Google Drive that were not moved, you can import them yourself by downloading the files from Google Drive and uploading them into OneDrive.
.zip file.
Use the sections below to expand and view more information
Dark mode in OneDrive offers a variety of benefits that can enhance your user experience. Many users appreciate how dark mode reduces eye strain, especially in low-light conditions, and prefer the aesthetic design.
Your Windows 11 device comes with Microsoft 365 Apps installed, the latest version of Microsoft Office. This allows you to create and edit Office documents using desktop apps on your Windows 11 device, as well as through Office web applications in your browser.
There are two recycle bins:
To access the Recycle Bin log into OneDrive via a browser, click on Recycle bin in the navigation panel.
Files that move to this Recycle Bin when deleted:
*These files will also go to the Windows 11 recycle bin.
Files will remain in the OneDrive Recycle Bin for 93 days. If you delete them from the OneDrive Recycle Bin before 93 days, they will move to the second stage Recycle Bin, which acts as a fail-safe. They will remain there for the remainder of the 93 days unless you delete them permanently.
To access the Recycle Bin, click the Icon on your desktop.
Files that move to the Windows 11 Recycle Bin when deleted:
*These files will also go to the OneDrive Recycle bin.
Locally deleted files will remain here until you empty it.
Note: If you have confidential files that need to be deleted, you may need to delete them from both the OneDrive and Windows 11 Recycle Bins.
Syncing means that specified folders on your Windows 11 device are automatically updated to OneDrive in the cloud. This allows you to access to these files via an internet browser through Office.com or a mobile app. When you add, change, or delete a file in your synced folder, these changes are reflected both locally and in the cloud.
Your Windows 11 device will be set up to automatically sync folders to OneDrive:
Information Services set standard storage quotas for OneDrive, Outlook (Email and Calendar) and SharePoint. This process explains how to request an increase, aligned with the Google storage process.
No cross-charging currently applies (subject to future review).
Doctoral students (PGR/PhD) are treated as staff for storage allocation. You’ll receive a 15 GB OneDrive quota and can request higher tiers to support research. Use your student account for research storage.
Use the sections below to expand and view more information
Note: If there’s an immediate, critical and legitimate business requirement, the Service Desk may apply the increase immediately. You’ll still need to submit the form afterwards.
| Product | Standard Quota | Additional tiers (via exception request process) |
|
|---|---|---|---|
| Initial Tiers (Service Desk Authorisation) | Additional authorisation tier (SDM and HoBP Authorisation) | ||
| OneDrive | 5GB (Students) 15GB (Staff) |
25GB + 50GB + 100GB | 200GB + 400GB + 600GB + 800GB + 1TB |
| Outlook (Email & Calendar) |
2GB (Students) 10GB (Staff & shared mailbox) |
5GB (students) 20GB (Staff & shared mailbox) |
50GB |
| SharePoint | 5GB (Staff & Students) | 5GB | 50GB |
Use the sections below to expand and view more information
The Personal Productivity project aims to transition staff from using Google mail, calendar, chat and meet to equivalent Microsoft products: Outlook, Teams and OneDrive. The project is separated into two parts that are being delivered in series:
This marks Part 2 of Phase 1 in the migration, building on the earlier transition to Outlook and Teams. You will receive an email before your migration begins with full instructions and a confirmed date.
The migration will:
Automatically copy over files and folders in your Google My Drive, specifically those placed in the _MWP_Migration folder.
Preserve your folder structure and migrate personal files into OneDrive.
Provide you with 15 GB of storage space in OneDrive.
Not migrate Shared Drives or team-based files. These will be reviewed separately in Phase 1b. You can continue to use Google Workspace for this type of shared content.
More information on what to expect after migration, including frequently asked questions, can be found on the Modern Work Programme Information Site.
Please note: For colleagues using Windows 10, OneDrive will only be accessible through a web browser.
This video walks you through moving files into your migration folder and shows what they’ll look like in OneDrive after migration.
We are currently confirming dates to move staff over to OneDrive with senior leaders, but it is important you start preparing now by following these steps:
Due to the Personal Productivity Project now being complete, the previous pre-migration form is no longer in use. Instead, staff should now use the new Request a MWP Migration form to request:
If your request relates to an issue with something that has already been migrated, please continue to log this through the Service Desk.
View a series of guides designed to help you understand how Google and Microsoft apps differ and prepare for any potential issues that may arise during this transition.
Not getting an answer to your question? Choose from the options below to get technical support, 1:1 Microsoft 365 guidance or Digital Skills training:
Contact IT Support Book a M365 WoW Session Attend a Digital Skills training session
Turn on notifications for critical updates like closures, safety alerts, and urgent service disruptions.


